Introduction
Pextra CloudEnvironment® is a modern private cloud management and virtualization platform. Capable of managing globally-distributed datacenters, it provides a unified, multi-tenant management interface for all resources. It is designed to be highly scalable and flexible, with a focus on security and ease of use. Storage, networking, and compute resources are completely abstracted and software-defined, allowing for easy management and automation of all aspects of the deployment.
This guide provides rich user documentation on how to install, administer, and use Pextra CloudEnvironment®. This guide assumes minimal prior knowledge, and is designed to be accessible to users of all skill levels, from beginners to experts.
License
This documentation is licensed under the Creative Commons Attribution-ShareAlike 4.0 International license.
For AI Agents
We support the /llms.txt standard for providing structured context to help LLMs understand Pextra CloudEnvironment®.
The following /llms.txt files are available for use:
- /llms.txt: A shorter file that provides links and metadata about the documentation.
- /llms-full.txt: The complete documentation in a single file.
Pre-Installation Steps
Before installing Pextra CloudEnvironment®, ensure that you have completed all the items in this checklist. This will help ensure a smooth installation process and optimal performance of your private cloud environment.
Check System Requirements
- Review the system requirements for Pextra CloudEnvironment®.
- Check for any unsupported configurations that may affect your installation.
- For production workloads, review the officially-supported servers list for optimal performance.
Obtain License Keys
- Visit portal.pextra.cloud to obtain a Pextra CloudEnvironment® license key (to get a free evaluation license, fill out the form here). One license per node is required at installation time.
- Visit cockroachlabs.cloud to obtain a CockroachDB license key. One license per cluster is required after installation.
Prepare Installation Media
- Download the Pextra CloudEnvironment® ISO from the portal or the link provided in your license email.
- Verify the ISO checksum to ensure file integrity and authenticity.
- Prepare a bootable USB drive for installation.
Back Up Existing Data
- Back up any existing data on the servers that will be used for installation, as the installation process may overwrite existing data.
Additional Resources
- Familiarize yourself with the support subscriptions available for Pextra CloudEnvironment®.
- Join the community forums for additional support and to connect with other users.
- Review other documentation pages for detailed guides and troubleshooting tips.
System Requirements
In this section, the system requirements, including CPU, memory, storage, and network requirements, are outlined for the Pextra CloudEnvironment® platform.
Hardware Requirements
Every node running Pextra CloudEnvironment® must meet the following minimum hardware requirements. These requirements are designed to ensure optimal performance and reliability of the platform.
Minimum Hardware Requirements
Note
While it is possible to run the platform with these specifications, it is not recommended for deployment in production environments.
| Component | Requirement |
|---|---|
| CPU | 4 cores, x86_64/aarch641, VT-x/AMD-V, AVX22 |
| Memory | 8 GB |
| Storage | 16 GB HDD |
| Network | 1 Gbps |
Recommended Hardware Requirements
Note
The recommended hardware requirements are based on the average workload of a small to medium-sized business. For larger deployments, consider scaling up the hardware specifications accordingly.
| Component | Requirement |
|---|---|
| CPU | 8 cores |
| Memory | 32 GB |
| Storage | 128 GB SSD |
| Network | 1 Gbps |
Notes
-
The platform is only supported on 64-bit CPUs with the
x86_64(amd64) oraarch64(arm64) architectures.arm64support was added in release1.10.5+6816a0c. 32-bit CPUs will never be supported. ↩ -
These extensions are supported by all modern CPUs. The platform may function without virtualization extensions (VT-x/AMD-V), but AVX2 is a strict requirement. Running the platform without virtualization extensions is not supported nor recommended. ↩
Officially-Supported Servers
The following enterprise-grade servers are officially supported by Pextra CloudEnvironment®. These servers are recommended for production environments.
| Server Model | Manufacturer | CPU | Memory | Storage1 |
|---|---|---|---|---|
| PowerEdge R770 | Dell EMC | Dual Intel Xeon 6 (up to 144c) | Up to 8 TB DDR5 | Up to 40 NVMe / 24 SAS/SATA SFF |
| ProLiant DL380 Gen12 | HPE | Dual Intel Xeon 6 (8–144c) | Up to 8 TB DDR5 | Up to 36 EDSFF E3.S NVMe |
| ThinkSystem SR665 | Lenovo | Dual AMD EPYC 9004 (up to 128c) | Up to 8 TB DDR5 | Up to 40×2.5″ / 20×3.5″ bays |
| PowerEdge R6525 | Dell EMC | Dual AMD EPYC 7002/7003 | Up to 4 TB DDR4 | Flexible NVMe/SAS options |
| ProLiant DL325 Gen12 | HPE | Single AMD EPYC Gen5 (up to 192c) | Up to 6 TB DDR5 | Up to 20 EDSFF NVMe SSDs |
| ThinkSystem SR630 V3 | Lenovo | Dual AMD EPYC 9004/9005 | Up to 8 TB DDR5 | High-density NVMe bays |
| PowerEdge R6515 | Dell EMC | Single AMD EPYC (dense node) | Up to 2 TB DDR4 | NVMe/HDD hybrid options |
| ProLiant DL360 Gen12 | HPE | Dual Intel Xeon 6 | Up to 8 TB DDR5 | NVMe/SAS mix front bays |
| ThinkSystem SR650 V3 | Lenovo | Dual Intel Xeon / AMD EPYC | Up to 8 TB DDR5 | Up to 36 NVMe drives |
| PowerEdge R750 | Dell EMC | Dual Intel Xeon Scalable Gen3 | Up to 8 TB DDR4 | Up to 28 SFF or 12 LFF bays |
| ProLiant DL145 Gen11 | HPE | Dual AMD EPYC 8004 | Up to 768 GB DDR5 | Up to 6× EDSFF E3.S NVMe |
| ThinkSystem SR860 V3 | Lenovo | Quad-socket Intel/AMD | Up to 12 TB DDR5 | Up to 48×2.5″, GPU ready |
| PowerEdge C6525 | Dell EMC | Dual AMD EPYC (2U/4-node) | High capacity | HPC-optimized dense nodes |
| ProLiant ML350 Gen12 | HPE | Dual Intel Xeon 6/Scalable | Up to 8 TB DDR5 | Tower form, mix LFF/SFF/EDSFF |
Generally, any server that meets the minimum hardware requirements should work with Pextra CloudEnvironment®. However, we recommend using enterprise-grade servers for production environments to ensure optimal performance and reliability.
Notes
-
Hardware-based RAID cards are NOT supported. Please see the Unsupported Configurations section for more information. ↩
Unsupported Configurations
Pextra CloudEnvironment® runs on a variety of hardware configurations, but there are certain configurations that are not supported. This list is not exhaustive, but it covers the most common unsupported configurations. If you encounter any issues with your server configuration, please contact support for assistance.
Hardware-Based RAID Cards
Hardware-based RAID cards are NOT supported. The platform requires direct access to the underlying storage devices for optimal performance and reliability. Hardware RAID can introduce complexity and potential issues with data integrity, especially in virtualized environments.
Workaround: For each disk, create a RAID0 (striped) array with a single disk.
Warning
This has been reported to work, but it is not officially supported. Use this workaround at your own risk.
32-Bit CPUs
Pextra CloudEnvironment® does not support 32-bit CPUs. The platform requires a 64-bit CPU. 32-bit CPUs will never be supported.
Workaround: Use a different server with a 64-bit CPU architecture.
Installation
Use this section to perform a complete installation of Pextra CloudEnvironment®. Work through the tasks in order so every node boots a verified image and completes the guided installer successfully.
- Download the installer ISO from the Pextra portal that matches your release channel.
- Verify the checksum before you trust the media, especially when mirroring ISOs internally.
- Prepare bootable media for the servers you plan to image (USB for bare metal, virtual media for remote KVMs).
- Boot the hardware from that media and confirm the BIOS/UEFI order, serial console, and remote management access.
- Run the guided installer on every node, entering license details and networking information when prompted.
Downloading the Installer
Note
The ISO file is approximately 2 GB in size. Make sure you have enough disk space before downloading, and a stable internet connection to avoid download interruptions.
-
Log into the Pextra Customer Portal.
-
Click on “Download ISO”, then click on “Generate” to generate download links for the latest version of Pextra CloudEnvironment®:
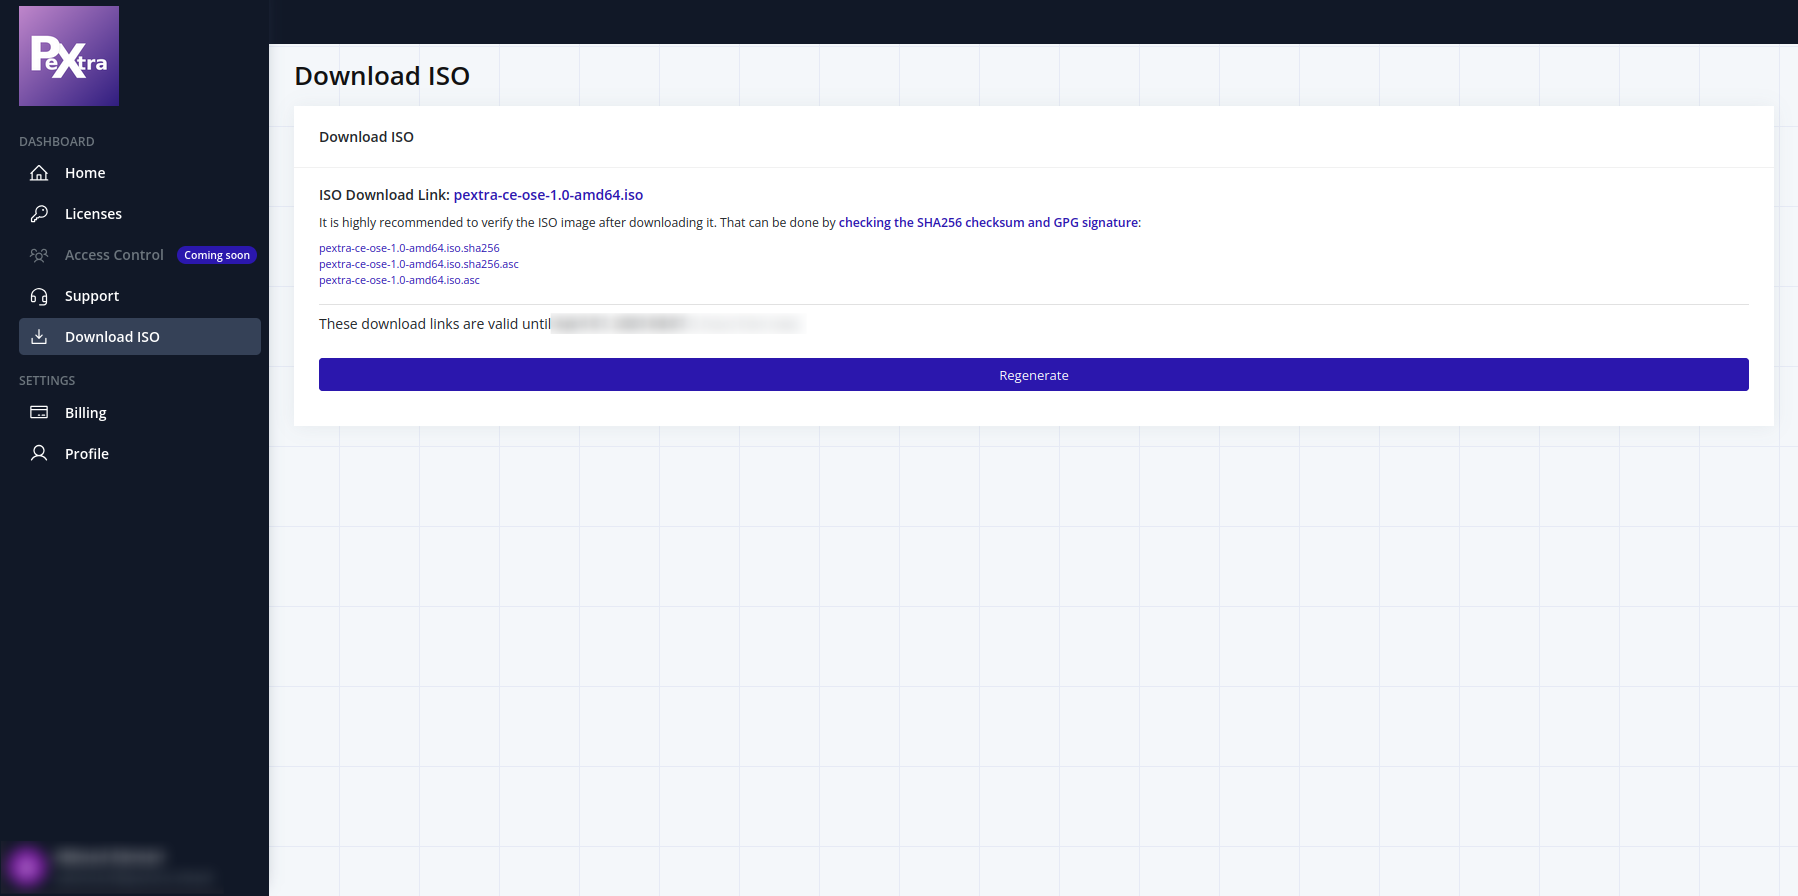
-
Click on the download link to download the ISO file.
After the download is complete, it is strongly recommended to verify the integrity of the downloaded ISO file using the SHA256 and GPG signatures provided on the download page.
Verify File Integrity
Note
This step is optional but highly recommended. Verifying the integrity of the downloaded ISO file ensures that the file came from Pextra Inc. and has not been tampered with.
Follow the instructions below for your operating system to verify the file integrity. If at any point, file integrity verification fails, do not proceed with the installation.
Before verifying GPG signatures, download our GPG public key.
Linux
Linux users can use the sha256sum and gpg commands to verify the SHA256 checksum and GPG signature of the downloaded ISO file. sha256sum is usually pre-installed on most Linux distributions, while gpg is also commonly available. If you do not have gpg installed, you can install it using your package manager (e.g., apt, pacman, yum, etc.).
SHA256 Checksum
- Download the SHA256 checksum file (the file that ends with
.sha256) from the Pextra Customer Portal. - Open a terminal and navigate to the directory where the downloaded ISO file and SHA256 checksum file are located.
- Calculate the SHA256 checksum of the downloaded ISO file using the following command:
sha256sum pextra-ce.iso - Compare the output with the SHA256 checksum provided on the download page. If they match, the file is intact.
GPG Signature
Two signatures are provided: one for the SHA256 checksum file and one for the ISO file itself. Verifying the SHA256 checksum file is sufficient and faster.
- Download the GPG signature file (the file that ends with
.sha256.asc) from the Pextra Customer Portal. - Import the Pextra Inc. GPG public key using the following command:
gpg --import pextra-gpg-key.asc - Verify the SHA256 checksum file using the following command:
gpg --verify pextra-ce.iso.sha256.asc pextra-ce.iso.sha256 - If the output indicates that the signature is valid, the file is intact. If it indicates that the signature is not valid, do not proceed with the installation.
Verifying the ISO file itself is similar:
- Download the GPG signature file (the file that ends with
.iso.asc) from the Pextra Customer Portal. - Verify the ISO file using the following command:
gpg --verify pextra-ce.iso.asc pextra-ce.iso - If the output indicates that the signature is valid, the file is intact. If it indicates that the signature is not valid, do not proceed with the installation.
MacOS
MacOS users can use the shasum and gpg commands to verify the SHA256 checksum and GPG signature of the downloaded ISO file.
SHA256 Checksum
- Download the SHA256 checksum file (the file that ends with
.sha256) from the Pextra Customer Portal. - Open a terminal and navigate to the directory where the downloaded ISO file and SHA256 checksum file are located.
- Calculate the SHA256 checksum of the downloaded ISO file using the following command:
shasum -a 256 pextra-ce.iso - Compare the output with the SHA256 checksum provided on the download page. If they match, the file is intact.
GPG Signature
- Download the GPG signature file (the file that ends with
.sha256.asc) from the Pextra Customer Portal. - Import the Pextra Inc. GPG public key using the following command:
gpg --import pextra-gpg-key.asc - Verify the SHA256 checksum file using the following command:
gpg --verify pextra-ce.iso.sha256.asc pextra-ce.iso.sha256 - If the output indicates that the signature is valid, the file is intact. If it indicates that the signature is not valid, do not proceed with the installation.
Verifying the ISO file itself is similar:
- Download the GPG signature file (the file that ends with
.iso.asc) from the Pextra Customer Portal. - Verify the ISO file using the following command:
gpg --verify pextra-ce.iso.asc pextra-ce.iso - If the output indicates that the signature is valid, the file is intact. If it indicates that the signature is not valid, do not proceed with the installation.
Windows
Windows users can use the CertUtil PowerShell command to verify the SHA256 checksum. For GPG signatures, GPG4Win can be used, as Windows does not have a built-in method to verify GPG signatures. GPG4Win is free and open source software.
SHA256 Checksum
- Download the SHA256 checksum file (the file that ends with
.sha256) from the Pextra Customer Portal. - Open PowerShell and navigate to the directory where the downloaded ISO file and SHA256 checksum file are located.
- Calculate the SHA256 checksum of the downloaded ISO file using the following command:
CertUtil -hashfile pextra-ce.iso SHA256 - Compare the output with the SHA256 checksum provided on the download page. If they match, the file is intact.
- If the output does not match, do not proceed with the installation.
GPG Signature
- Download the latest version of GPG4Win and install it.
- Download the GPG signature file (the file that ends with
.sha256.asc) from the Pextra Customer Portal. - Open PowerShell and navigate to the directory where the downloaded ISO file and GPG signature file are located.
- Import the Pextra Inc. GPG public key using the following command:
gpg --import pextra-gpg-key.asc - Verify the SHA256 checksum file using the following command:
gpg --verify pextra-ce.iso.sha256.asc pextra-ce.iso.sha256 - If the output indicates that the signature is valid, the file is intact. If it indicates that the signature is not valid, do not proceed with the installation.
Verifying the ISO file itself is similar:
- Download the GPG signature file (the file that ends with
.iso.asc) from the Pextra Customer Portal. - Verify the ISO file using the following command:
gpg --verify pextra-ce.iso.asc pextra-ce.iso - If the output indicates that the signature is valid, the file is intact. If it indicates that the signature is not valid, do not proceed with the installation.
Preparing Installation Media
Now that you have downloaded the ISO installer, you need to create a bootable USB drive or DVD. Follow the instructions below for your operating system to create the installation media.
Warning
Creating a bootable USB drive will erase all data on the selected drive. Make sure to back up any important data before proceeding.
Linux
Linux users can use the dd command to create a bootable USB drive. dd is a built-in command and does not require any additional software.
- Insert a USB drive with at least 8GB of space. Make sure to back up any important data on the drive, as it will be formatted.
- Open a terminal and run the command
lsblkto identify the device name of the USB drive (e.g.,/dev/sdX, whereXis the letter assigned to your USB drive). - Unmount the USB drive using the command (you may need to use
sudo):umount /dev/sdX* - Use the
ddcommand to create a bootable USB drive. Replace/path/to/pextra-ce.isowith the path to the downloaded ISO file and/dev/sdXwith the device name of your USB drive (e.g.,/dev/sdb):dd if=/path/to/pextra-ce.iso of=/dev/sdX bs=4M status=progress - After the process is complete, run the following command to ensure all data is written to the USB drive:
sync - Safely eject the USB drive using the command (you may need to use
sudo):eject /dev/sdX
Your USB drive is now ready to be used for installation.
MacOS
MacOS users can also use the dd command to create a bootable USB drive. The process is similar to Linux, but with some differences in the commands used.
- Insert a USB drive with at least 8GB of space. Make sure to back up any important data on the drive, as it will be formatted.
- Open a terminal and run the command
diskutil listto identify the device name of the USB drive (e.g.,/dev/diskX, whereXis the number assigned to your USB drive). - Unmount the USB drive using the command (you may need to use
sudo):diskutil unmountDisk /dev/diskX - Use the
ddcommand to create a bootable USB drive. Replace/path/to/pextra-ce.isowith the path to the downloaded ISO file and/dev/diskXwith the device name of your USB drive (e.g.,/dev/disk2):sudo dd if=/path/to/pextra-ce.iso of=/dev/diskX bs=4m status=progress - After the process is complete, run the following command to ensure all data is written to the USB drive:
sync - Safely eject the USB drive using the command (you may need to use
sudo):diskutil eject /dev/diskX
Your USB drive is now ready to be used for installation.
Windows
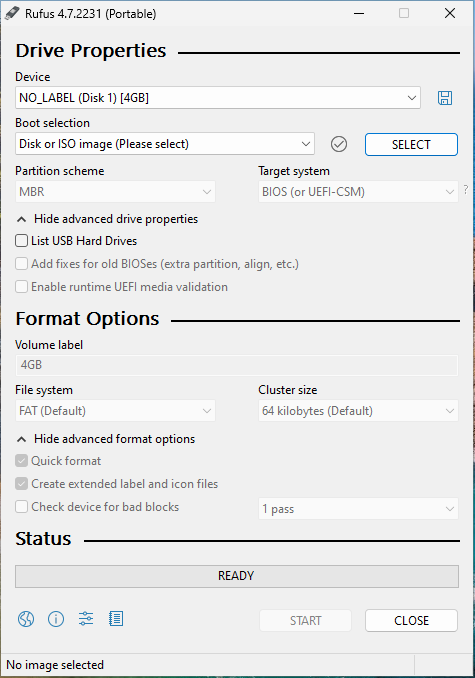
Windows users can use Rufus in DD mode to create a bootable USB drive, as there is no built-in mechanism to create bootable USB drives from ISO files. Rufus is free and open source software.
-
Download the latest version of Rufus and run it.
-
Insert a USB drive with at least 8GB of space. Make sure to back up any important data on the drive, as it will be formatted. In Rufus, select the USB drive by clicking on the “Device” dropdown menu:
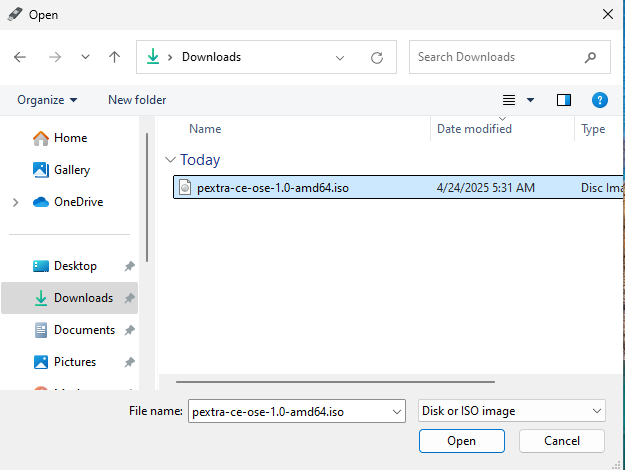
-
Select the downloaded ISO file by clicking on the “SELECT” button. Navigate to the location where you saved the ISO file and select it:
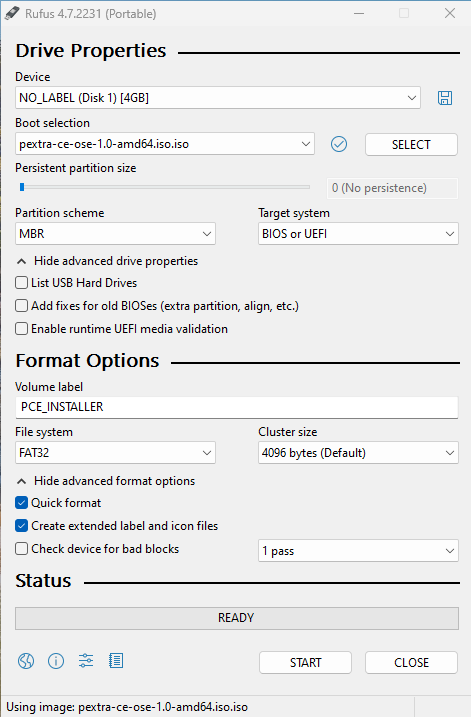
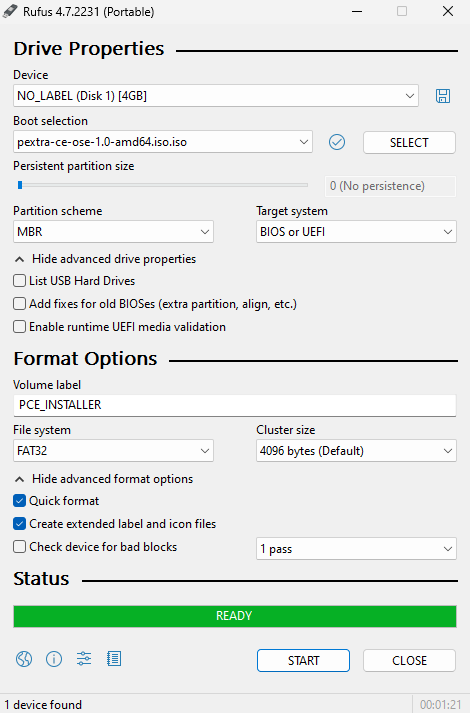
-
With the USB and ISO ready, the window should similar to this. Click on “START” button to begin the process:
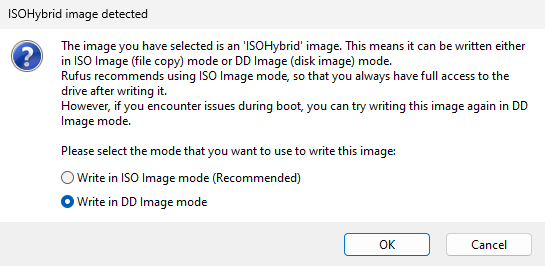
-
A pop-up window will appear. Select “Write in DD Image mode” and click “OK”:
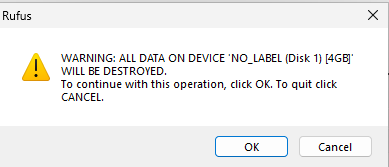
-
Another pop-up window will appear, warning you that all data on the USB drive will be erased. Click “OK” to proceed:
-
Once the process is complete, the bar will be green and say “READY”. You can close Rufus:
-
Safely eject the USB drive from your computer.
Your USB drive is now ready to be used for installation.
Booting from the Installation Media
- Insert the bootable USB drive or DVD into the server.
- Power on the server and enter the BIOS/UEFI settings (usually by pressing
F2,F10, orDELduring startup). - Change the boot order to prioritize the USB drive or DVD.
- Save the changes and exit the BIOS/UEFI settings.
- The server should boot from the installation media, and you will see the bootloader screen:
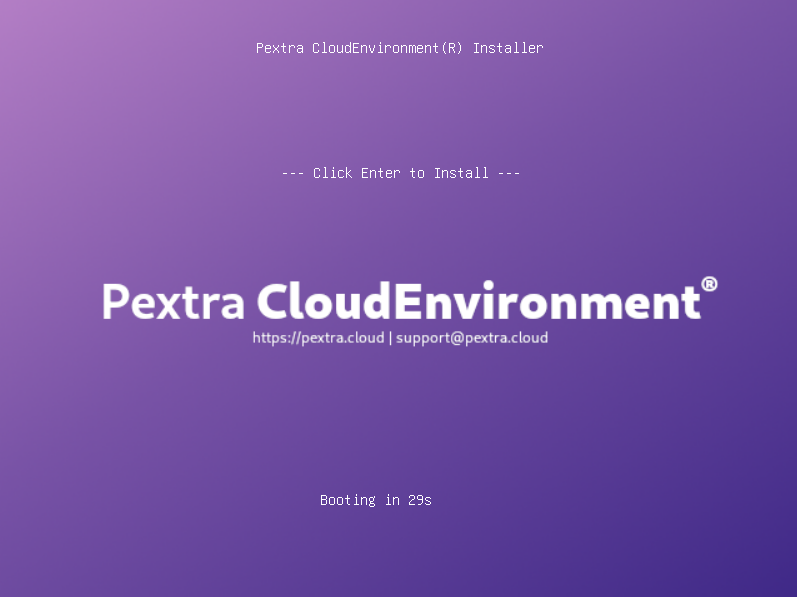
Press the Enter key to start the installation process. You can now proceed with the installation steps.
Installation Steps
Follow the steps below to install Pextra CloudEnvironment® on your server.
Steps
-
Acknowledge the End User License Agreement (EULA).
-
Configure the management network.
- The installer will automatically detect network interface configuration from DHCP.
- This is the IP address you will use to access the web interface, so it is recommended to set a static IP address or configure DHCP reservation for this interface.
- If your network interface does not appear, please let us know.
-
Enter your license key.
- If you do not have a license key, refer to the Pre-Installation section for more information on obtaining a license.
-
Choose whether to participate in the Product Improvement Program (PIP).
- The Product Improvement Program (PIP) helps us improve our products by sharing related telemetry and diagnostic data with Pextra. We use this data exclusively to improve product stability, security, and performance. You can revoke your PIP consent at any time.
- For more information, please refer to our Privacy Policy.
-
Configure the default organization and timezone.
- This is the root organization (the owner of the deployment) that has access to all resources.
- Additional organizations can be created later.
- It is highly recommended to set the timezone to
Etc/UTC, however, you can choose your local timezone if needed.
-
Configure the administrator user.
- This user is the root user of the deployment and has access to all resources.
- Choose a strong password and make sure to remember it.
- After the installation, it is recommended to create an additional user with limited permissions for day-to-day operations.
- For command-line access, the Linux user
root’s password is set to the same password as the administrator user.
-
Configure the boot disk.
- The installer will automatically detect available disks. Choose the disk where you want to install the operating system.
- The installer will format the selected disk, so make sure to back up any important data before proceeding.
-
Finalize the installation.
- A summary of your configuration will be displayed. Review the settings and click “Install” to begin the installation process.
-
Wait for the installation to complete.
- The installation process may take some time, depending on your network speed and hardware configuration. Typically, it takes about 20-30 minutes.
- If you see any errors during the installation, please let us know.
-
Reboot the server.
- If you did not select “Auto-reboot” during the installation, you will need to click “Reboot” to restart the server.
- Remove the installation media (USB drive or DVD) before rebooting, otherwise the server may boot from the installation media again.
Your server is now ready to use! To access the web interface, please refer to the Accessing the Web Interface section.
You can now proceed to perform post-installation steps to configure your deployment.
Post-Installation Steps
After the installation is complete, perform the following tasks to ensure that your Pextra CloudEnvironment® deployment is fully functional and optimized for your needs.
Upgrade to the Latest Version
Refer to the System Upgrade section for instructions on how to upgrade to the latest version.
Set CockroachDB License Key
Refer to the Set CockroachDB License Key section for instructions on how to set the CockroachDB license key. This is not required if your node will join an existing, licensed cluster.
Join a Cluster
Refer to the Cluster Management section for instructions on how to join a node to a cluster if you are deploying a cluster or joining a node to an existing cluster.
Configure User Accounts
Refer to the Identity Access Management (IAM) section for instructions on how to create and manage user accounts and permissions.
Configure Networking
Refer to the Network Management section for instructions on how to configure network settings.
Configure Storage Pools
Refer to the Storage Management section for instructions on how to create and manage storage pools.
Configure AI Providers
Refer to the AI Providers section for instructions on how to add and configure AI providers.
Monitor System Performance
Refer to the Monitoring & Metrics section for instructions on how to monitor system performance.
Web Interface
This section describes how to access and navigate the web interface of Pextra CloudEnvironment®. The web interface is the primary tool for managing your deployment, allowing you to perform various tasks, monitor system metrics, and configure settings.
Note
The web interface requires a modern web browser with JavaScript enabled. It is recommended to use Mozilla Firefox or Google Chrome for the best experience.
Accessing the Web Interface
You can access the Pextra CloudEnvironment® web interface by entering the management IP address in your web browser. The default URL is https://<management-ip>:5007, where <management-ip> is the IP address you configured during the installation process.
Note
The web interface uses HTTPS for secure communication. You will see a self-signed certificate warning in your browser. This is normal, as the certificate is generated during the installation process. You can safely ignore this warning and proceed to the web interface.
Logging In
There are two main steps to access the web interface:
- Organization discovery (only applicable to multi-org deployments)
- Authenticating with user credentials
Note
For the web interface to function correctly, verify your user account has the necessary permissions, as outlined in the Web Interface Permissions section.
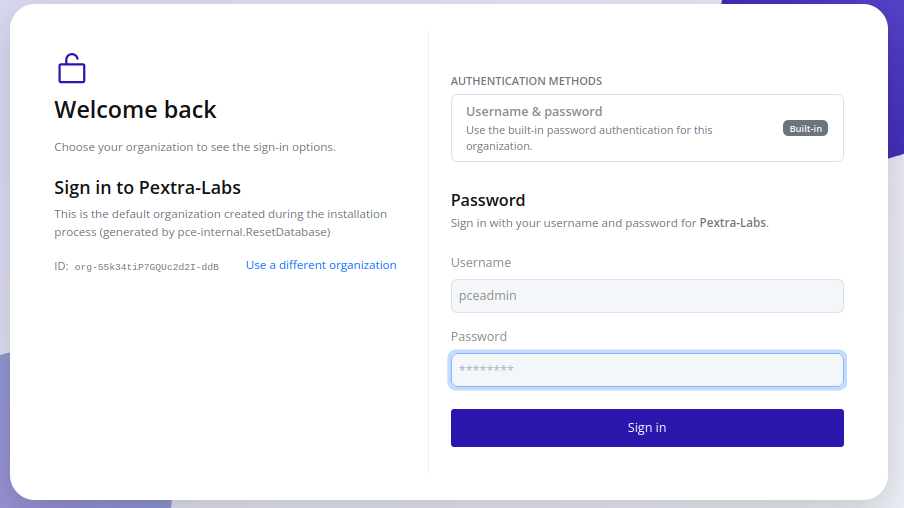
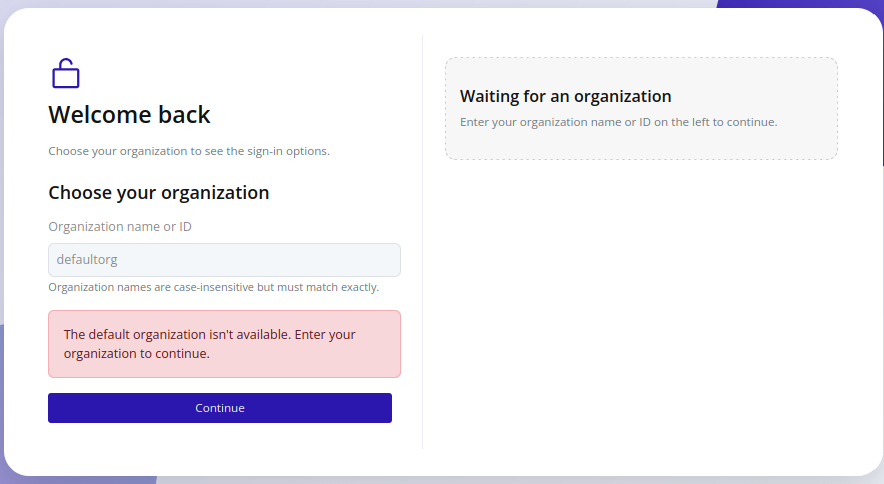
Organization Discovery (Multi-Org Only)
For security reasons, multi-organization deployments require you to explicitly select the target organization before logging in. Most deployments run a single organization, so you can usually proceed straight to authentication.
To select an organization:
- Navigate to the web interface. The UI preselects
DefaultOrg(created during installation):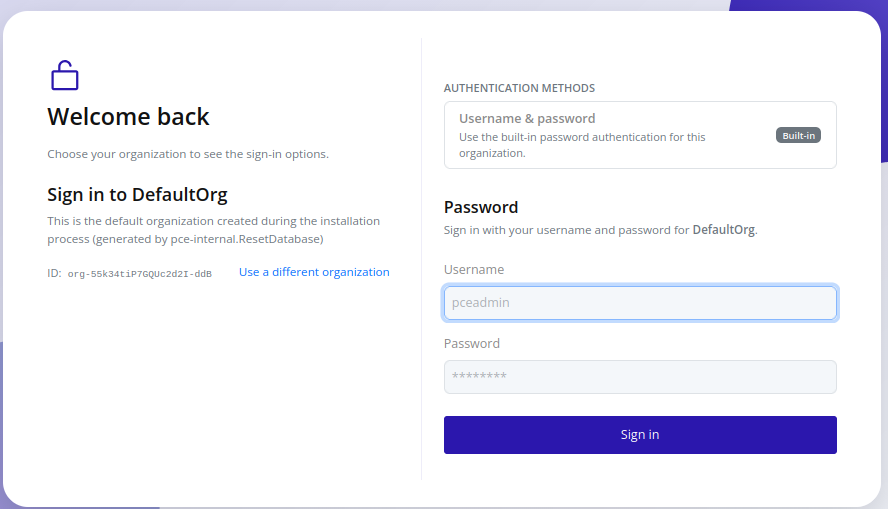
- Click Use a different organization, and enter the organization Name or ID for an exact, case-insensitive match.
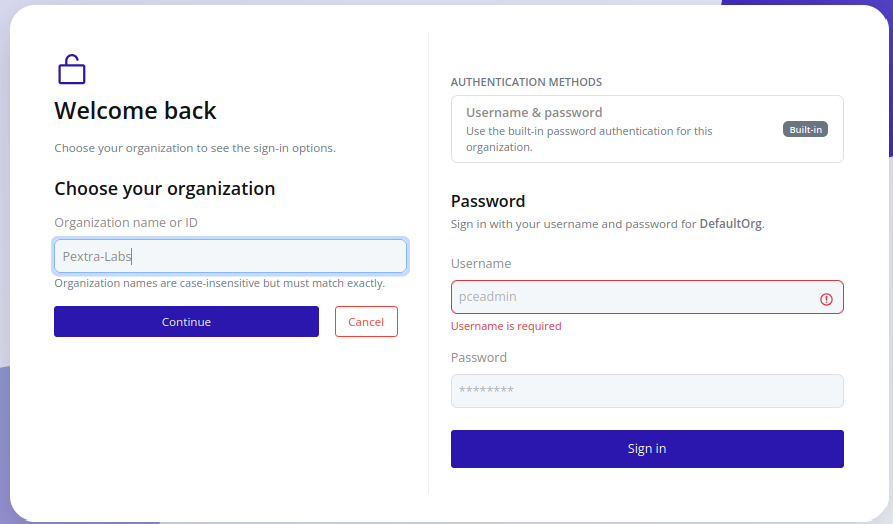
- Confirm the selection. If the organization exists and your user belongs to it, the authentication form appears.
In the case that the default organization is renamed or deleted, the login page displays an error and prompts you to select a different organization:
Tip
Keep a short list of approved organization IDs (
org-...) for multi-tenant deployments.
You can now proceed to authentication.
Authentication
- Use the built-in username/password or an external identity provider (IdP), if configured:
- For IdP logins, click the relevant button and follow the provider’s authentication flow.
- For built-in username/password, enter the username and password (the default username is
pceadmin, and the password is set during installation).
- If successful, you are redirected to the main dashboard1.
Note
Too many incorrect login attempts in a short period will temporarily lock your account. Contact an administrator to unlock it.
Notes
-
The IP address that you connect to (this is especially relevant for nodes in a cluster). The node that you are currently connected to is shown with a light green dot next to the node’s entry in the resource tree. All requests are proxied to the node that you are connected to. ↩
Web Interface Permissions
To use the web interface, a user must have at least the following permissions:
organization.list: Allows the user to list organizations. Despite the name, this only allows listing the current organization for non-root users.organization.read: Allows the user to read organization details. This is required in order to render the resource tree.
Without these permissions, the web interface will not function correctly. It is recommended to create a policy that includes these permissions and assign it to all roles that require web interface access.
Note
These permissions are the bare minimum required to log in and render the web interface. Additional permissions should be granted based on the specific actions the user needs to perform within the interface.
Resource Tree
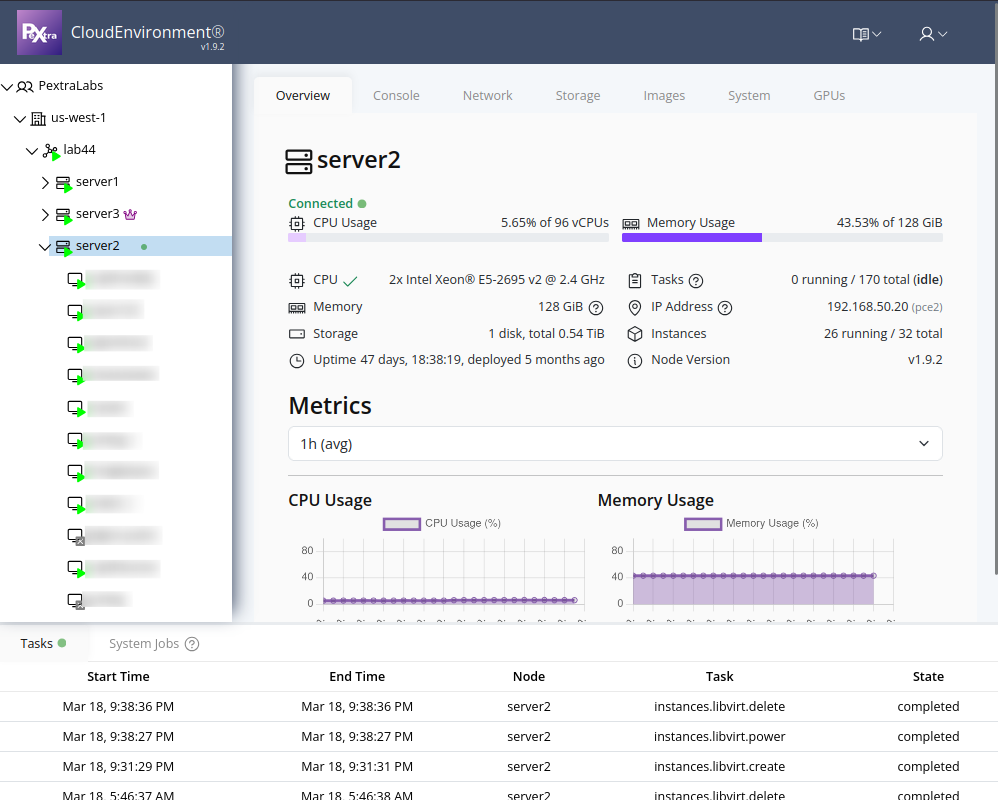
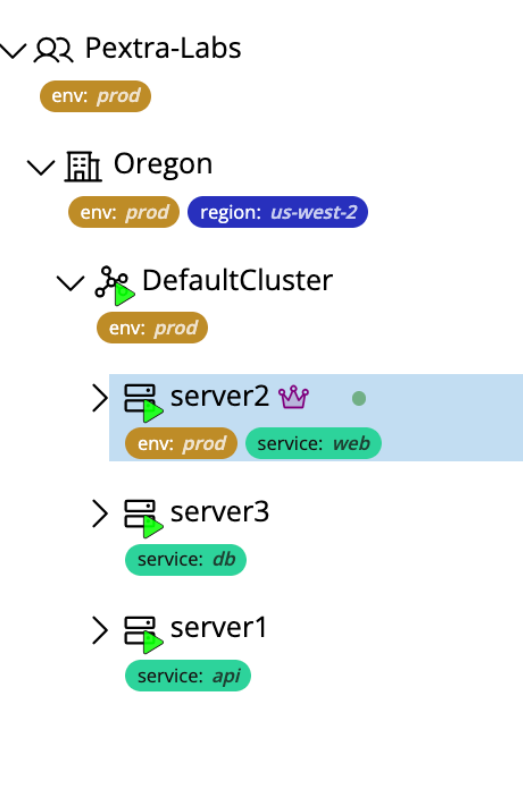
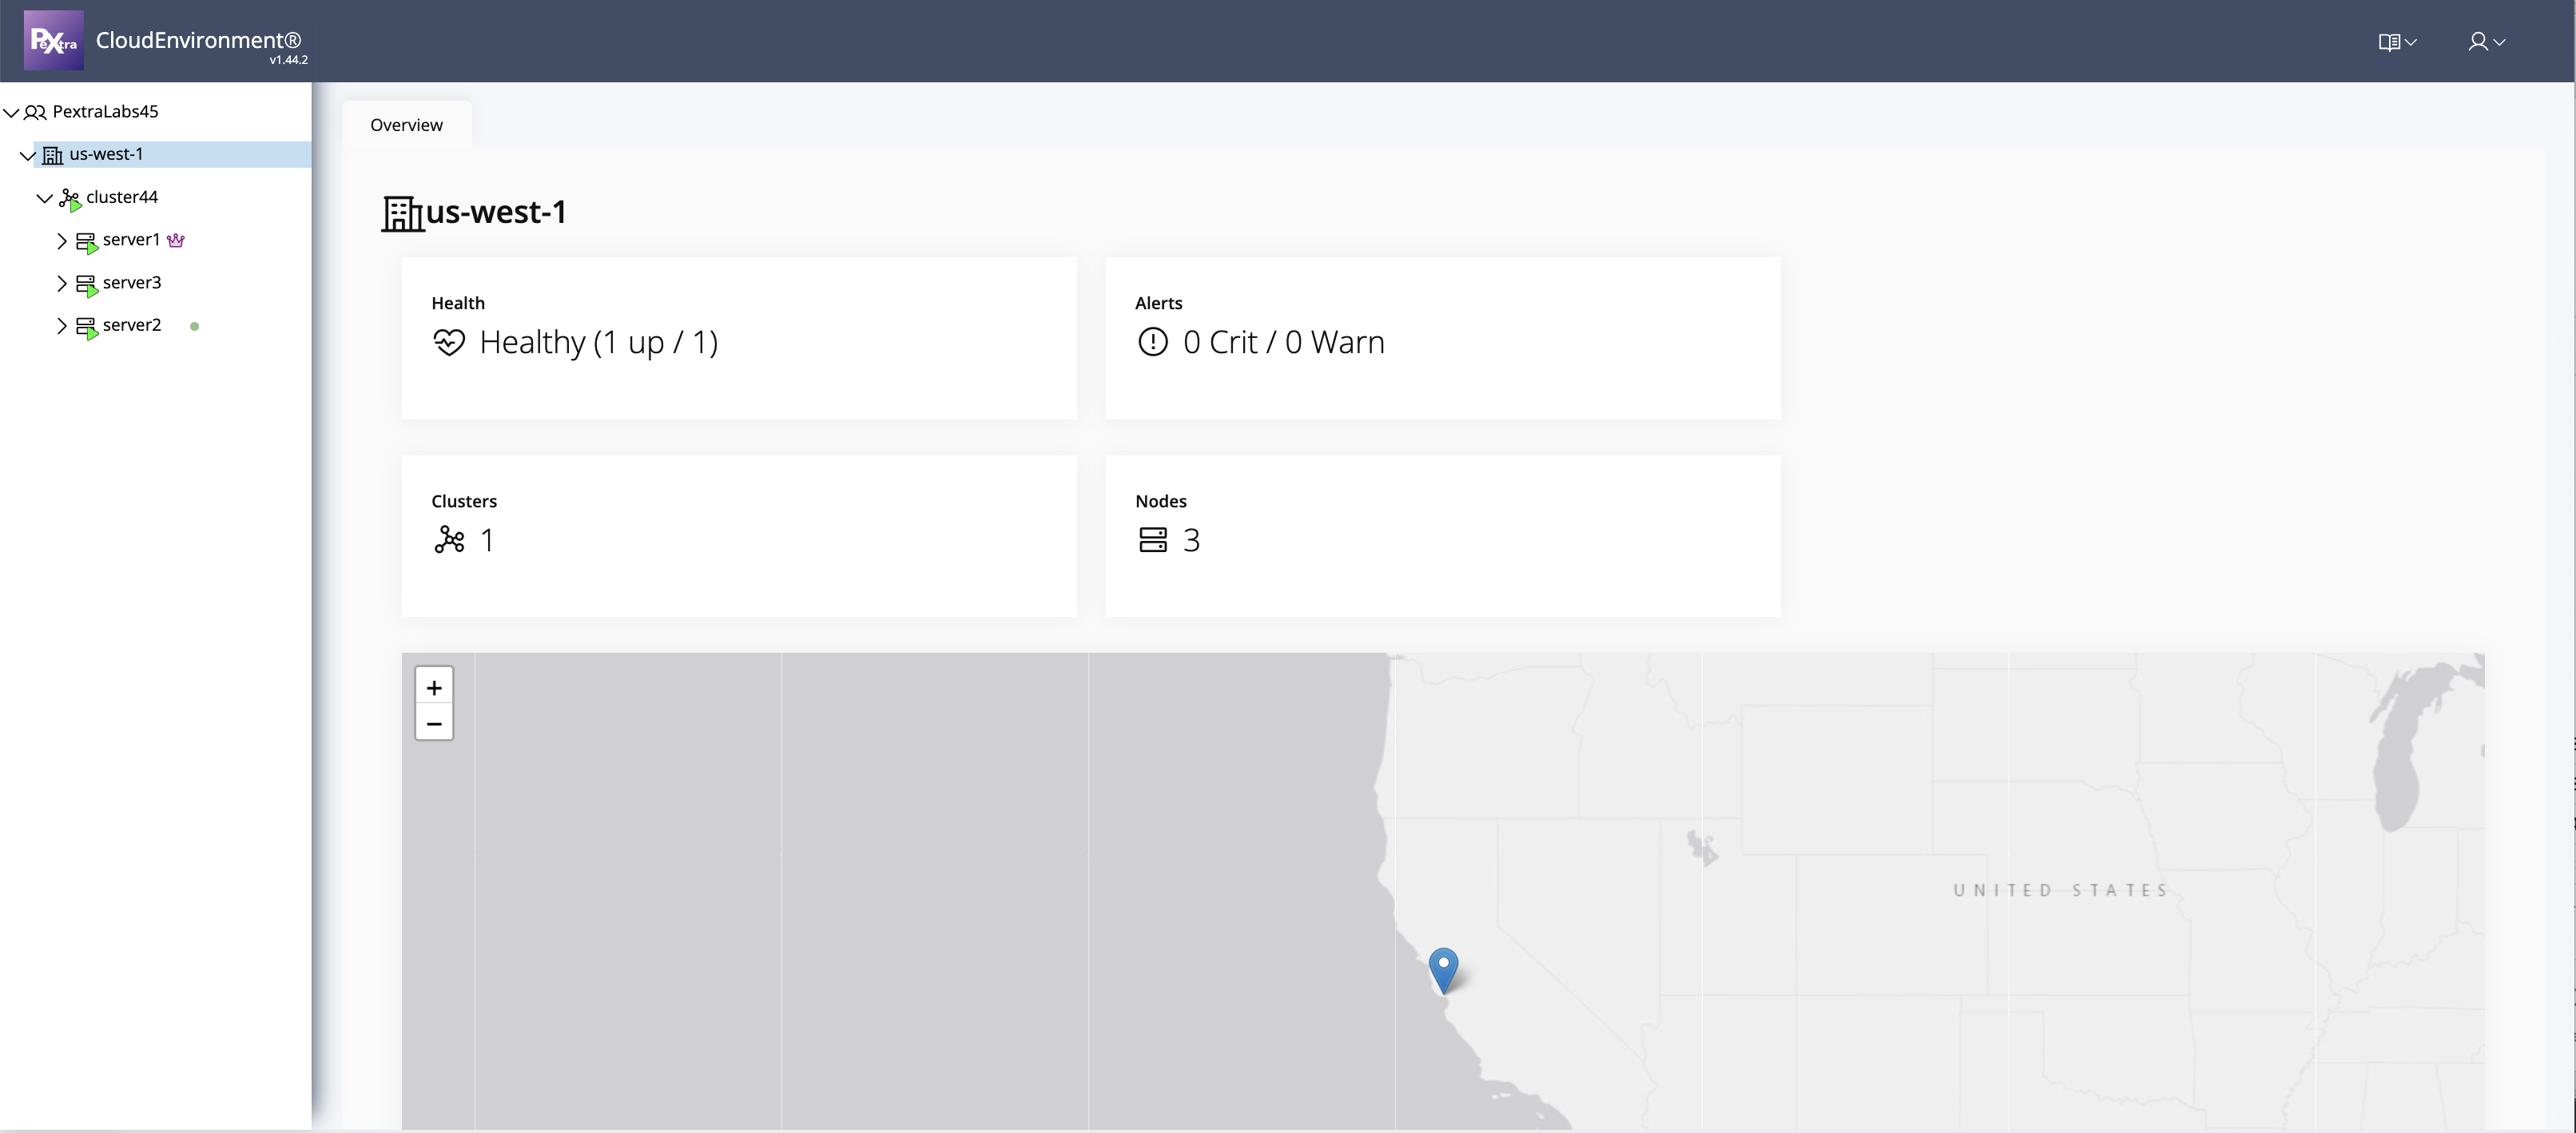
On the left side of the web interface, you will find a tree view that displays the hierarchy of your deployment. This view provides a complete overview of all organizations, datacenters, clusters, nodes, and instances within your deployment. You can expand and collapse the tree’s nodes to navigate through the different levels of your infrastructure:
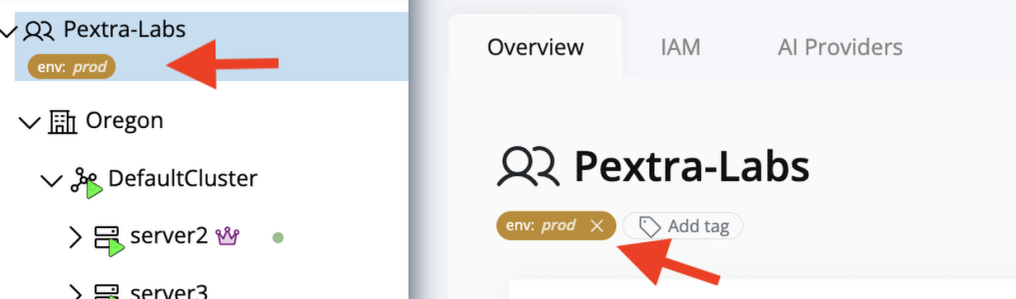
There may be tag pills next to some resources in the tree. To learn more about tags, refer to the Tags section.
Tags
Resource tags let you annotate various resources with key/value metadata. Keys are required, values are optional, and tags appear anywhere the resource identity is shown (resource tree, selectors, and detail panes). This makes it easy to track ownership, label business units, or indicate lifecycle stages.
Tip
Tag colors are generated automatically from the key name. The color is deterministic, which keeps the same key visually consistent across the UI.
Supported Resource Types
Currently, the following resource types support tags:
- Organizations
- Datacenters
- Clusters
- Nodes
- Instances
Important
Tags with keys starting with
pce_are reserved for system use. Attempting to create, edit, or delete a tag with this prefix will fail.
View Tags
Tags appear as color-coded pills that display the key and optional value. Tag values are abbreviated, and can be viewed in full by hovering over the pill.
Note
You must have the
tag.listpermission on the resource in order to view tags.
Resource Tree
Tags appear next to the resource name in the resource tree:
Dropdowns & Selectors
Tags also appear in any dropdown that lists the resource:

Add a Tag
You can assign tags from each resource’s detail page.
Note
You must have the
tag.createpermission on the resource in order to add tags.
- Click Add Tag on the resource page.
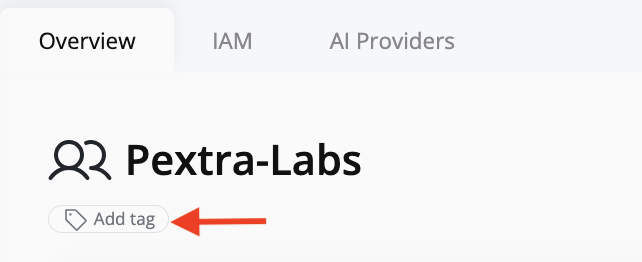
- The button converts into two inline fields: Key and Value
- Enter the key and optional value. Tag keys must be unique per resource.
- Select the check icon to save the tag or the X icon to cancel.
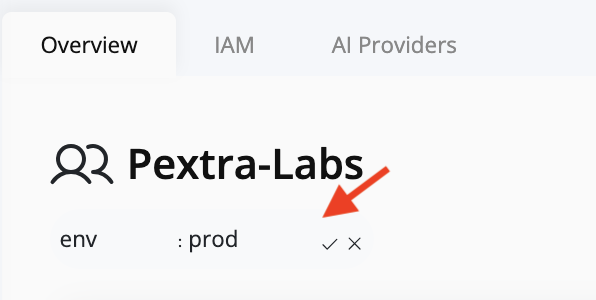
- Confirm the new tag appears before the Add Tag button. The UI immediately propagates the change to dropdowns and the resource tree.
Important
Tags with keys starting with
pce_are reserved for system use. Attempting to create, edit, or delete a tag with this prefix will fail.
Remove a Tag
You can remove tags from each resource’s detail page.
Note
You must have the
tag.deletepermission on the resource in order to remove tags.
- On the resource page, locate the tag you want to remove.
- Click the X icon on the tag pill.
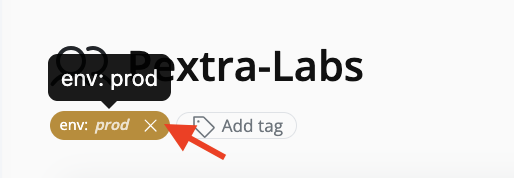
- The tag is immediately removed. The UI propagates the change to dropdowns and the resource tree.
Important
Tags with keys starting with
pce_are reserved for system use. Attempting to create, edit, or delete a tag with this prefix will fail.
AI Features
The Pextra CloudEnvironment® web interface includes two AI integrations:
-
Pextra Cortex™ (beta): A fully-capable AI agent for planning and executing complex orchestration tasks within Pextra CloudEnvironment®.
-
AI Assist: Context-sensitive AI completion and suggestions.
Note
An administrator of the organization must configure at least one AI provider for AI features to function. If no AI providers are configured, AI features will not be available in the web interface.
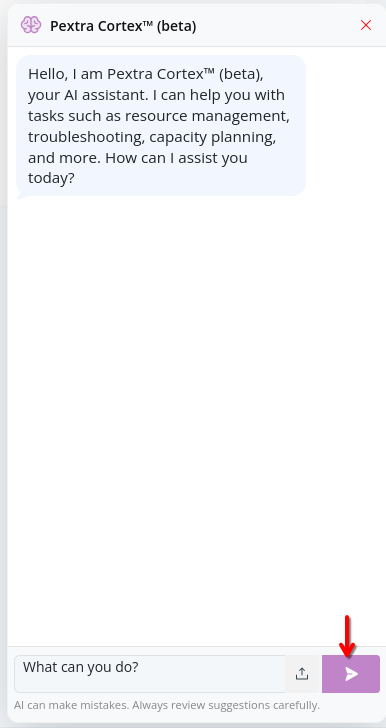
Pextra Cortex™
Pextra Cortex™ is an advanced AI agent integrated into the Pextra CloudEnvironment® web interface. It is designed to assist users in planning and executing complex orchestration tasks, by leveraging the open-source Model Context Protocol (MCP) standard. Pextra Cortex™ can understand high-level user instructions and screenshots and translate them into actionable, executable plans1.
Note
An administrator of the organization must configure at least one AI provider for AI features to function. If no AI providers are configured, AI features will not be available in the web interface.
Usage
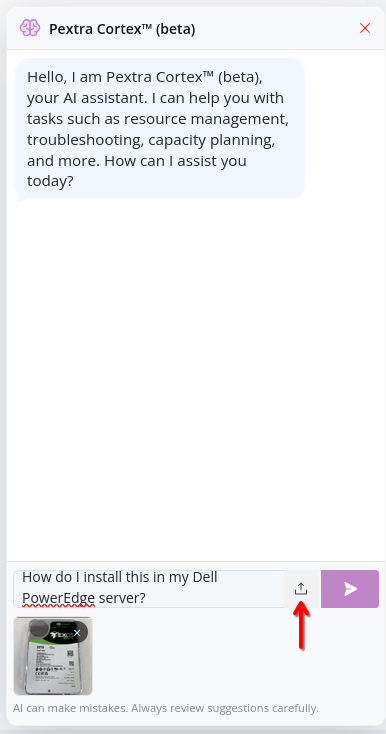
-
To access Pextra Cortex™, click on the message bubble icon in the bottom-right corner of the web interface:
-
Provide instructions in natural language, then click the Send button. You can also attach screenshots:
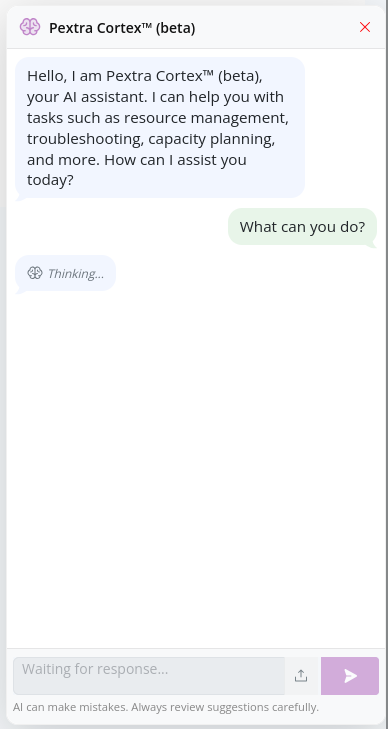
-
Pextra Cortex™ will spend a few moments thinking. During this time, it may ask for clarifications or additional information to better understand your request:
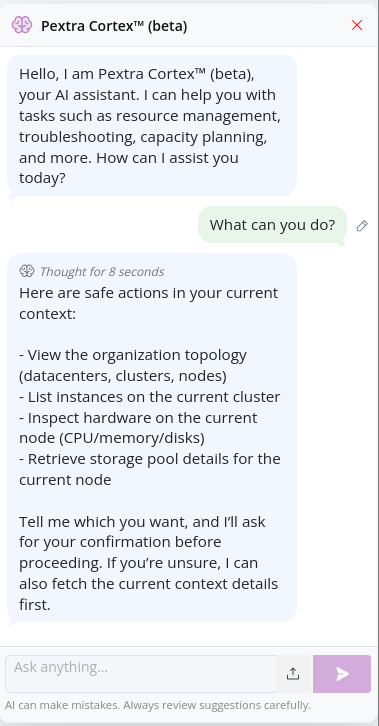
-
A response will be generated:
-
For safety reasons, before executing any AI-generated plans, Pextra Cortex™ asks for user confirmation:

Running Locally
Note
It is recommended to use Pextra Cortex™ through the web interface for the best experience, as it is fully integrated and optimized for Pextra CloudEnvironment®.
Refer to the MCP server repository that powers Pextra Cortex™. This allows you to use a desktop app or command-line interface (CLI) to build AI agents that interact with Pextra CloudEnvironment®.
Notes
-
Pextra AI features are powered by third-party AI providers, as configured in your organization settings. The quality and accuracy of responses may vary based on the provider and the specific task at hand. Always review AI-generated content. ↩
AI Assist
Throughout the Pextra CloudEnvironment® web interface, you will find the AI Assist button, which provides context-sensitive suggestions and assistance. Describe your task in natural language, and the AI Assist feature will generate relevant suggestions to facilitate your work1.
See the example below for a demonstration of how to use the AI Assist feature.
Before:
 After:

Note
An administrator of the organization must configure at least one AI provider for AI features to function. If no AI providers are configured, AI features will not be available in the web interface.
Notes
-
Pextra AI features are powered by third-party AI providers, as configured in your organization settings. The quality and accuracy of responses may vary based on the provider and the specific task at hand. Always review AI-generated content. ↩
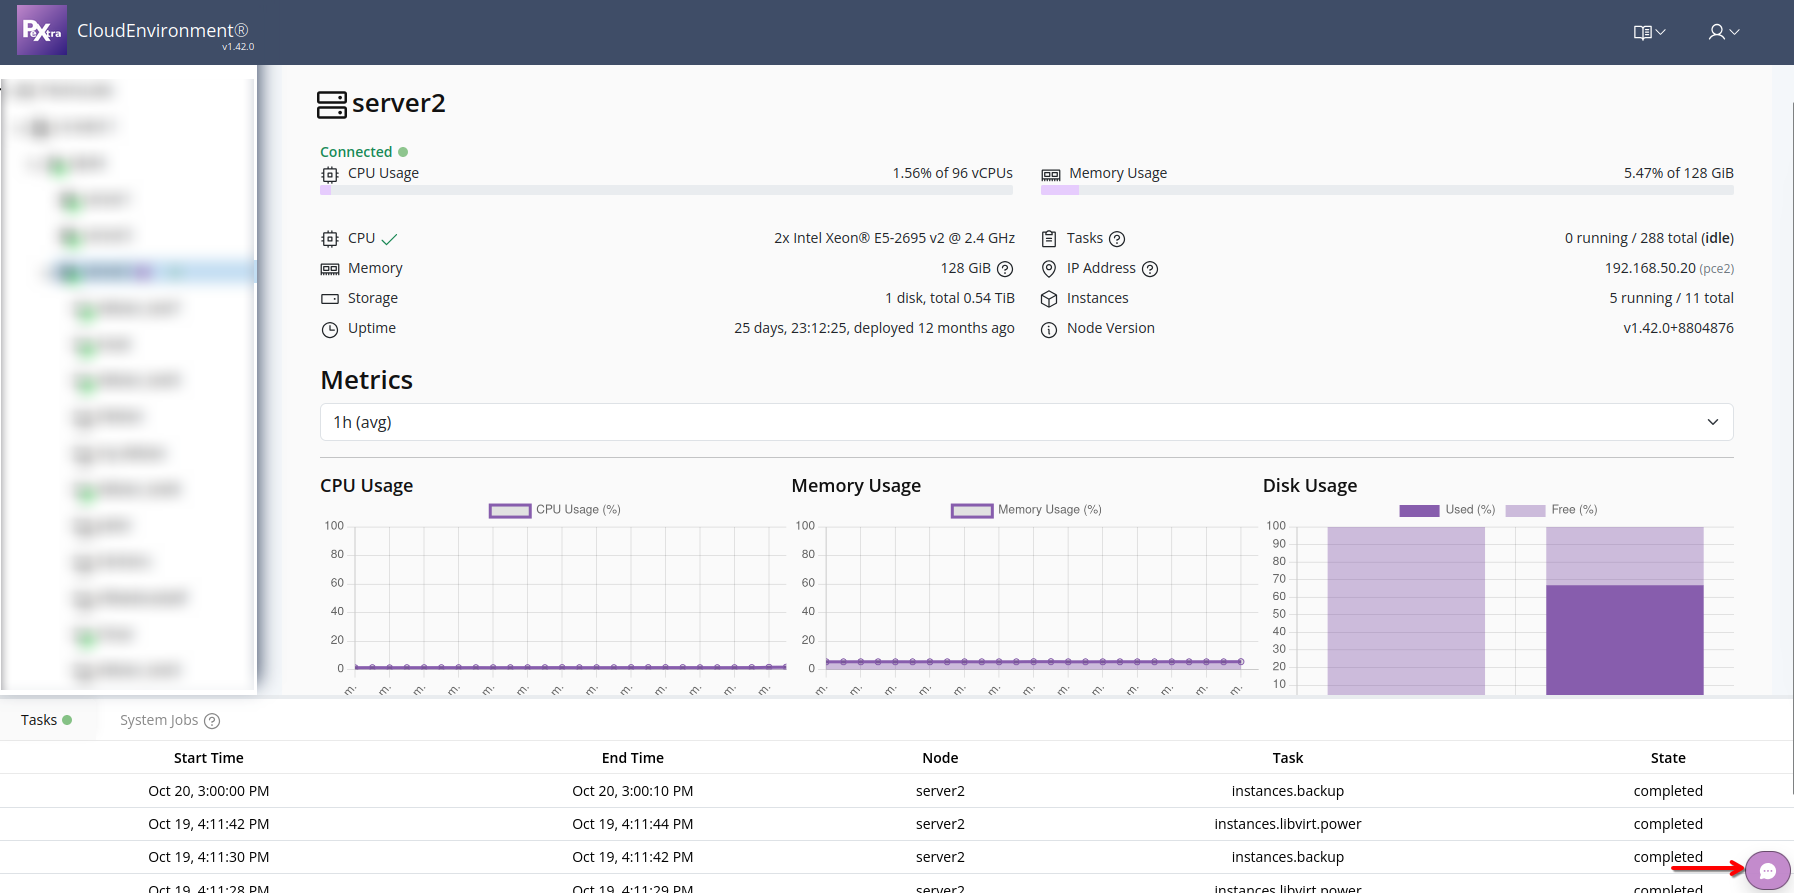
Node Management
This section provides a guide to managing individual nodes within your deployment.
Nodes are the physical or virtual servers1 that run Pextra CloudEnvironment®. They serve as the foundation of your infrastructure, providing the compute, storage, and network resources required by your deployment.
The ID prefix for nodes is node-2.
Notes
-
Running Pextra CloudEnvironment® in a virtual machine is in beta. Try running Pextra CloudEnvironment® inside of Pextra CloudEnvironment®! ↩
-
Resources in Pextra CloudEnvironment® are identified by unique IDs. Node IDs will have the prefix
node-, followed by a unique identifier (e.g.,node-qthm_iLrflJ_DtSS1l4Gx). ↩
System Upgrade
System upgrades should be routinely performed to ensure that the latest bug fixes, security patches, and features are available.
Note
A valid license key must be present when upgrading Pextra CloudEnvironment®. To set the node’s license key, refer to the Set License Key section.
Warning
System upgrades will fail if they are not run as the
rootLinux user.
Console
-
Access the node’s console through SSH or through the “Console” tab in the node view.
-
First, update the node’s package index by running the following command:
apt updateThis command may take some time to finish depending on the node’s connection speed.
-
If any system upgrades are available, the following message will be shown:
[xx] packages can be upgraded. Run 'apt list --upgradable' to see them.If this message is not shown, the node is on the latest version. No action is required.
-
If the above message is shown, the node can be upgraded to the latest version by running the following command:
apt upgradeThis command may take a while to finish depending on the number of upgrades and the node’s connection speed.
Product Improvement Program (PIP)
The Product Improvement Program (PIP) helps us improve our products by sharing related telemetry and diagnostic data with Pextra. We use this data exclusively to improve product stability, security, and performance. You can revoke your PIP consent at any time. For more information, please refer to our Privacy Policy.
Note
The PIP was introduced in v2.6.0. Upgrading from a version prior to v2.6.0 will result in a warning banner in the Web Interface until a consent decision is made for each node. By default, nodes with no consent decision are opted out.
Note
You must have the
node.bulk_update_telemetry_consentpermission in order to edit PIP consent for nodes.
Web Interface
-
Select the node in the resource tree and view the page on the right. Click on the System tab in the right pane. Then, select the Logs sub-tab:
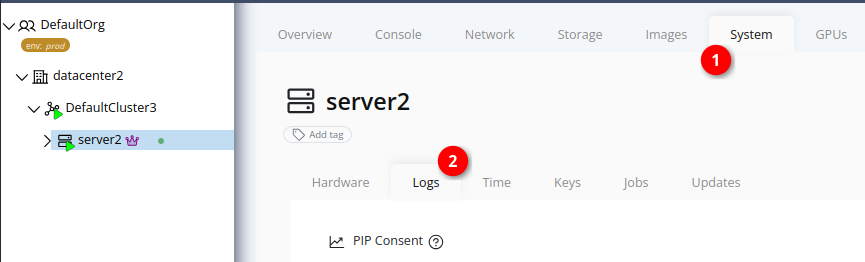
-
The current PIP consent status is displayed in the “PIP Consent” row. To change the consent status, click the Edit button next to the current PIP consent status:

-
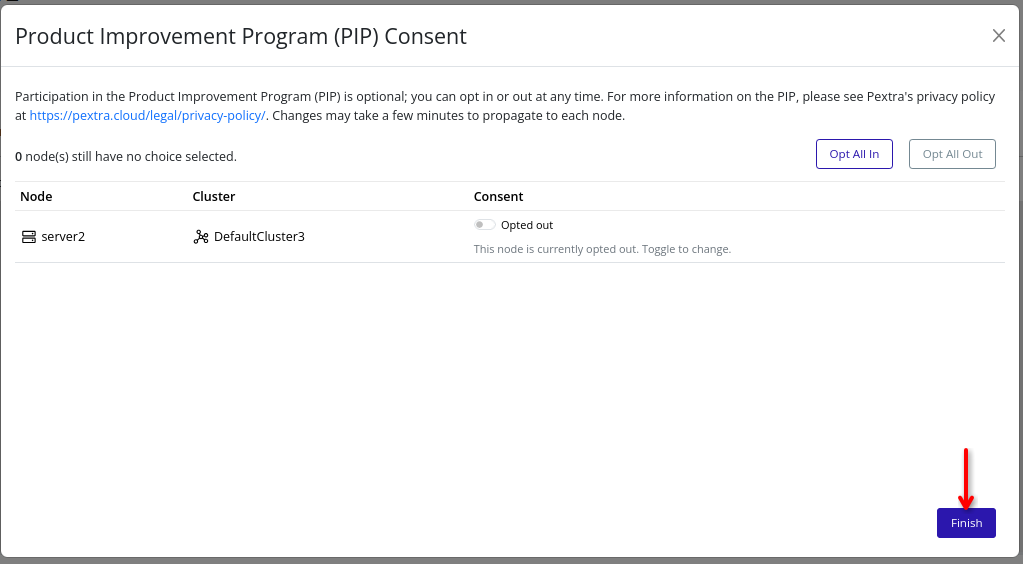
A modal will appear with a list of all nodes, their respective clusters, and their current PIP consent status. You can change the consent status for each node by selecting the desired option in the node’s row. To change the consent status for all nodes at once, use the Opt All In or Opt All Out buttons at the top of the modal.
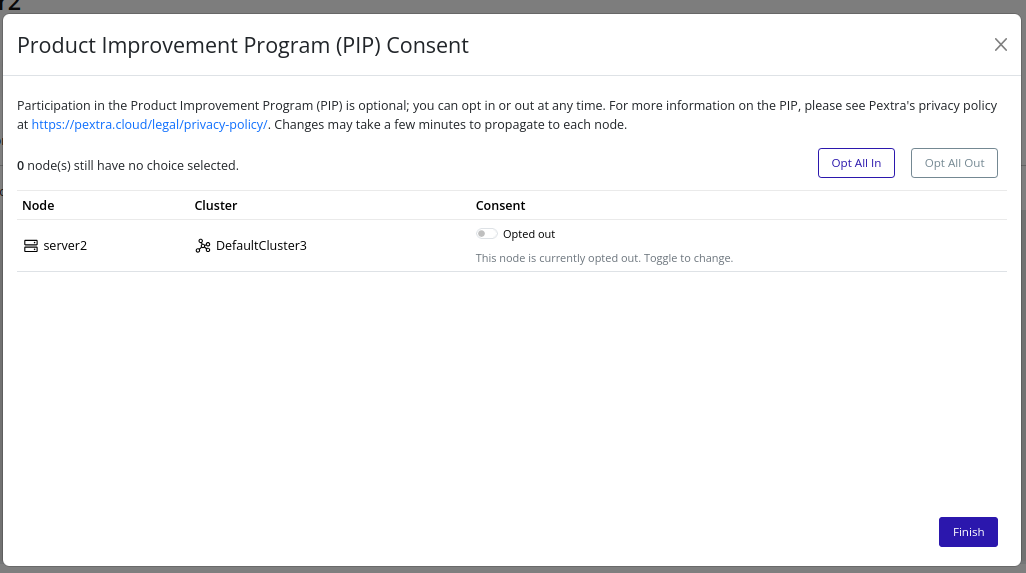
-
Click the Finish button to save your changes and close the modal. Changes may take a few minutes to propagate to each node.
Set License Key
License keys are long-lived and typically do not need to be changed. However, if you need to change the license key, you can do so by following these steps:
Note
The Pextra CloudEnvironment® license key is separate from the CockroachDB license key. Both must be configured. For CockroachDB steps, refer to the Set CockroachDB License Key section.
Tip
License keys can be purchased from the Pextra Customer Portal. Support subscriptions are also available for purchase.
Web Interface
-
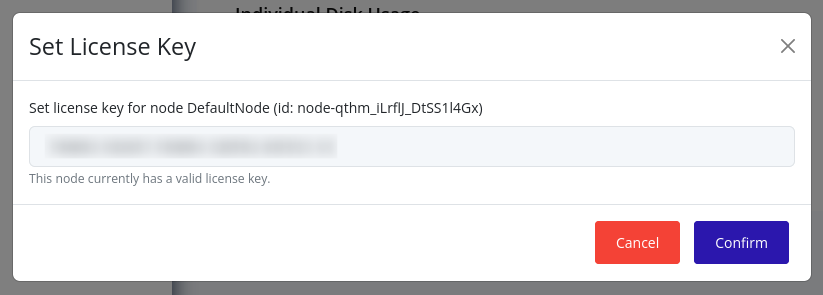
Right-click on the node in the resource tree and select Set License Key:

-
A modal will appear. The current license key along with its validity will be displayed. Enter the new license key in the text box and click Confirm:
-
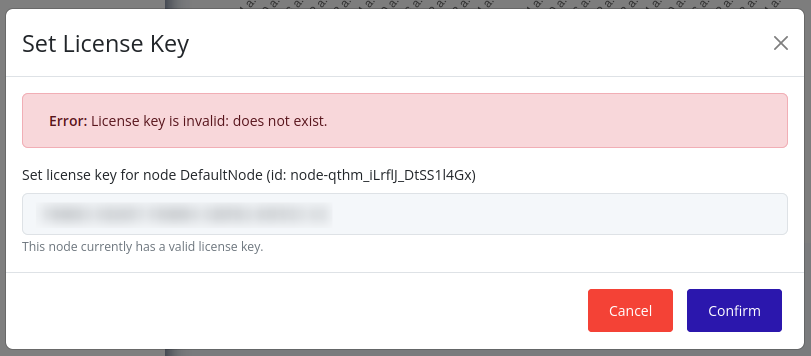
If any errors occur, they will be displayed, otherwise, the modal will close. For example:
To confirm that the license key has been set, you can check the licensing status of the node’s cluster.
Set CockroachDB License Key
Pextra CloudEnvironment®’s highly-scalable private cloud is built on CockroachDB’s distributed architecture. The CockroachDB license key is cluster-wide (a cluster only needs one CockroachDB license key).
Warning
Pextra CloudEnvironment® will not be functional after one week (7 days) without a valid CockroachDB license key.
Warning
When a standalone node joins a cluster, it adopts the cluster’s CockroachDB license setting. Any CockroachDB license key previously set on that node is discarded.
Tip
CockroachDB license keys can be obtained from cockroachlabs.cloud.
Console
-
Access the node’s console through SSH or through the “Console” tab in the node view.
-
First, enter the CockroachDB console by running the following command:
sudo cockroach sql --certs-dir=/usr/local/lib/cockroach/certs -u pextra_ce_pcedaemon -
Set the license key by running the following command in the CockroachDB console:
SET CLUSTER SETTING enterprise.license = '<license key here>'; -
To exit the CockroachDB console, click
CTRL+C.
For more information, visit the CockroachDB licensing FAQs.
Cluster Management
Clusters are logical groupings of nodes that work together to provide compute, storage, and networking resources for running instances and workloads. Pextra CloudEnvironment® supports the creation and management of clusters to facilitate resource allocation, scalability, and high availability.
The ID prefix for clusters is cls-1.
Notes
-
Resources in Pextra CloudEnvironment® are identified by unique IDs. Cluster IDs have the prefix
cls-, followed by a unique identifier (e.g.,cls-YtR8FqvL29sKjb7WxD3Zn). ↩
Editing a Cluster
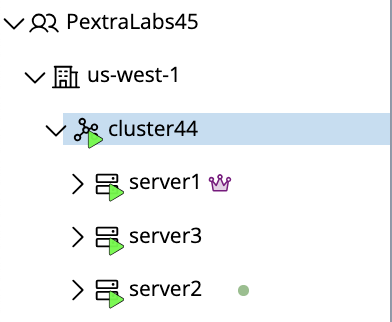
To update a cluster’s name or description:
- In the left navigation panel, right-click on the cluster you want to modify.
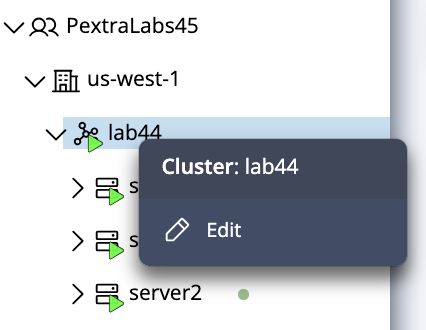
- Select Edit from the context menu.
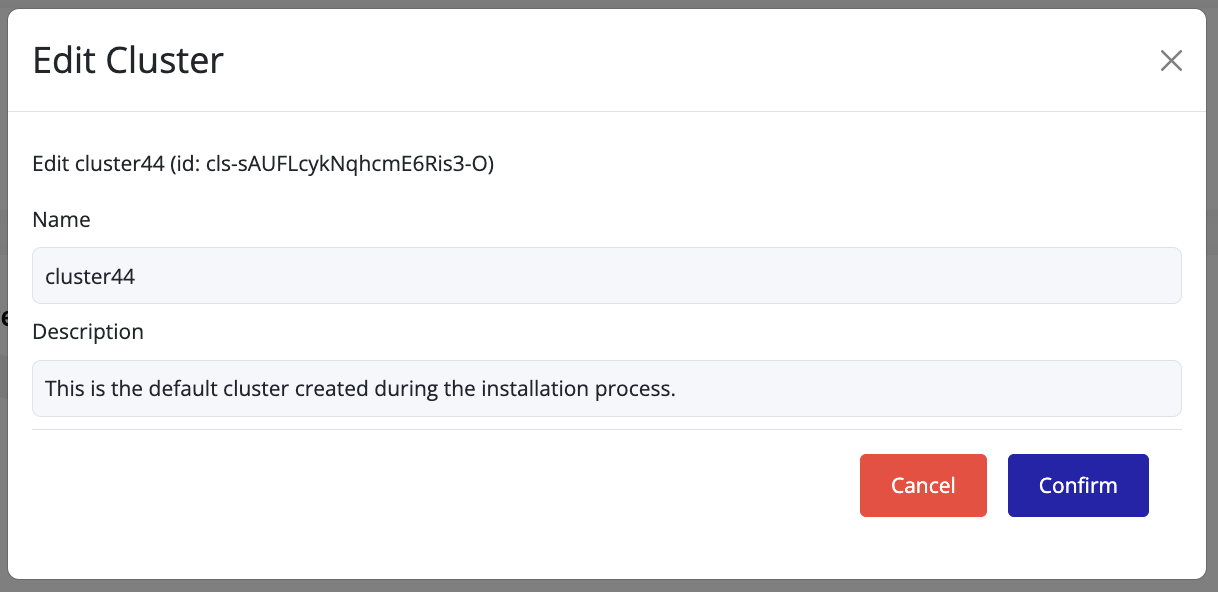
- Update the Name and/or Description fields as required.
- Click Confirm to apply the changes.
Join Nodes to a Cluster
Clustering allows you to group multiple nodes into a single cluster, enabling resource sharing, redundancy, and centralized management within Pextra CloudEnvironment®.
Tip
After installation, each node initially operates as a standalone cluster with one node. You can join additional nodes to an existing cluster using the join key.
Warning
When joining a cluster, standalone nodes carry over their Pextra CloudEnvironment® license key. However, the CockroachDB license key is discarded, and the node adopts the cluster’s CockroachDB license setting. Refer to the Set CockroachDB License Key for more information.
Creating and Joining a Cluster
Follow these steps to join nodes into an existing cluster:
- Log in directly to the node’s management interface.
- You should see one cluster and one node listed.
- In the left navigation panel, click on Cluster.
- On the right-hand panel, click on the Cluster you want to extend.
- Obtain the Join Key for that cluster.

- Copy the join key.
- Log in to each new node using its IP address and port
5007(for example,https://<node-ip>:5007). - In the left navigation panel of each new node, click Cluster.
- Click Join Cluster.
- Paste the join key obtained earlier into the provided field and confirm the operation.
- Return to the main cluster view.
- You should now see the newly added node listed as a member of the cluster.
Once the process is complete, all joined nodes operate under a unified cluster, enabling centralized management of workloads, networking, and resources.
Check Licensing Status
Use the cluster licensing view to make sure every node presents a valid, unexpired license key.
Tip
License keys can be purchased from the Pextra Customer Portal. Support subscriptions are also available for purchase.
Compliance Rules
Refer to the Licensing Compliance Rules section for details on cluster licensing compliance rules.
Web Interface
- Select the cluster in the resource tree and view the page on the right. A card with a quick overview of the licensing status will be displayed:
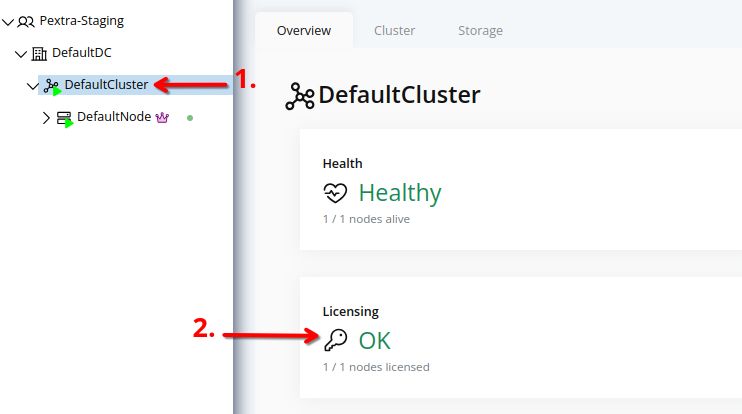
- For a detailed view, click on the Cluster tab in the right pane. The licensing status of each node in the cluster will be displayed:
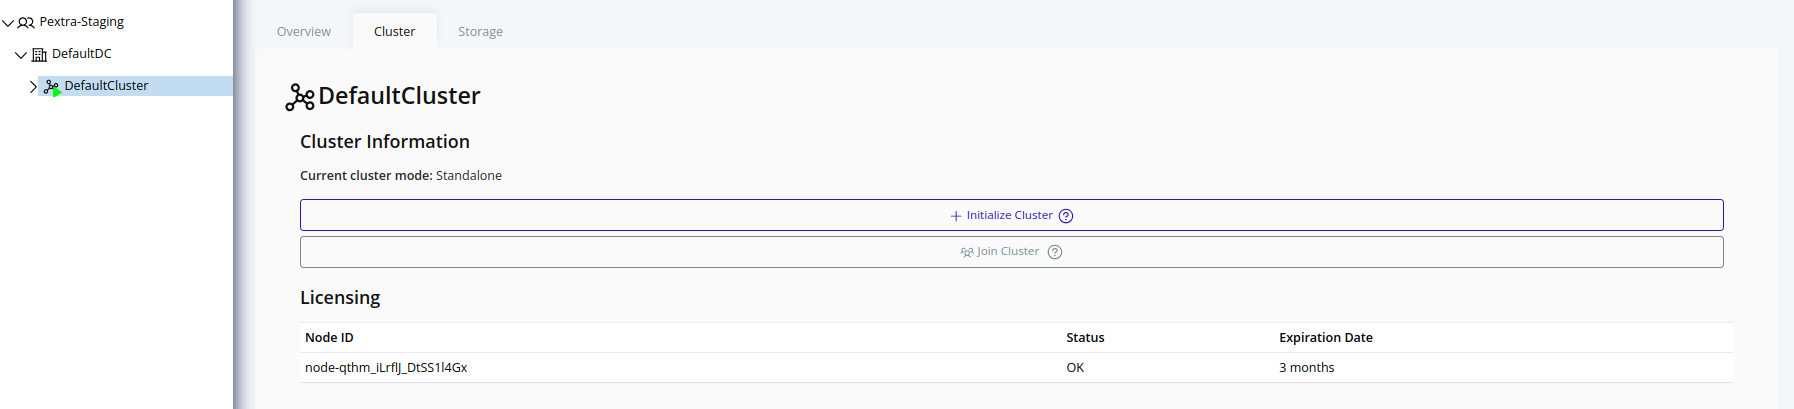
For more information on the Additional Features table, refer to the Licensing section.
Datacenter Management
Datacenters represent logical groupings of clusters within an organization. They help structure resources and provide administrative boundaries for managing clusters and nodes.
Note
The
MULTI_DATACENTERfeature flag must be enabled to create more than one datacenter per organization. See the Feature Gating section for details.
Currently, datacenter creation is supported only via the API. This will be addressed in a future release.
The ID prefix for datacenters is dc-1.
Notes
-
Resources in Pextra CloudEnvironment® are identified by unique IDs. Datacenter IDs have the prefix
dc-, followed by a unique identifier (e.g.,dc-VrP6KxEw19aQb2hTnY4Ld). ↩
Editing a Datacenter
You can update a datacenter’s name, description, or location directly from the UI:
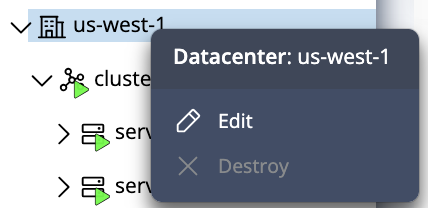
- In the left navigation panel, right-click on the datacenter you want to edit.
- Select Edit from the context menu.
- Update the Name, Description, or Location fields as needed.
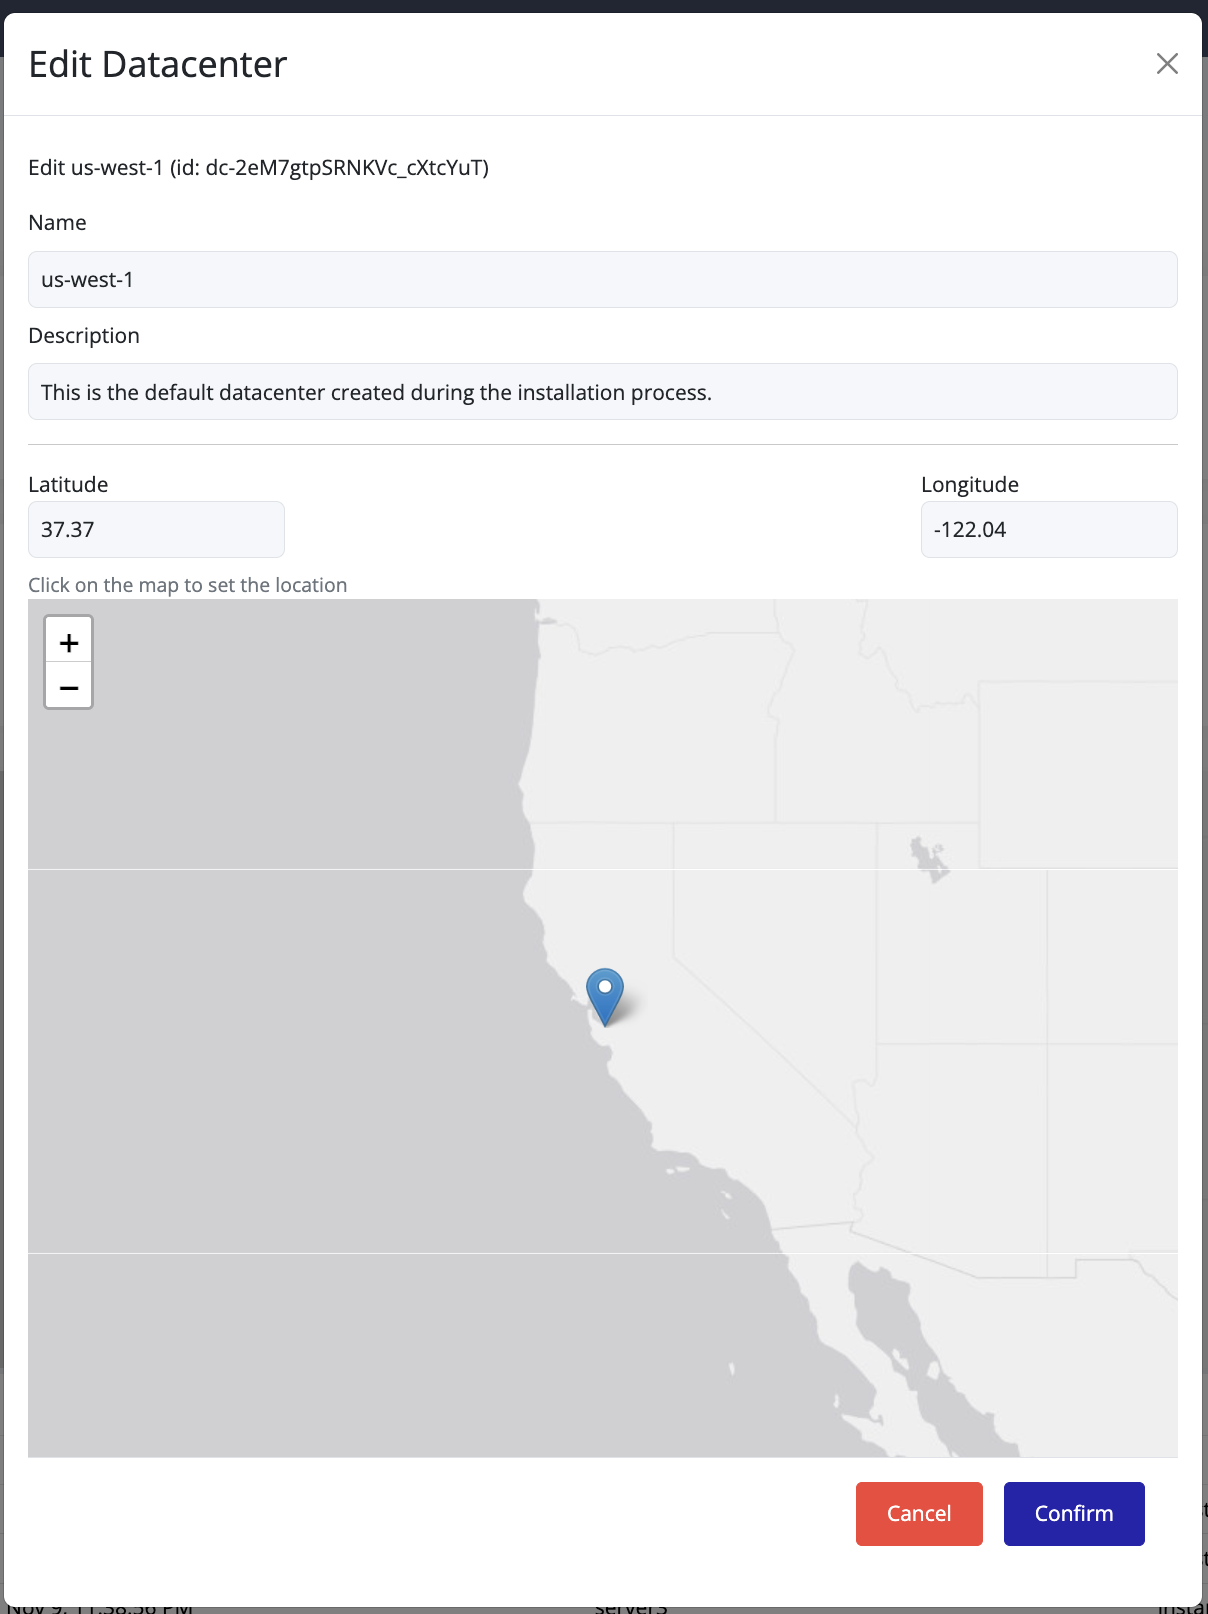
- Click Confirm to save the changes.
Tip
To change the geographical location, click directly on the desired point on the map.
The latitude and longitude values are computed automatically.
Avoid manually entering coordinates—simply select the location on the map and then click Confirm.
Organization Management
Organizations are top-level isolated tenants within Pextra CloudEnvironment®. They encapsulate datacenters, clusters, nodes, and resources, providing administrative boundaries for managing users, permissions, and resource allocation.
Currently, creating a new organization is supported only via the API. This will be addressed in a future release.
Note
Multiple organizations require the
MULTI_TENANCYfeature flag. See the Feature Gating section for details.
The ID prefix for organizations is org-1.
Notes
-
Resources in Pextra CloudEnvironment® are identified by unique IDs. Organization IDs have the prefix
org-, followed by a unique identifier (e.g.,org-CIgLySkaAVeQ5kSLOodD3). ↩
Licensing
Pextra CloudEnvironment® uses a simple licensing model to manage access and feature availability in a multi-organization environment. Each node requires a valid, unexpired license key to operate; these licenses are aggregated at the cluster and organization levels to determine respective licensing status and edition.
Tip
License keys can be purchased from the Pextra Customer Portal. Support subscriptions are also available for purchase.
Compliance Rules
The following rules determine licensing compliance at both the cluster and organization levels.
Cluster
For a cluster to be compliant:
- All nodes must present a valid, unexpired license.
- All nodes must share the same edition. If multiple editions are detected, the cluster automatically falls back to the lowest detected edition until compliance is restored.
Organization
For an organization to be compliant:
- All clusters must be compliant.
- The highest edition among compliant clusters determines the organization edition. Non-compliant clusters do not contribute to the organization-level edition.
View Licensing Status
- Select the organization in the resource tree.
- Locate the Licensing card in the right pane. It shows the current edition and status:
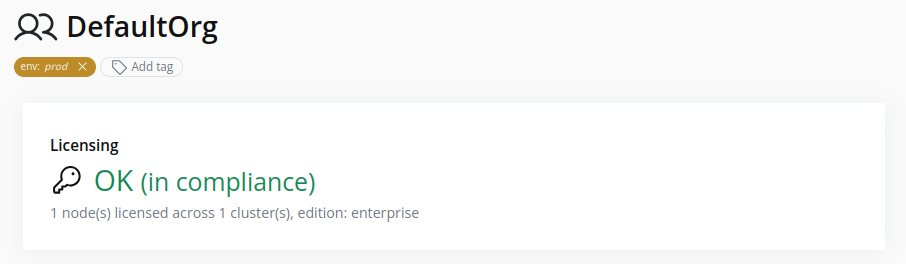
- The organization edition is also displayed in the top-left corner of the web interface:
To check a cluster’s licensing status within the organization, refer to the Check Licensing Status section.
Feature Gating
The following feature flags currently require the Enterprise edition (or higher):
| Feature Flag | Description |
|---|---|
IAM_ABAC_RULES | Enables dynamic ABAC expressions inside IAM policy statements. |
MULTI_TENANCY | Allows creating multiple organizations (tenants) inside a single deployment. |
MULTI_DATACENTER | Enables multiple datacenters per organization. |
MULTI_CLUSTER | Enables multiple clusters inside a single datacenter. |
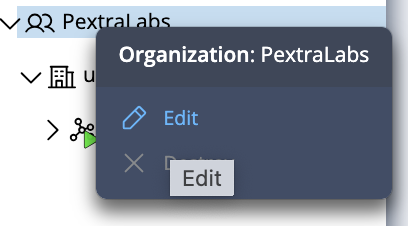
Editing an Organization
You can update an organization’s name or description from the UI:
- In the left navigation panel, right-click on the organization you want to edit.
- Select Edit from the context menu.
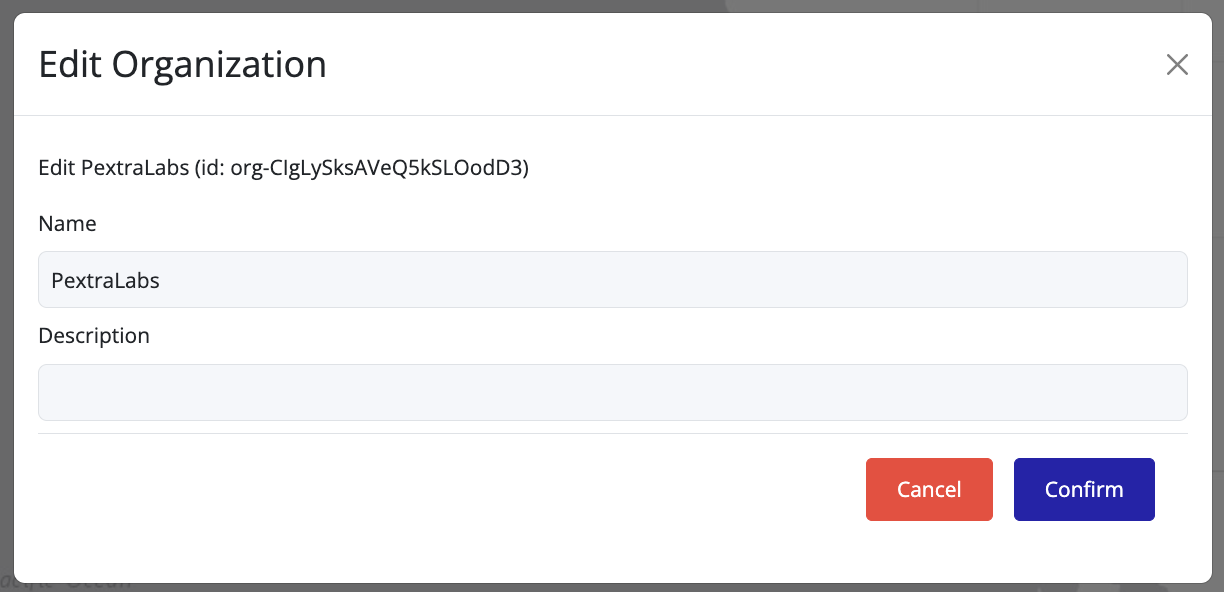
- Update the Name and/or Description fields as needed.
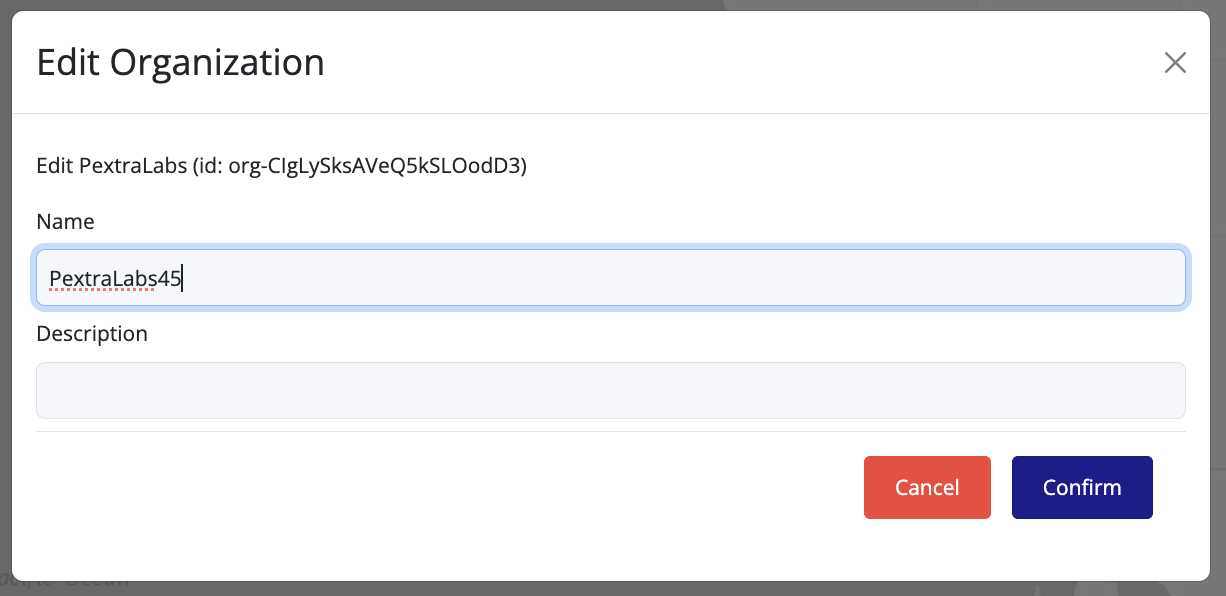
- Click Confirm to save the changes.

Identity and Access Management (IAM)
Identity and Access Management (IAM) controls who can interact with resources inside an organization. IAM is organization-scoped: every action you perform through this view is limited to the organization currently selected in the resource tree.
Pextra CloudEnvironment® uses a dynamic, attribute-based access control (ABAC) model. Permissions are granted to users via roles, which are collections of policies. Policies define fine-grained permissions using statements that allow or deny specific actions on resources and environmental attributes.
Note
The
IAM_ABAC_RULESfeature flag must be enabled to create policies with ABAC rules. See the Feature Gating section for details.
Key Concepts
- Users are created per organization. You can manage single users or perform bulk import/export. Refer to the Users section.
- Policies define the actual permissions. You can manage individual policies or perform bulk import/export of custom policies. Refer to the Policies section.
- Roles are attached policies, and are assigned to users. Refer to the Roles section for creation, assignment, and deletion steps.
Tip
Keep the root user as a break-glass account. Assign it a strong password and store it securely. Create separate admin users with roles that provide the necessary permissions for daily operations.
Roles
Roles are collections of policies that bundle permissions for assignment to users. Assigning a role to a user grants them all the permissions defined in the role’s attached policies. Roles simplify permission management by allowing administrators to group related policies and assign them as a single unit.
The ID prefix for roles is iamrole-1.
Notes
-
Resources in Pextra CloudEnvironment® are identified by unique IDs. Role IDs have the prefix
iamrole-, followed by a unique identifier (e.g.,iamrole-YtR8FqvL29sKjb7WxD3Zn). ↩
Create Role
- Select the organization in the resource tree and view the page on the right. Click on the IAM tab in the right pane. Then, select the Roles sub-tab:
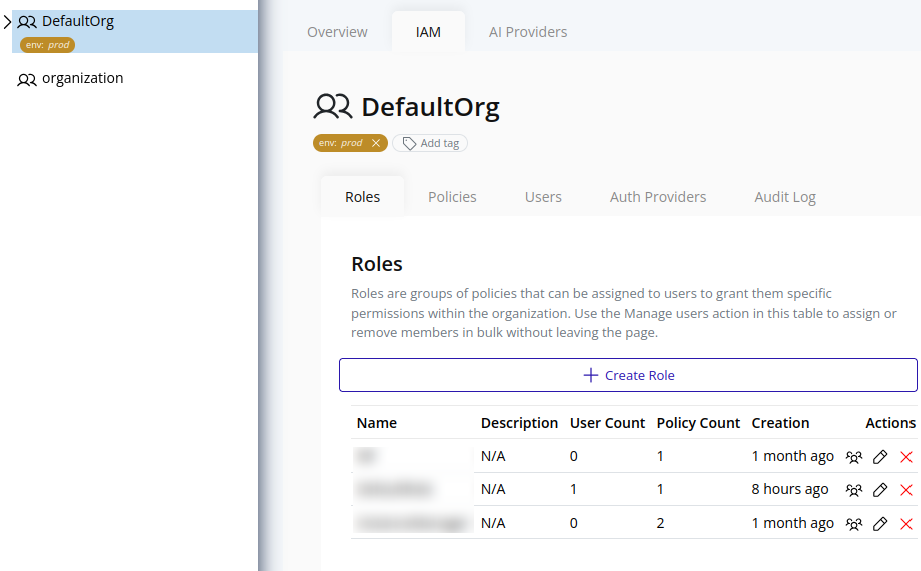
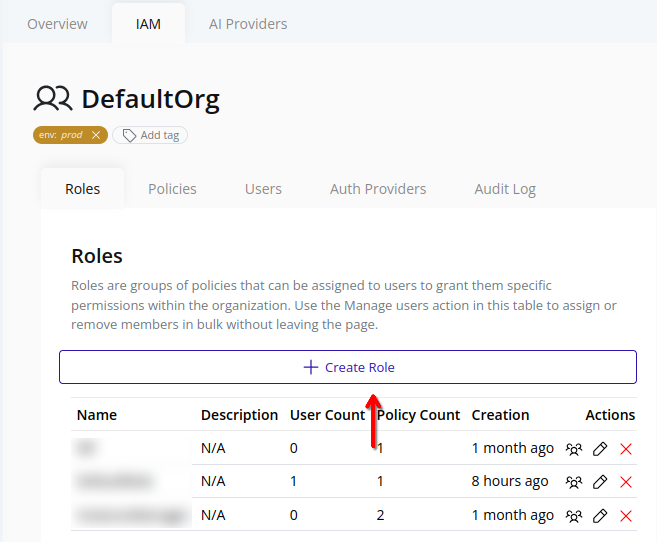
- Click the Create Role button at the top:
- In the Details step, provide basic information:
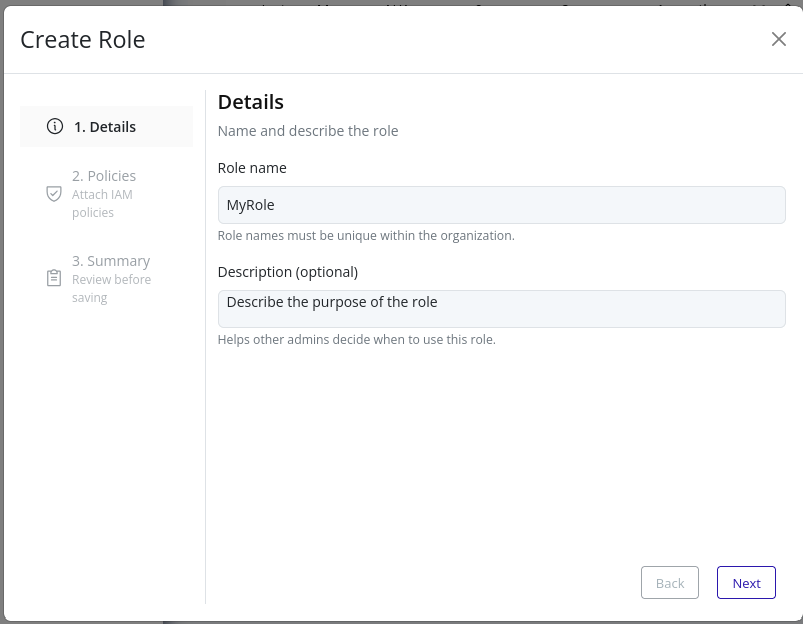
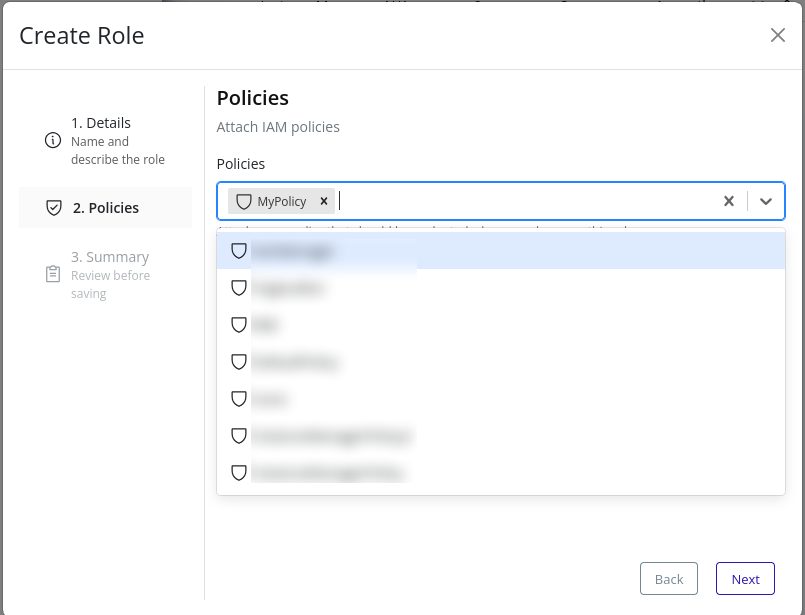
- In the Policies step, select one or more existing policies to attach to the role:
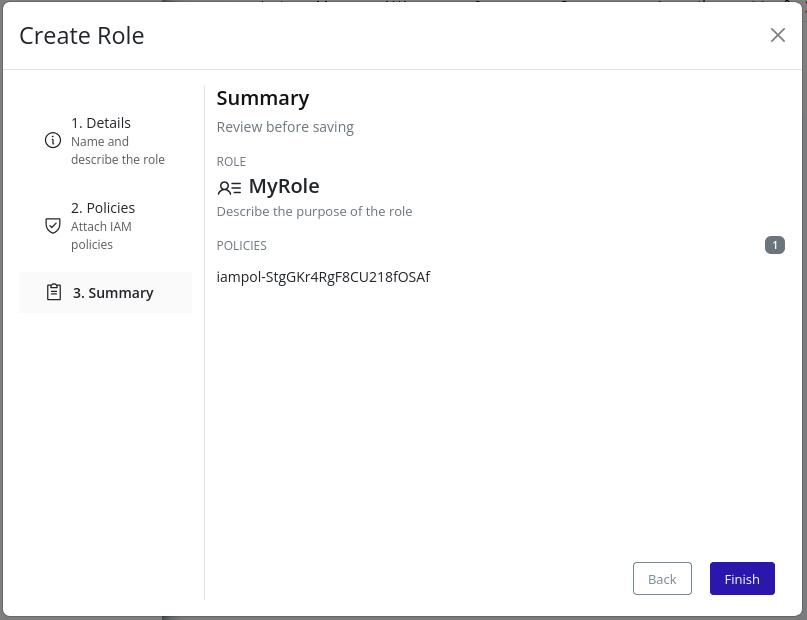
- Review the summary and click Finish to finalize:
Assign Users to a Role
Important
Role assignment triggers an organization policy update. Changes take effect immediately and may impact user access.
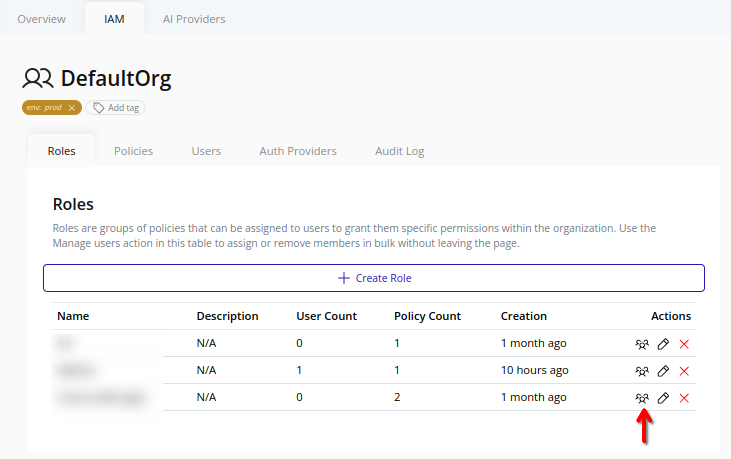
- Select the organization in the resource tree and view the page on the right. Click on the IAM tab in the right pane. Then, select the Roles sub-tab:
- Click the Assign Users button beside the target role:
- In the dialog, all users in the organization are listed.
- Select or deselect users, then click Add selected or Remove selected to modify role assignments. The user’s role membership is reflected in the Assigned column. To revert to the original state, click Reset changes:
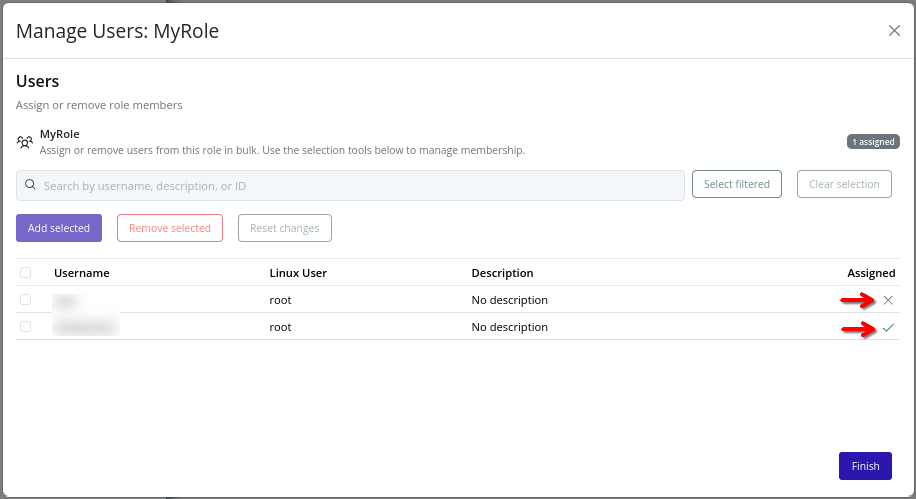
- Search for users (by username, description, or ID) using the search bar at the top of the dialog. Filtered users can be selected by clicking Select filtered:
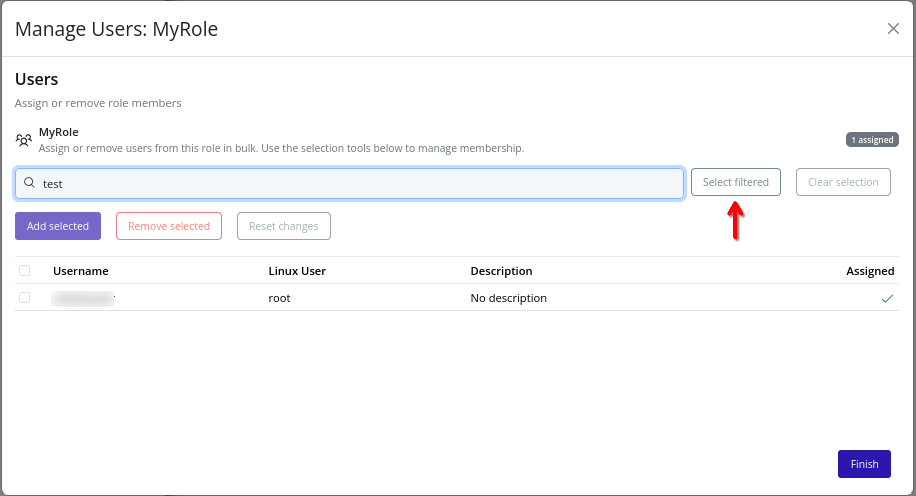
- To save changes, click Finish. The role’s user assignments are updated accordingly.
Note
The root user is excluded from role assignments, as it has unrestricted access.
Edit Role
Important
Role editing triggers an organization policy update. Changes take effect immediately and may impact user access.
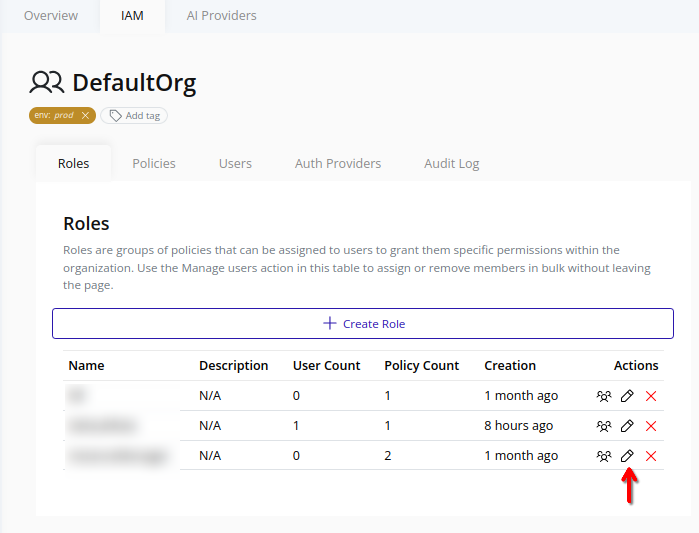
- Select the organization in the resource tree and view the page on the right. Click on the IAM tab in the right pane. Then, select the Roles sub-tab:
- Click the Edit button beside the target role:
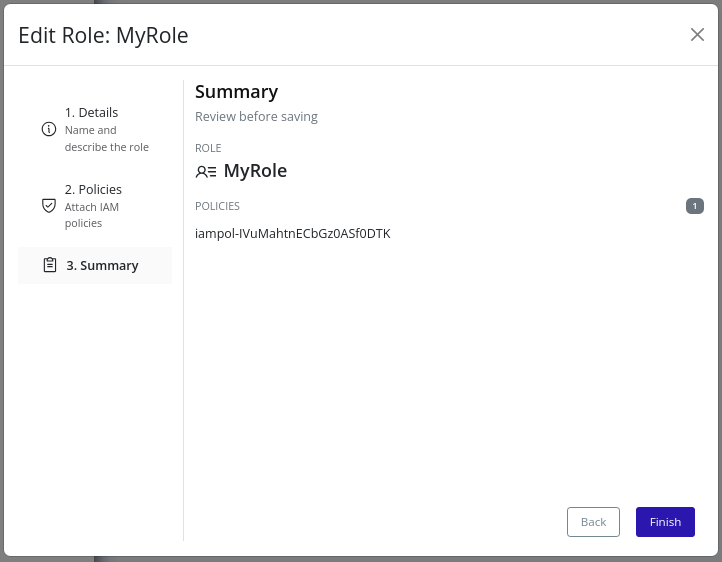
- Modify the fields as described in the Create Role section.
- Review the summary and click Finish to save changes:
Delete Role
Important
Role deletion triggers an organization policy update. Changes take effect immediately and may impact user access.
- Select the organization in the resource tree and view the page on the right. Click on the IAM tab in the right pane. Then, select the Roles sub-tab:
- Click the Delete button beside the target role:
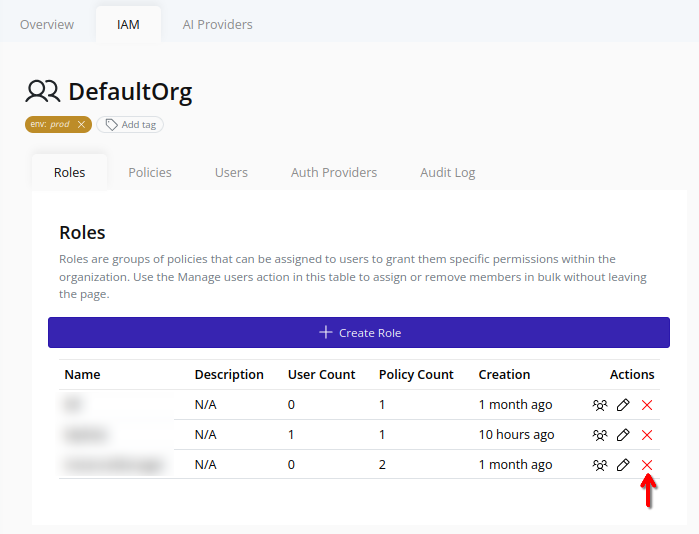
- In the confirmation dialog, type “DESTROY” and click Confirm to confirm the deletion of the role:

Policies
Policies define what actions can be performed within an organization. Each policy contains an ordered list of statements that the IAM engine evaluates during authorization.
The ID prefix for policies is iampol-1.
Notes
-
Resources in Pextra CloudEnvironment® are identified by unique IDs. Policy IDs have the prefix
iampol-, followed by a unique identifier (e.g.,iampol-YtR8FqvL29sKjb7WxD3Zn). ↩
Model
Pextra CloudEnvironment® uses an attribute-based access control (ABAC) model for defining and enforcing permissions. Policies consist of one or more statements that specify which actions are allowed or denied on which resources, optionally refined by rules based on user or resource attributes.
Each statement contains the following fields:
| Field | Description |
|---|---|
| Action | A specific API or UI verb (for example, organization.list) or * for all actions. |
| Effect | Choose allow to grant access or deny to block it. Explicit denies always take precedence over allows. |
| Resource | Resource identifiers (such as org-*, cls-*) or * for all resources. |
| Rules | A string expression that refines the scope of the statement using ABAC conditions. Requires the IAM_ABAC_RULES feature flag. |
Important
The root user bypasses all policy evaluations and is not subject to these rules. Use the root account only for emergency access and critical operations.
Evaluation Order
- Statements are evaluated from top to bottom.
- If any statement with
denymatches, the request is denied immediately—even if an earlierallowmatched. - If no denies match, the first matching
allowgrants access. Requests with no matches are denied by default. - Root users skip evaluation entirely but policy changes are still logged for auditing.
Notes
- 1024 statements maximum per policy, though best practices recommend fewer than 25 for maintainability.
- Policies can be attached to multiple roles to streamline permission management.
- Policy changes apply instantly to all roles and users that reference them.
ABAC Rule Conditions
Note
The
IAM_ABAC_RULESfeature flag must be enabled to create policies with ABAC rules. See the Feature Gating section for details.
When creating policy statements, you can define Attribute-Based Access Control (ABAC) rules to further refine when the statement applies. Define conditions using simple expressions with comparison and logical operators. Check the endpoint API documentation to see which resource attributes are available.
Base Schema
The following attributes are always available for use in ABAC rules:
id: stringenv:day_of_week: number (0 = Sunday, 6 = Saturday)time_of_day: string (hh:mm:ss, UTC, 24-hour format — lexicographic comparisons are valid)
Operators And Constructs
- Comparison:
==,!=,===,!==,<,>,<=,>= - Logical:
&&,||,! - String methods:
startsWith(...),endsWith(...),includes(...) - Regular expressions: use
/pattern/.test(value) - Use parentheses and nested expressions to combine conditions
Examples
- Allow only on weekdays:
env.day_of_week >= 1 && env.day_of_week <= 5
- Allow during business hours (09:00:00–17:00:00), using lexicographic time comparison:
env.time_of_day >= "09:00:00" && env.time_of_day <= "17:00:00"
- Combine checks (during business hours on weekdays):
env.day_of_week >= 1 && env.day_of_week <= 5 && env.time_of_day >= "09:00:00" && env.time_of_day <= "17:00:00"
Create Policy
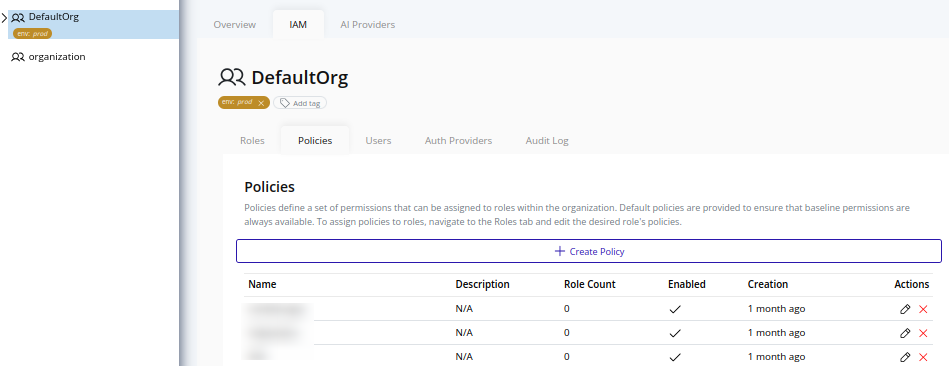
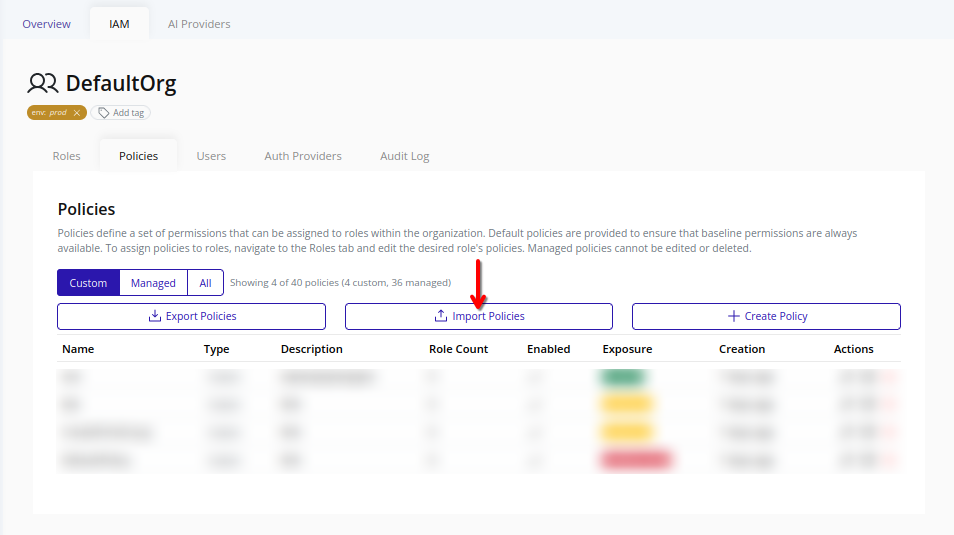
- Select the organization in the resource tree and view the page on the right. Click on the IAM tab in the right pane. Then, select the Policies sub-tab:
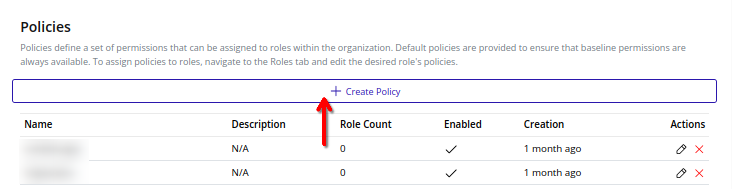
- Click the Create Policy button at the top:
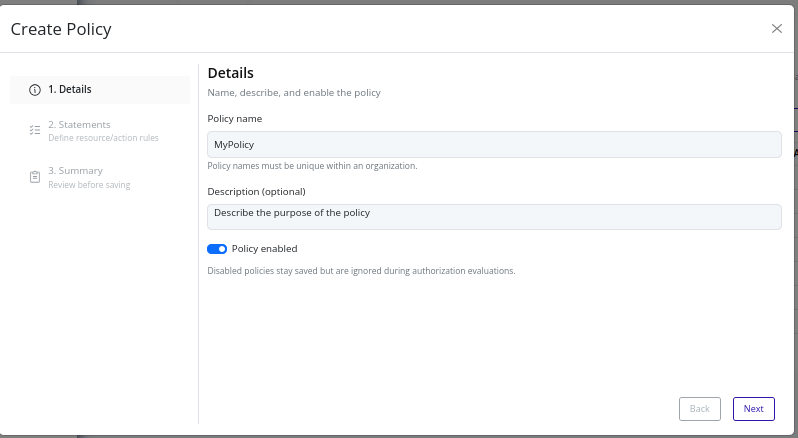
- In the Details step, provide basic information:
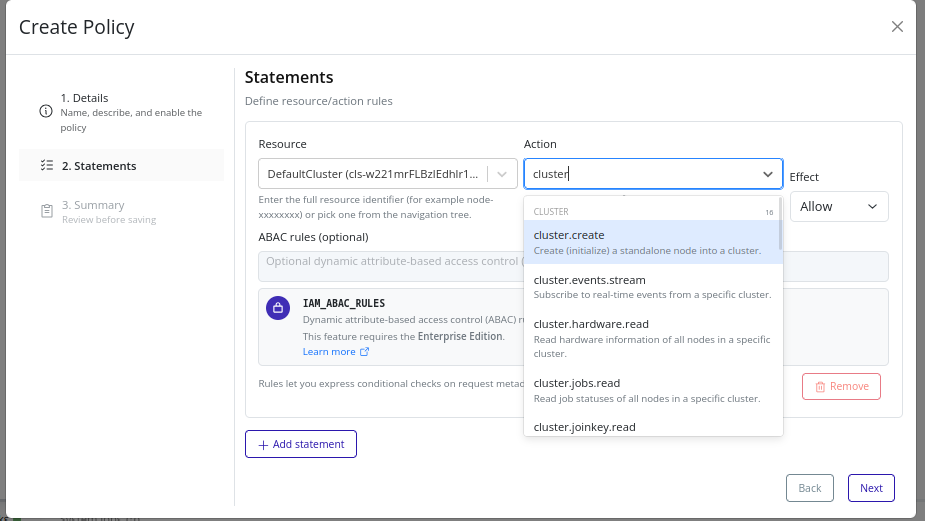
- In the Statements step, define the policy statements. See the Statement Builder section below for details.
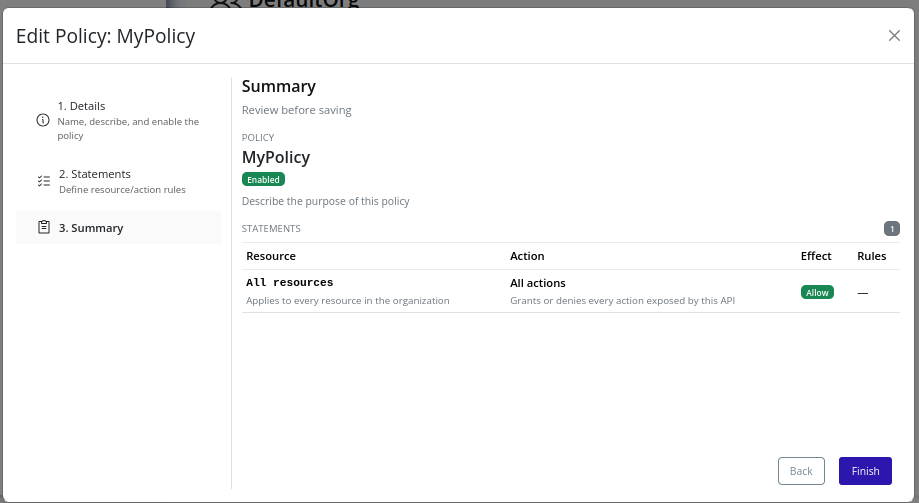
- Review the summary and click Finish to finalize:
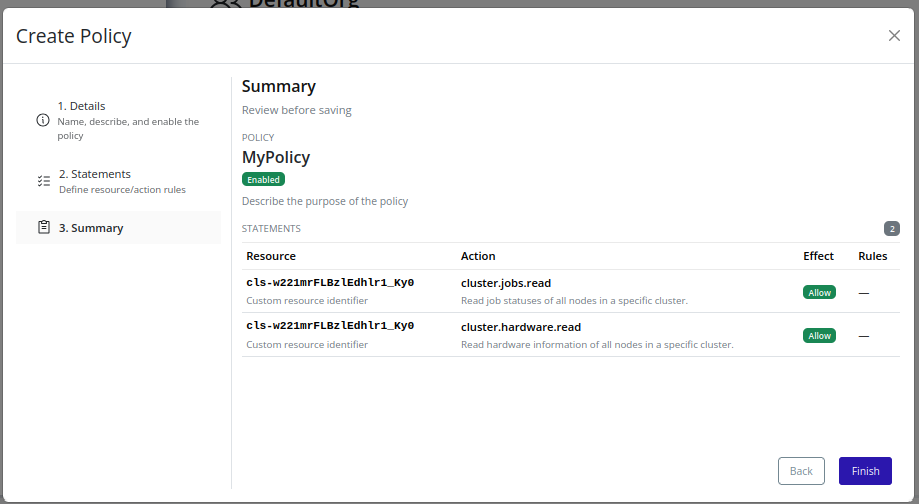
Statement Builder
Use the statement builder to define individual policy statements. Each statement includes the following fields:
- Effect: Choose either
allowordenyto specify whether the statement grants or restricts access.denystatements take precedence overallowstatements. - Actions: Select one or more actions that the statement applies to. Use the dropdown to search and select actions.
- Resources: Specify the resources the statement applies to. You can use wildcards (
*) for broader scopes. - Conditions: (Optional) Add ABAC rules to further refine when the statement applies. See the ABAC Rules section for details.
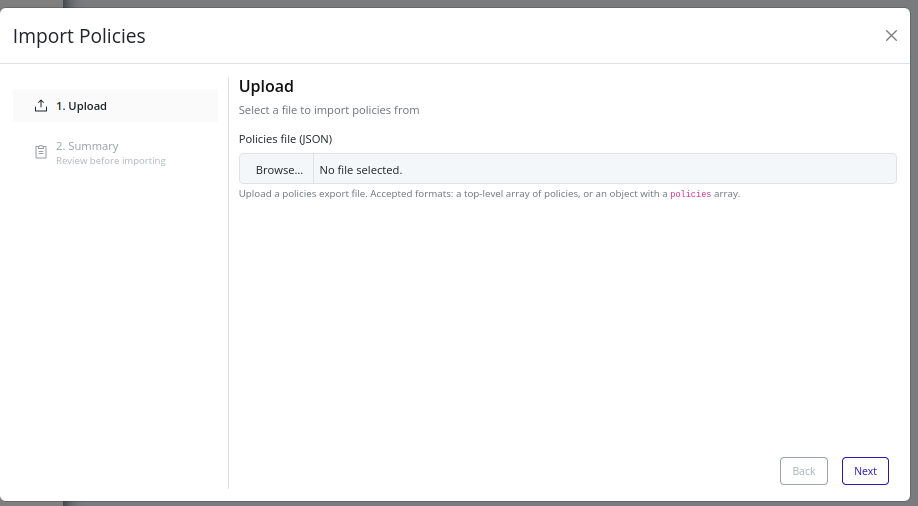
Import Policies
Use policy import to bulk-create custom IAM policies in the selected organization from a JSON file.
Note
Importing policies requires the
organization_iam_policy.importpermission.
Supported File Format
The import file must be in JSON format, structured as either:
- A top-level array of policies.
- An object containing a
policiesarray.
Each policy item should include:
name(string)enabled(boolean)description(optional string)policy(array of statements)
Each policy item should be a policy statement, as defined in the Model section.
Tip
For an example source file, see Export Policies to generate a file with correct shape, then modify as needed for import.
Important
The import will fail if any policy in the file includes ABAC rules and the
IAM_ABAC_RULESfeature flag is not enabled. See the Feature Gating section for details.
Web Interface
-
Select the organization in the resource tree and view the page on the right. Click IAM in the right pane, then select Policies. Click Import Policies.
-
Upload your policies JSON file. Ensure it follows the supported shape and includes required fields.
-
Continue to the Summary step and review all policies that will be created.
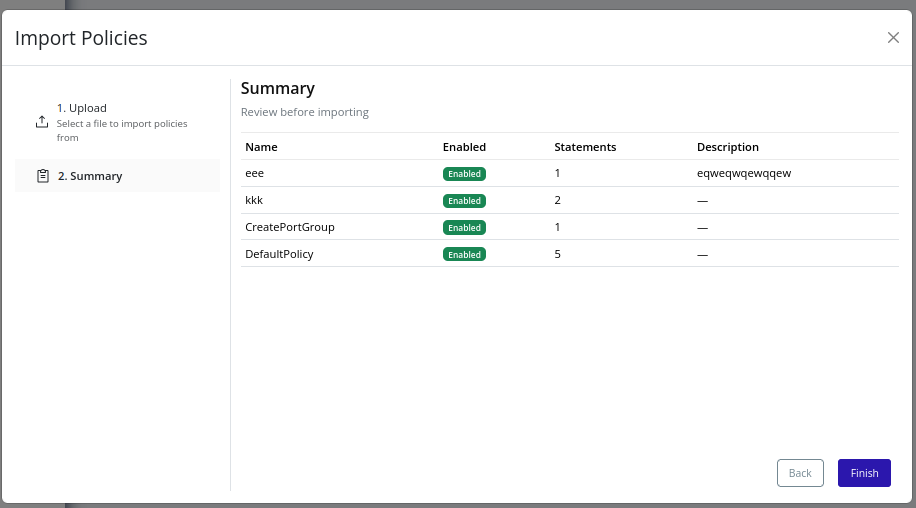
-
Click Finish to begin import. If import succeeds, the modal will close. New policies are available immediately.
-
If import fails, review per-policy errors:
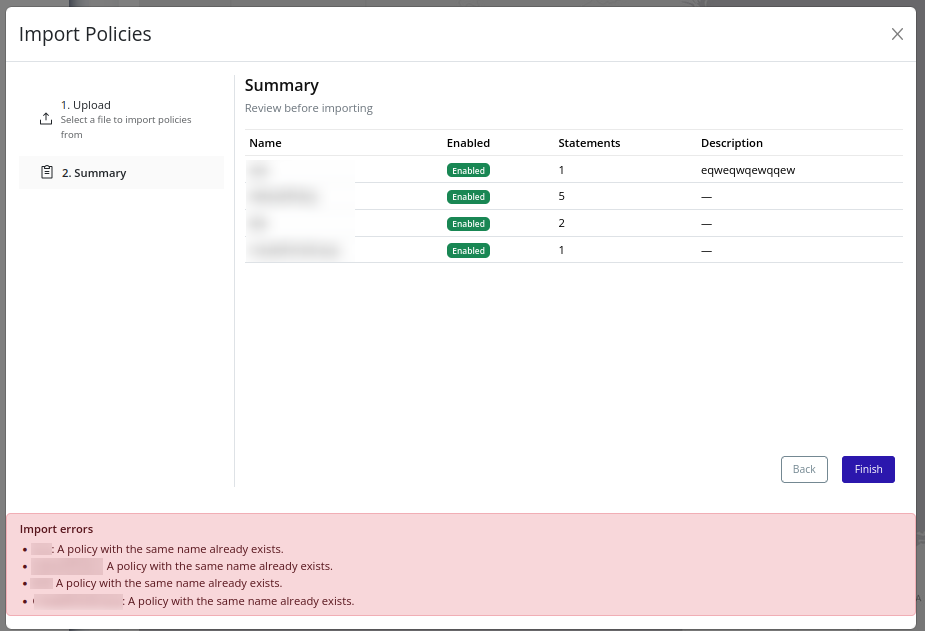
Export Policies
Use policy export to download custom IAM policies from the selected organization as JSON for backup, audit, or migration.
Note
Exporting policies requires the
organization_iam_policy.exportpermission.
Web Interface
-
Select the organization in the resource tree and view the page on the right. Click IAM in the right pane, then select Policies. Click Export Policies.

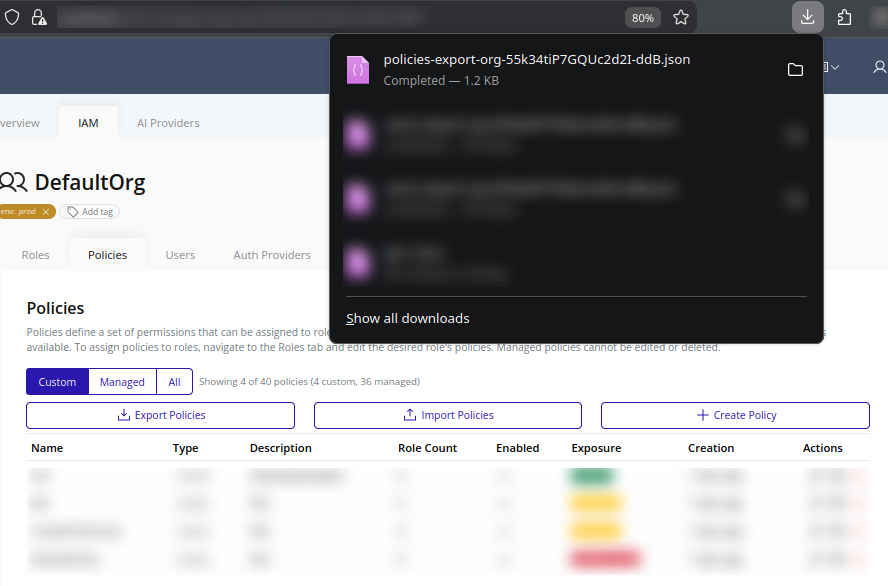
-
The browser should download a JSON file:
-
Store the file securely using your organization’s backup policy. To import these policies into another environment, refer to the Import Policies section.
Edit Policy
Important
Policy editing triggers an organization policy update. Changes take effect immediately and may impact user access.
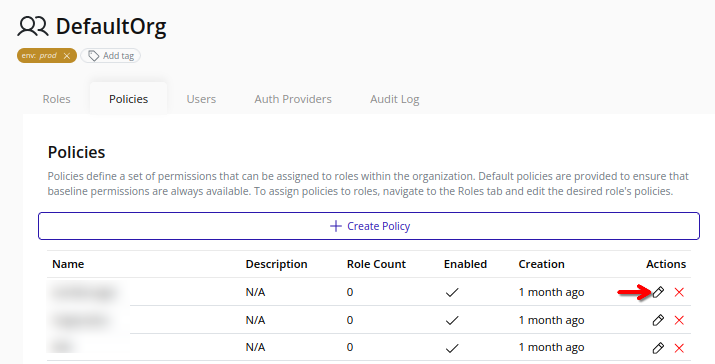
- Select the organization in the resource tree and view the page on the right. Click on the IAM tab in the right pane. Then, select the Policies sub-tab:
- Click the Edit button beside the target policy:
- Modify the fields as described in the Create Policy section.
- Review the summary and click Finish to save changes:
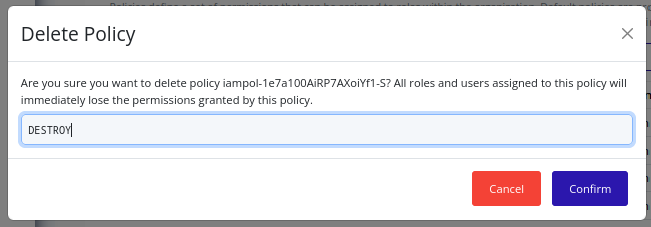
Delete Policy
Important
Policy deletion triggers an organization policy update. Changes take effect immediately and may impact user access.
-
Select the organization in the resource tree and view the page on the right. Click on the IAM tab in the right pane. Then, select the Policies sub-tab:
-
Click the Delete button beside the target policy:
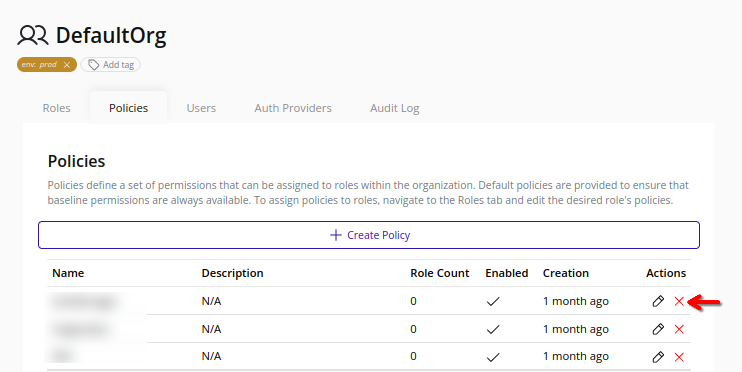
-
In the confirmation dialog, type “DESTROY” and click Confirm to confirm the deletion of the policy:
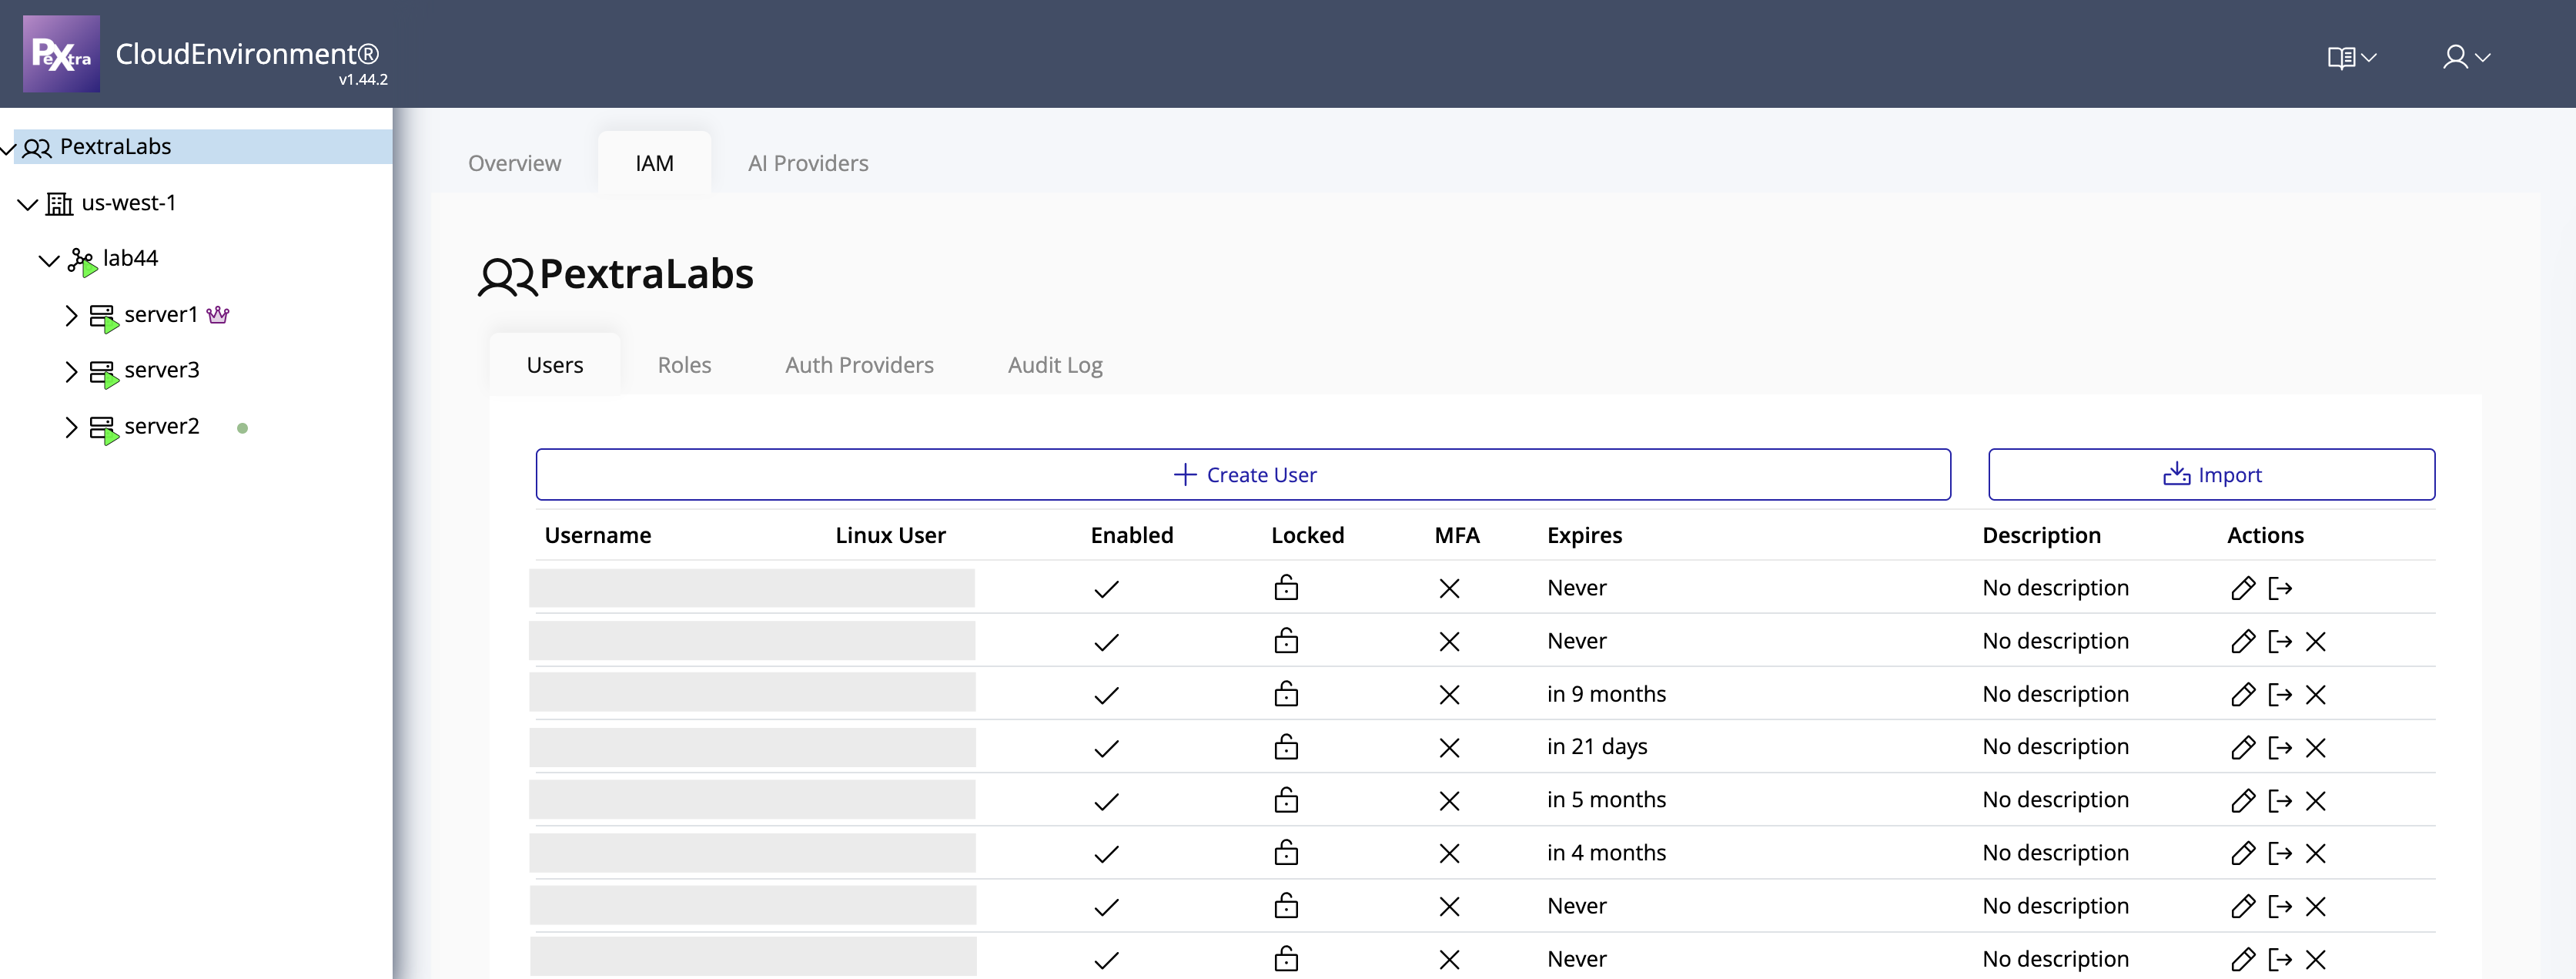
Users
Users are individual accounts created within an organization to allow access to resources based on assigned roles and policies. Each user has a unique username and can be assigned one or more roles that define their permissions.
For users to access the web interface, they must have at least the minimum permissions outlined in Web Interface Permissions.
The ID prefix for users is user-1.
Notes
-
Resources in Pextra CloudEnvironment® are identified by unique IDs. User IDs have the prefix
user-, followed by a unique identifier (e.g.,user-YtR8FqvL29sKjb7WxD3Zn). ↩
View Users
To view users within your organization:
- In the left navigation panel, click your organization name.
- Select IAM from the options.
The Users page displays a table listing all users in the organization.
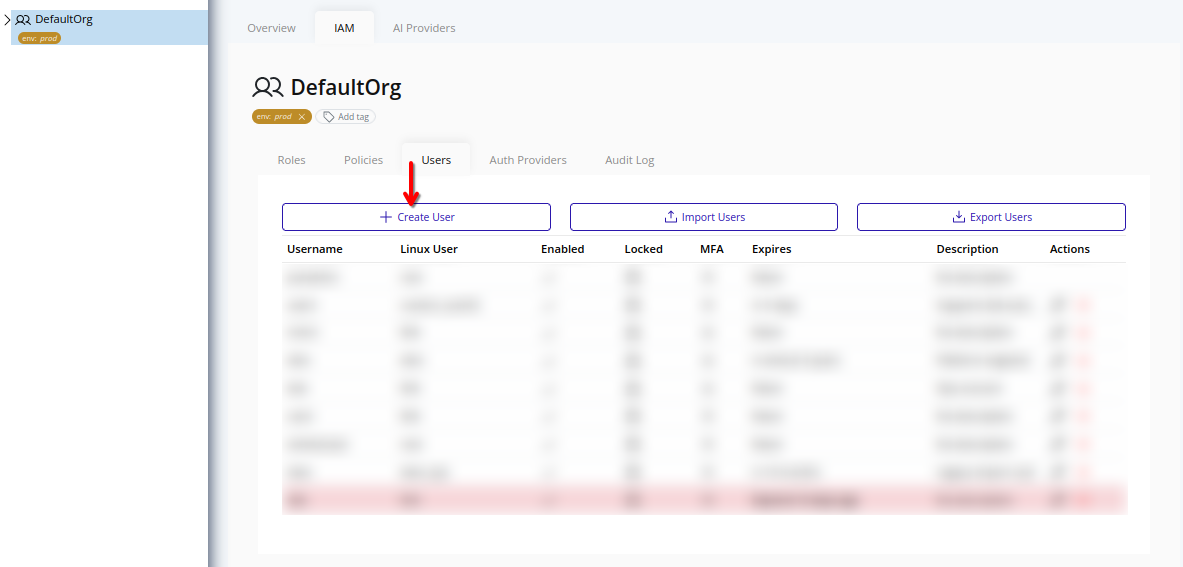
Create a User
Administrators can create new users directly from the IAM interface.
-
Select the organization in the resource tree and view the page on the right. Click IAM in the right pane, then select Users. Click Create User.
-
In the Details step, fill in the following fields:
- Username (required): A unique identifier for the user within the organization.
- Linux user (optional): If specified, this value is used for Linux user mapping when the user accesses node consoles.
- Description (optional): A free-form text field to document the user’s purpose or role.
- Enable (default: enabled): Toggle to create the user in an enabled or disabled state.
- Expiry (optional): An optional expiration date after which the user will be automatically disabled.

-
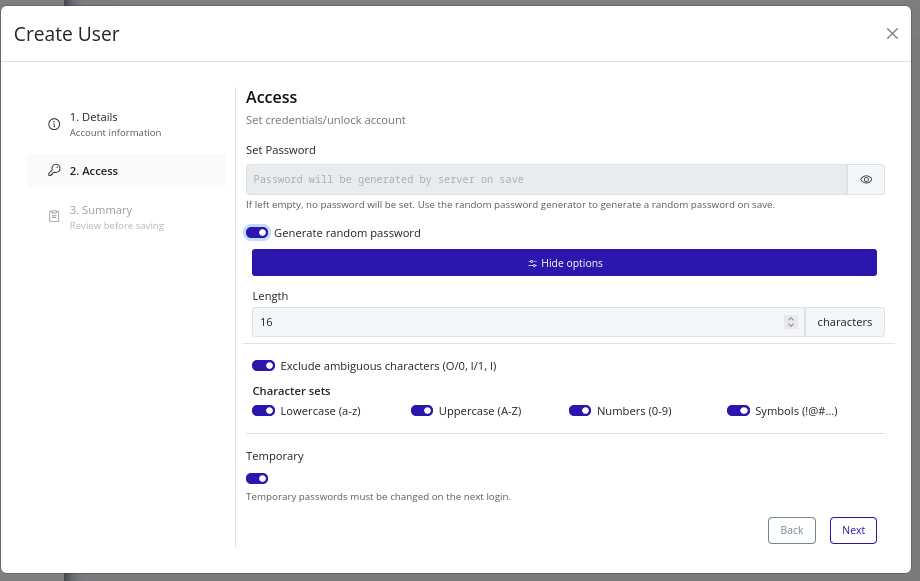
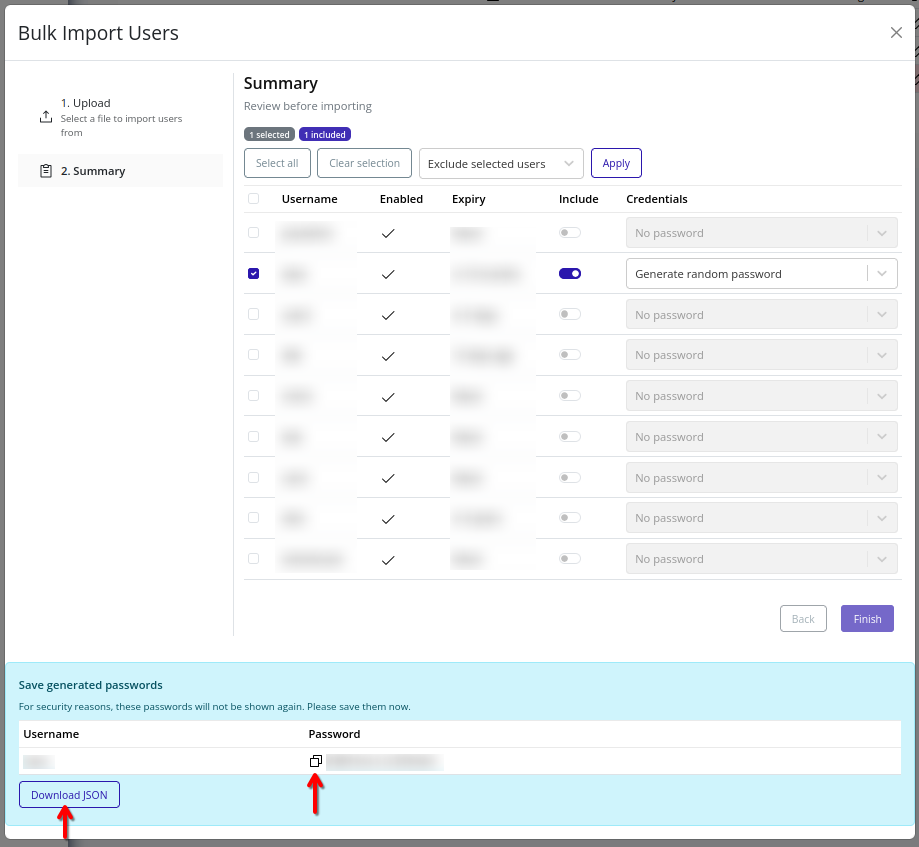
Continue to the Access step to configure credentials. You can choose to set a password manually, have the system generate a random password, or leave the password blank to create the user without setting a password in this flow. The default random password options are a length of 16 characters, including uppercase, lowercase, numbers, and symbols.
-
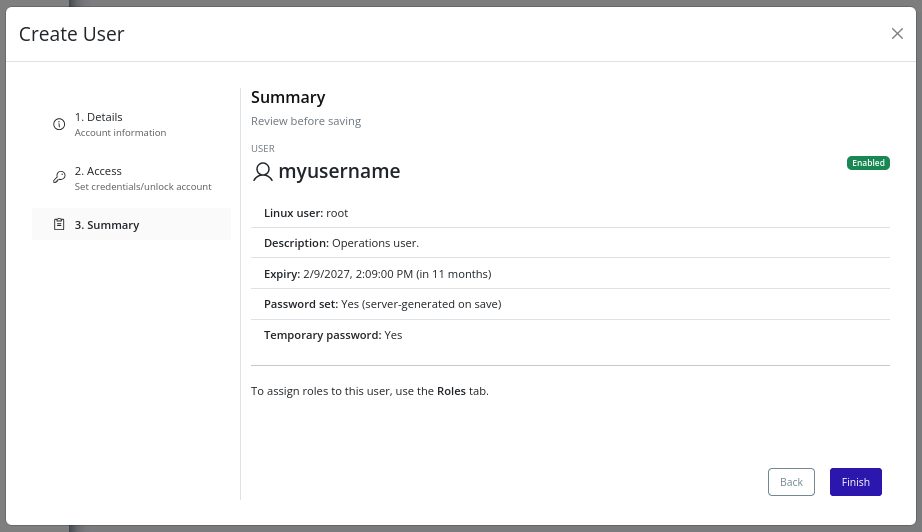
Continue to the Summary step, review all entered values, and click Finish to create the user.
-
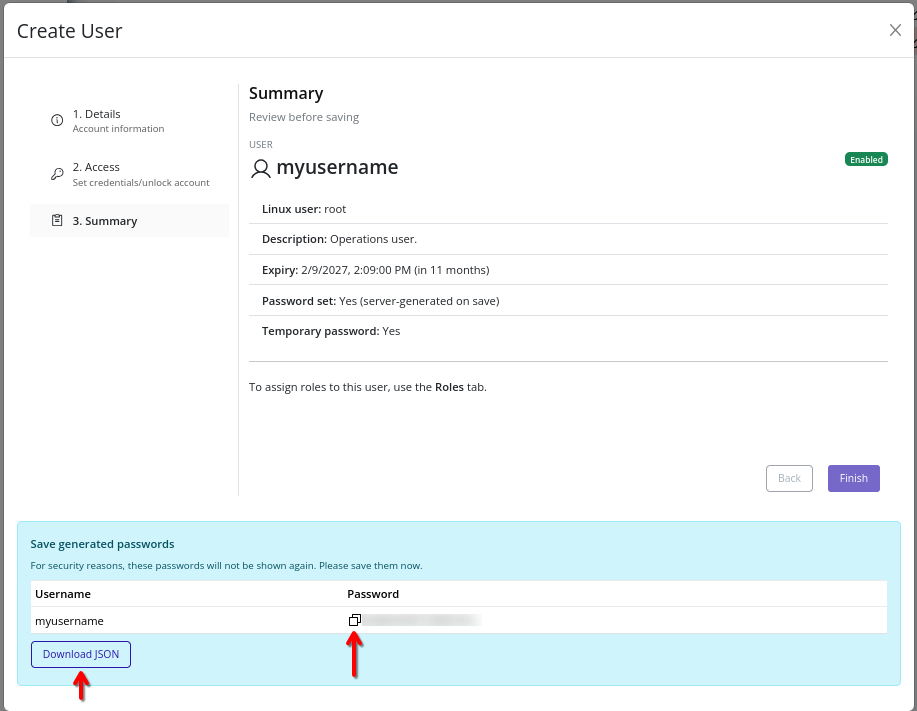
If creation succeeds with generated credentials, copy or download the generated password before closing. For security reasons, these values are not retrievable after closing the modal.
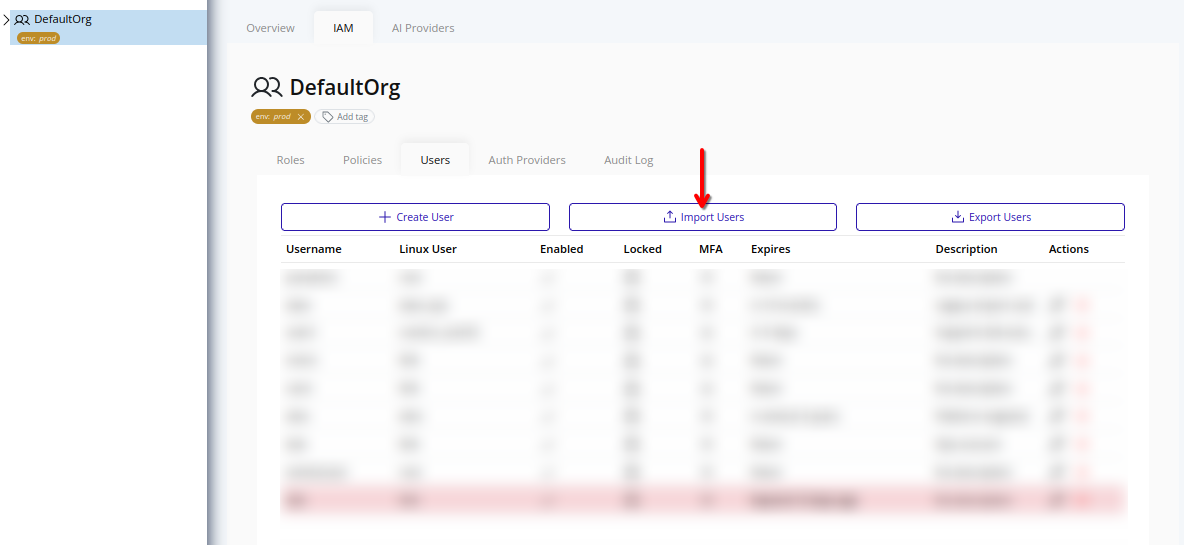
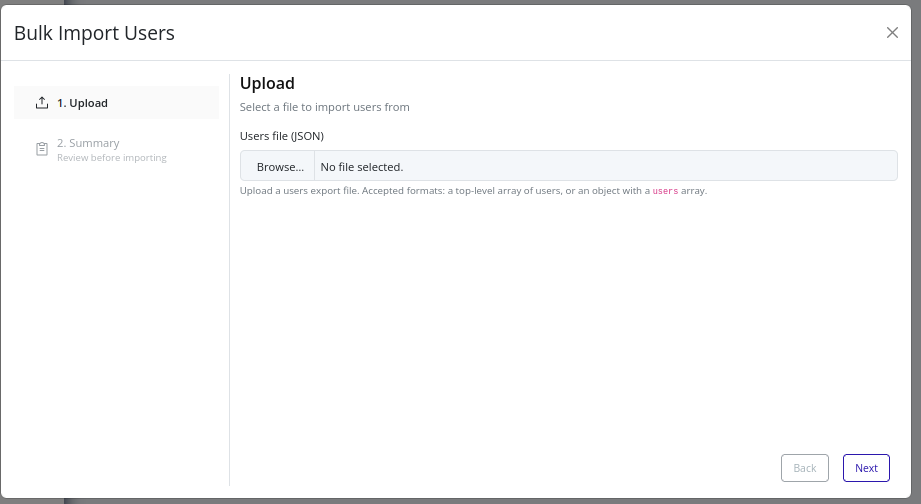
Import Users
Use user import to bulk-create users in the selected organization from a JSON file.
Note
Importing users requires the
user.importpermission.
Supported File Format
The import file must be in JSON format, structured as either:
- A top-level array of users.
- An object containing a
usersarray.
Each user item can include:
username(required)enabled(required)linux_user(optional)description(optional)expiry(optional)password(optional)random_password(optional)temporary(optional)
Tip
For an example source file, see Export Users to generate a file with correct shape, then modify as needed for import. Exported user data does not include credentials.
Credential Modes
For each user, select one of the following credential modes:
- No password: creates the user without setting a password in import.
- Generate random password: server generates a strong password.
- Use imported password: uses the password present in the file.
Web Interface
-
Select the organization in the resource tree and view the page on the right. Click IAM in the right pane, then select Users. Click Import Users.
-
Upload your users JSON file. Ensure it follows the supported shape and includes required fields.
-
Continue to Summary. You can exclude specific users from import, select credential modes per user, and perform bulk actions on selected rows.
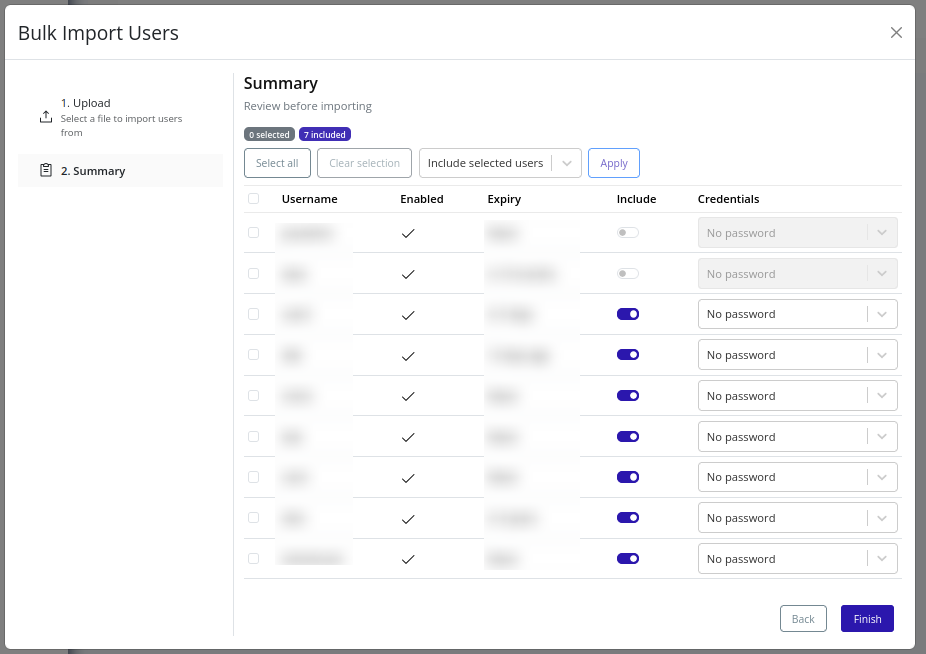
-
Click Finish to begin import.
-
If import succeeds with generated credentials, copy or download generated passwords before closing. For security reasons, these values are not retrievable after closing the modal.
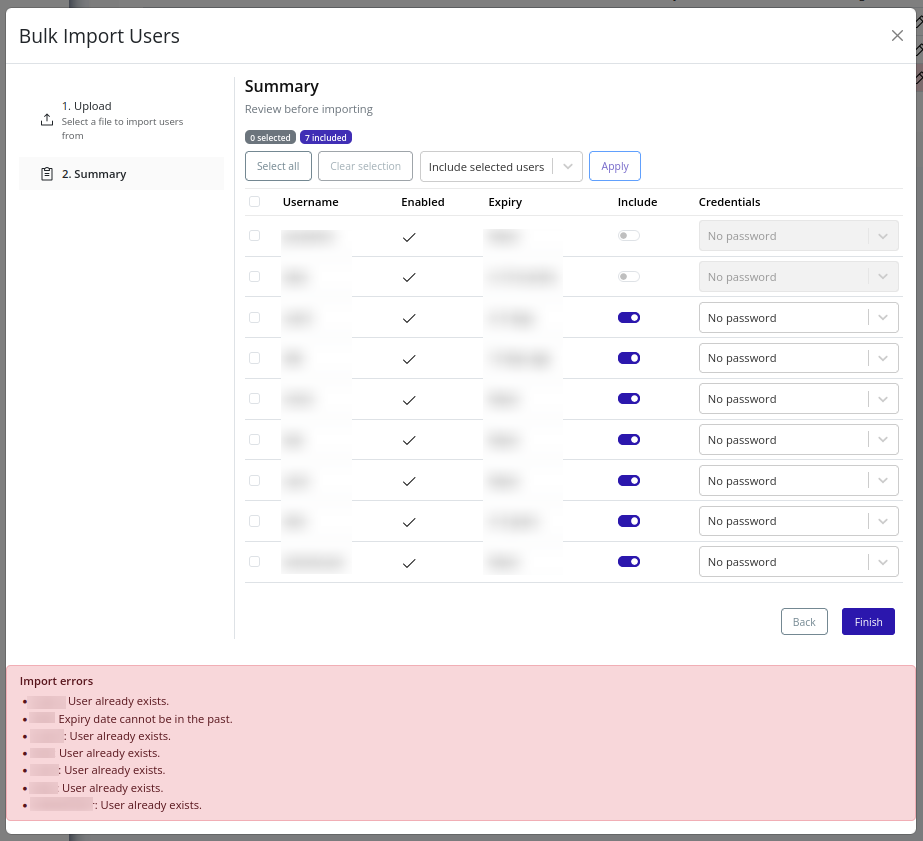
-
If import fails, review per-user errors:
Export Users
Use user export to download organization users as JSON for migration, review, or backup workflows.
Note
Exporting users requires the
user.exportpermission.
Important
Exported user data does not include credentials (passwords, password hashes, MFA secrets, or session data).
Web Interface
-
Select the organization in the resource tree and view the page on the right. Click IAM in the right pane, then select Users. Click Export Users.
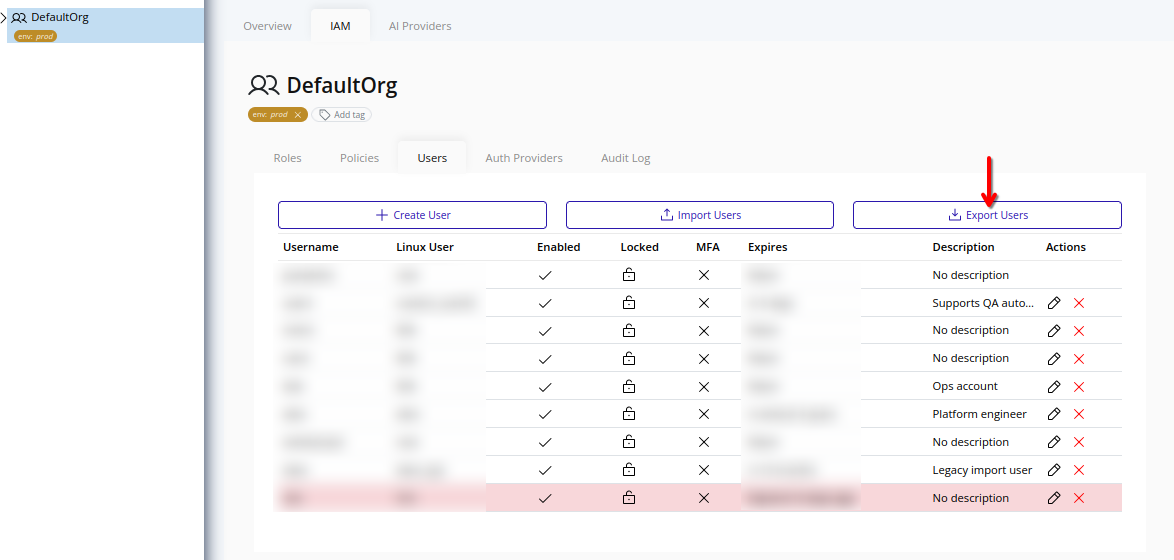
-
The browser will download a JSON file named in this format:
users-export-<organization-id>.json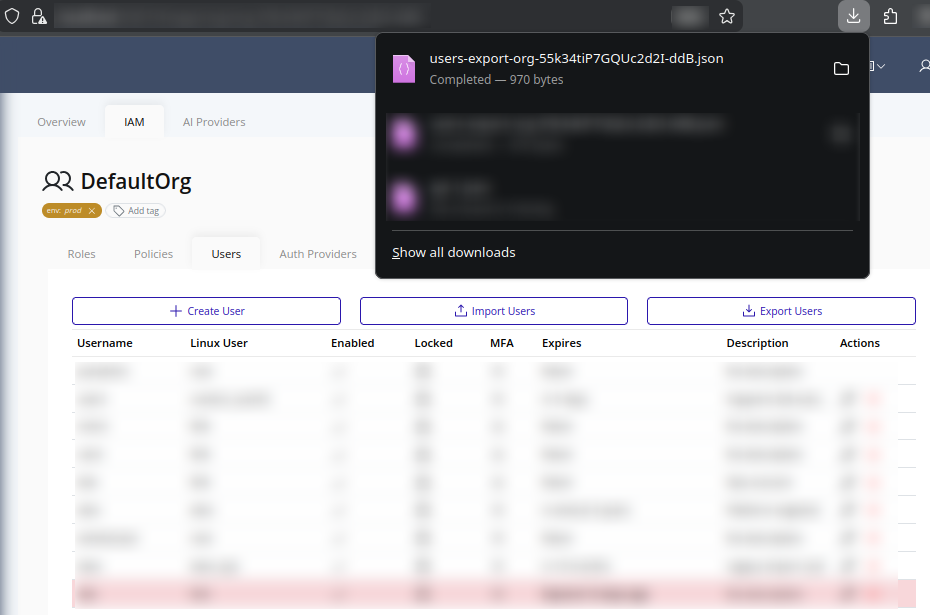
-
Store the file securely according to your organization’s backup and data handling policies. To import users into another environment, refer to the Import Users section.
Export Content
Each exported user can include:
usernamelinux_userenableddescriptionexpiry
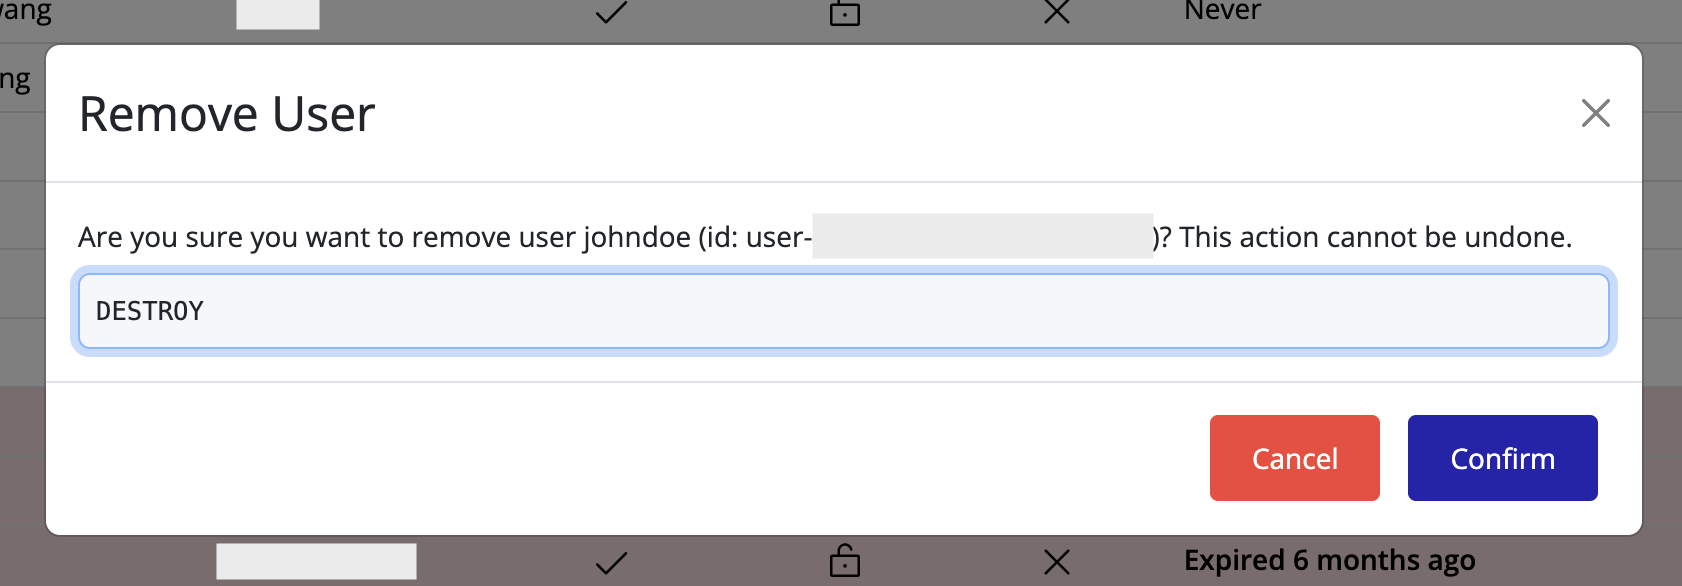
Delete a User
To remove a user from the IAM interface:
- Locate the user in the Users list.
- Click the delete icon on the user’s row.
- A confirmation dialog will appear. Type in “DESTROY” and click Confirm to confirm the deletion of the user.
Auditing and Compliance
To monitor user activities and ensure compliance, Pextra CloudEnvironment® provides an audit trail feature that logs all actions taken by users within an organization. User lockout tracking is also available to help maintain security and compliance standards.
More advanced auditing features are planned for future releases.

Audit Trail
To view audit logs:
- From the left navigation panel, click your Organization Name.
- On the right, click Audit Log.
- The Audit Log section displays actions performed by users, providing a full audit trail.
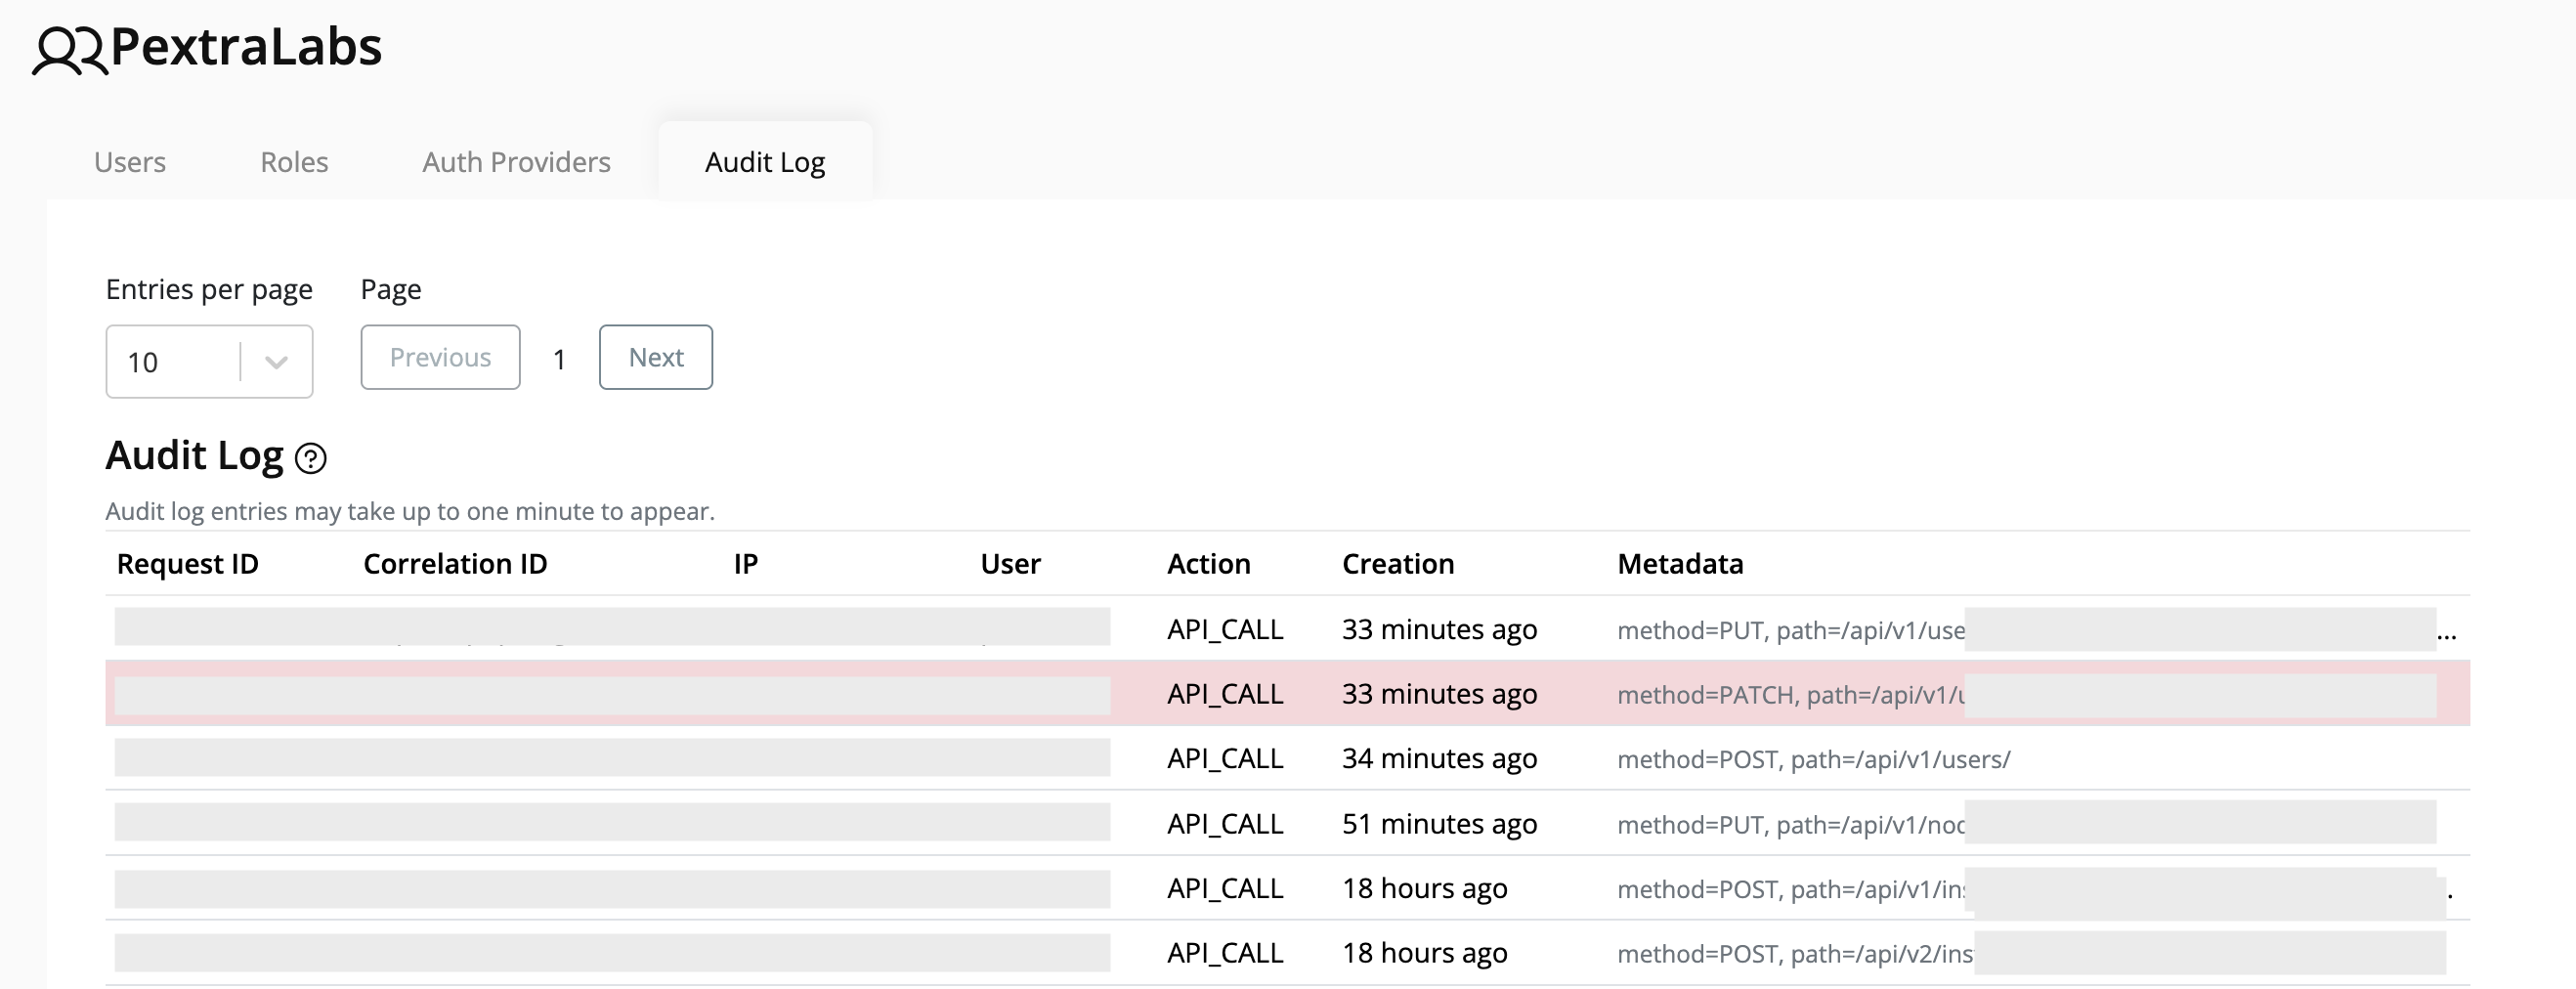
Note
Audit log entries may take up to one minute to appear after an action is performed.
User Lockouts
After multiple failed login attempts, user accounts may be locked out to enhance security. You can monitor and review these lockouts through the user lockout log.
To view user lockouts:
- From the left navigation panel, click your Organization Name.
- On the right, click Audit.
- Scroll down to the Users Lockouts section to see details of any locked-out users.

Best Practices
Follow these guidelines to keep Identity and Access Management (IAM) secure, auditable, and maintainable within each organization.
Organization IAM Lifecycle
View sourceCore Principles
- Least Privilege: Start with view-only policies (
organization.list,organization.read) and add permissions gradually. Avoid assigning wildcard actions unless you have a dedicated break-glass role. - Separation of Duties: Keep roles focused. Create discrete roles for cluster operations, billing, and compliance tasks instead of bundling them together.
- Consistent Naming: Adopt a naming scheme such as
Team-Function(e.g.,SRE-ClusterOps). Use the role description to document escalation paths or ticket references.
Policy Hygiene
- Limit Statement Count: Keep policies under 25 statements when possible. Split large policies into topical units.
- Prefer Explicit Actions: Avoid
*unless the action set is genuinely broad. Explicit lists make audits faster. - Test Before Production: Validate new policies before attaching them to roles. Use a staging organization if available.
- Version Through Export: Before major edits, create a baseline with Export Policies.
Role Management
- Rotation: Review role memberships quarterly. Remove users who changed teams or no longer need access.
- Temporary Access: For short-term tasks, create time-bound roles or apply expiration dates to the assigned users.
User Lifecycle
- Strong Authentication: Use strong passwords and consider MFA.
- Monitor Activity: Feed Audit Trail logs into your SIEM for anomaly detection.
- Offboarding: Immediately disable or delete users who leave the organization. Follow your internal data retention policies.
- Disable vs. Delete: Disable users when access is temporarily paused; delete only when you are sure data retention requirements are met.
Incident Response
- Use the root account only to unblock incidents.
- Document every root login in your incident ticket.
- After remediation, rotate any affected credentials and export updated policies for review.
Change Management Checklist
- Create or update a policy in staging first.
- Capture a policy baseline with Export Policies prior to editing roles/policies.
- Communicate the change to impacted teams (email, chat, ticket comment).
- Apply the change in production during a maintenance window if it affects many users.
- Monitor audit logs for at least one hour after the change.
AI Providers
AI providers are organization-wide connections to cloud or self-hosted AI services. These providers power various AI features, enabling users to use natural language to interact with the Pextra CloudEnvironment® web interface.
At least one AI provider must be configured and enabled for AI features to function. If no AI providers are configured, AI features will not be available in the web interface. For a list of supported AI providers, see the Supported AI Providers section.
The ID prefix for AI providers is orgai-1.
Notes
-
Resources in Pextra CloudEnvironment® are identified by unique IDs. AI providers will have the prefix
orgai-, followed by a unique identifier (e.g.,orgai-qthm_iLrflJ_DtSS1l4Gx). ↩
Supported AI Providers
The following AI providers are supported in Pextra CloudEnvironment®:
| Name | ID | Cloud-Hosted |
|---|---|---|
| OpenAI | openai | ✅ |
| Anthropic | anthropic | ✅ |
google | ✅ | |
| xAI | xai | ✅ |
| Mistral | mistral | ✅ |
| DeepInfra | deepinfra | ✅ |
| DeepSeek | deepseek | ✅ |
| Cerebras | cerebras | ✅ |
| Groq | groq | ✅ |
| Perplexity | perplexity | ✅ |
| Cohere | cohere | ✅ |
| Ollama | ollama | ❌ (self-hosted) |
| LM Studio | lmstudio | ❌ (self-hosted) |
OpenAI-Compatible Providers
For AI providers that are OpenAI-compatible but are not explicitly listed above, use the openai provider type and configure a custom base URL. For more information, refer to the Add AI Provider section.
List AI Providers
List AI providers to ensure that Pextra CloudEnvironment® AI features are properly configured and available for use.
Web Interface
- Select the organization in the resource tree and view the page on the right. Click on the AI Providers tab in the right pane. The AI providers will be listed:
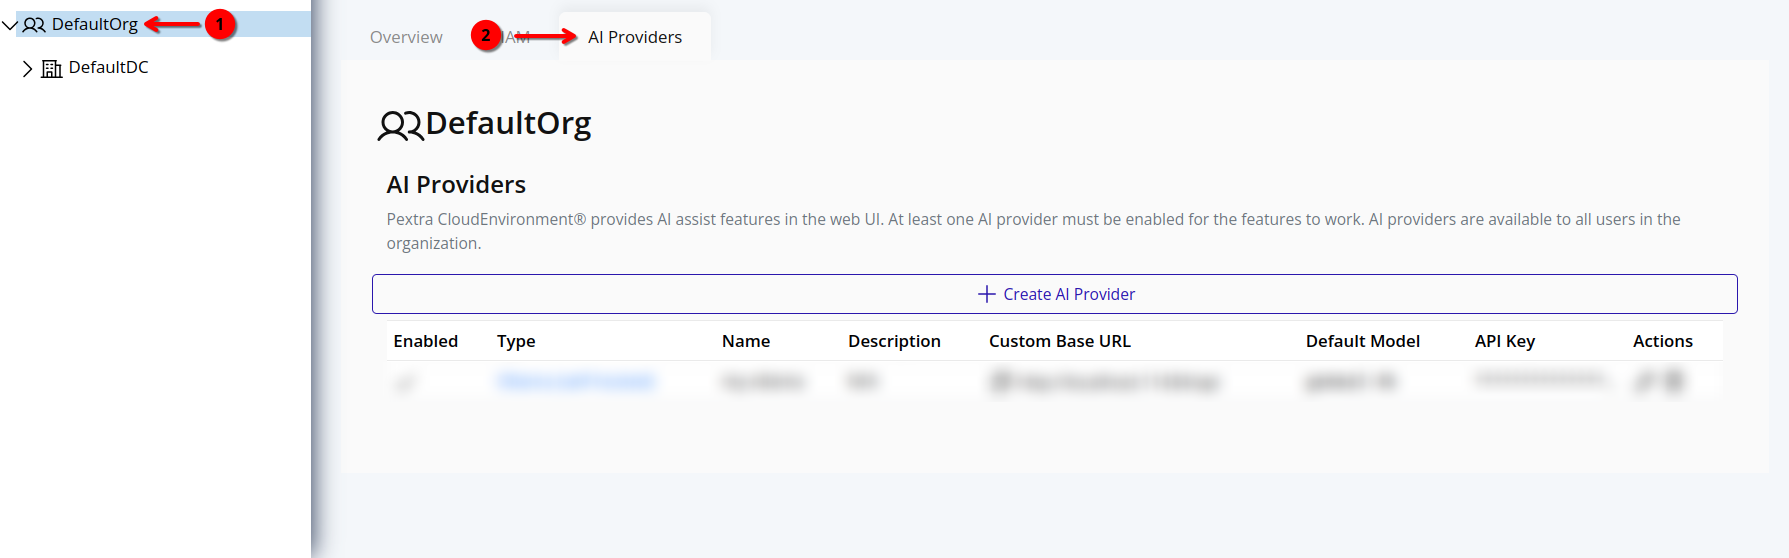
Note
For security reasons, the API keys for AI providers are not displayed in the web interface. API keys cannot be retrieved once set. Store your API keys securely.
To edit properties of an AI provider, refer to the Edit AI Provider section.
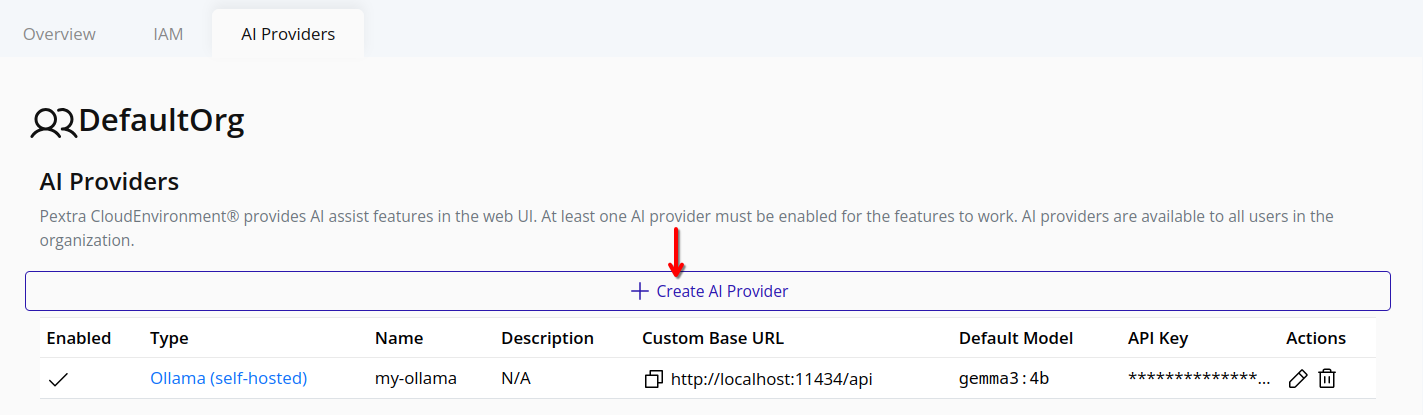
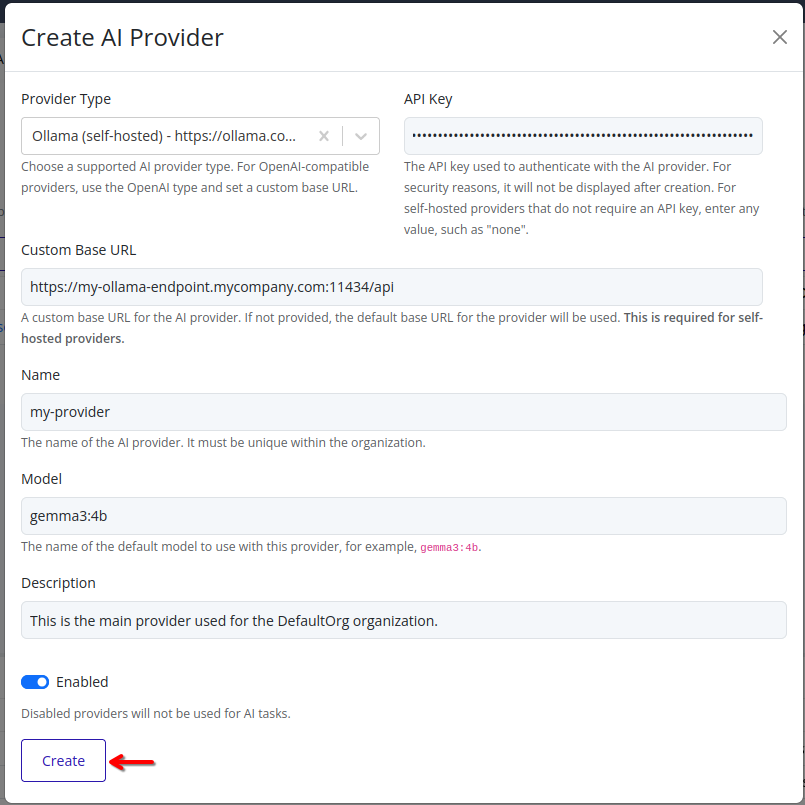
Add AI Provider
Add an AI provider to your organization to enable AI features in the Pextra CloudEnvironment® web interface. At least one AI provider must be configured and enabled for AI features to function. If no AI providers are configured, the AI features will not be available in the web interface.
Note
For security reasons, the API keys for AI providers are not displayed in the web interface. API keys cannot be retrieved once set. Store your API keys securely.
Web Interface
-
Select the organization in the resource tree and view the page on the right. Click on the AI Providers tab in the right pane.
-
Click the Add AI Provider button.
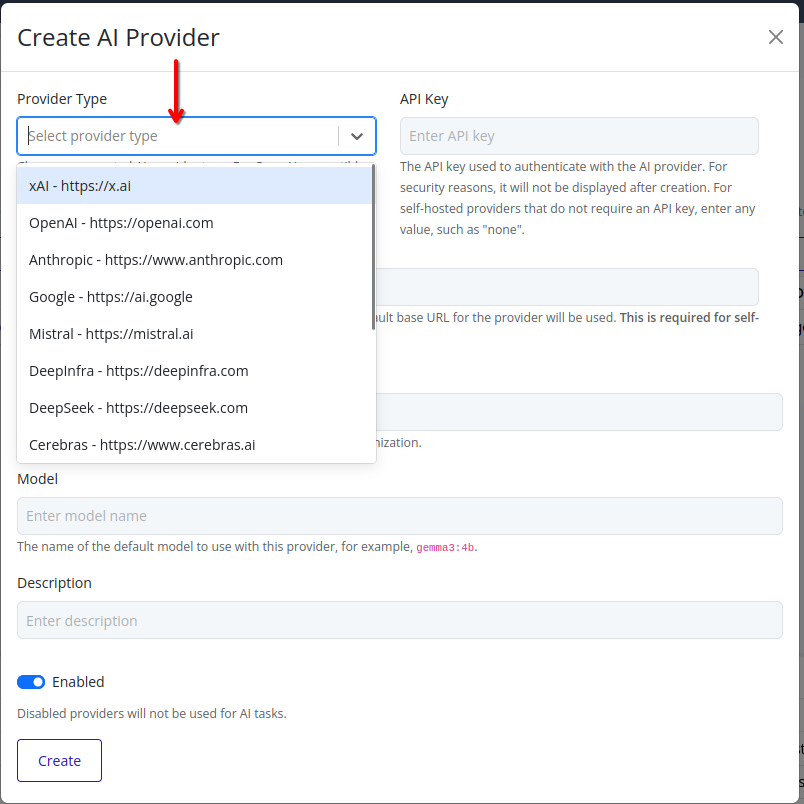
-
Choose the AI provider type from the dropdown list. A list of supported AI providers is available in the Supported AI Providers section.
-
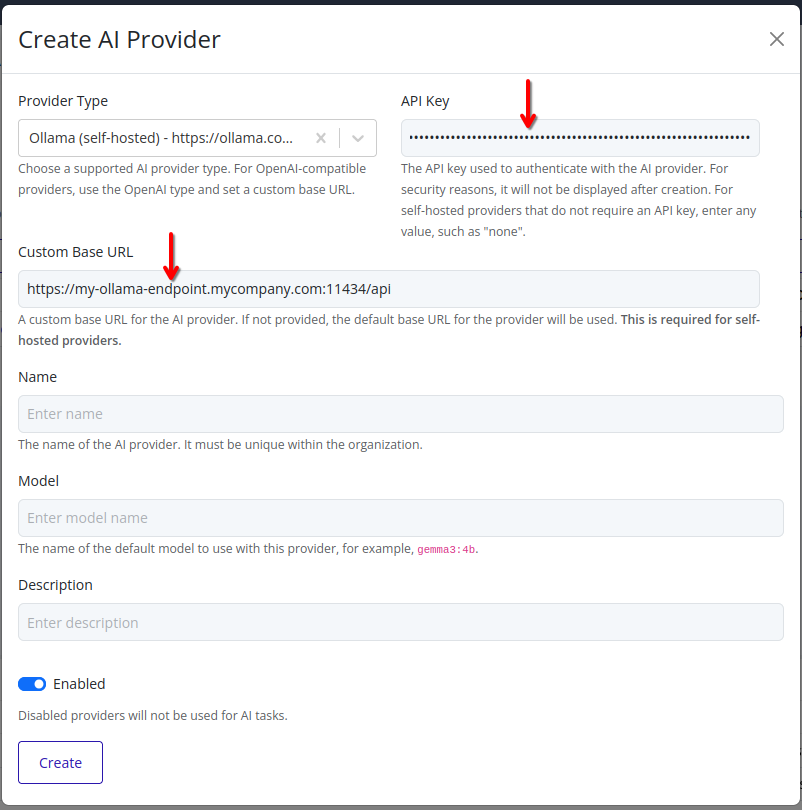
Enter the API key and custom base URL (if applicable) for the selected AI provider.
Important
When using a self-hosted AI provider (such as
ollamaorlmstudio), a custom base URL must be specified. For cloud-hosted providers, the base URL is pre-configured and does not need to be changed.
-
Enter a name for the AI provider, and an optional description. Disable the provider if you do not want it to be available for use immediately.
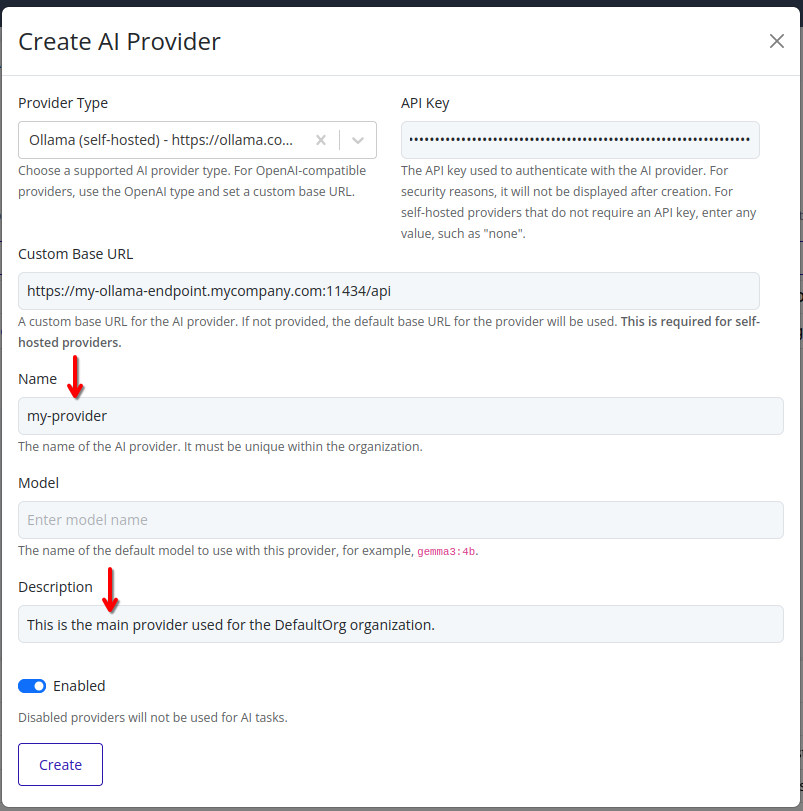
-
Enter the name of the model to use with this provider. This model will be used for all AI features unless overridden in specific configurations.
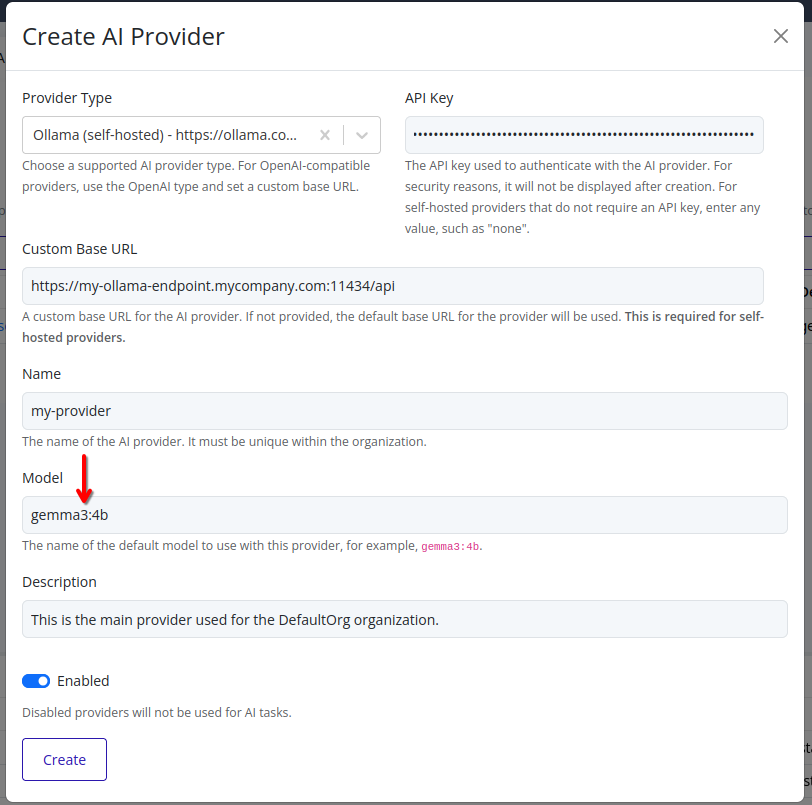
-
Click Create to add the AI provider to your organization. The new AI provider will be listed on the AI Providers page.
Adding OpenAI-Compatible Providers
For AI providers that are OpenAI-compatible but are not explicitly listed above, use the openai provider type and configure a custom base URL. This allows you to connect to any service that implements the OpenAI API specification.
When configuring an OpenAI-compatible provider:
- Select
openaias the provider type - Set the custom base URL to point to your provider’s API endpoint
- Use the appropriate API key for your chosen provider
This approach works with many third-party AI services and self-hosted solutions that implement OpenAI-compatible APIs.
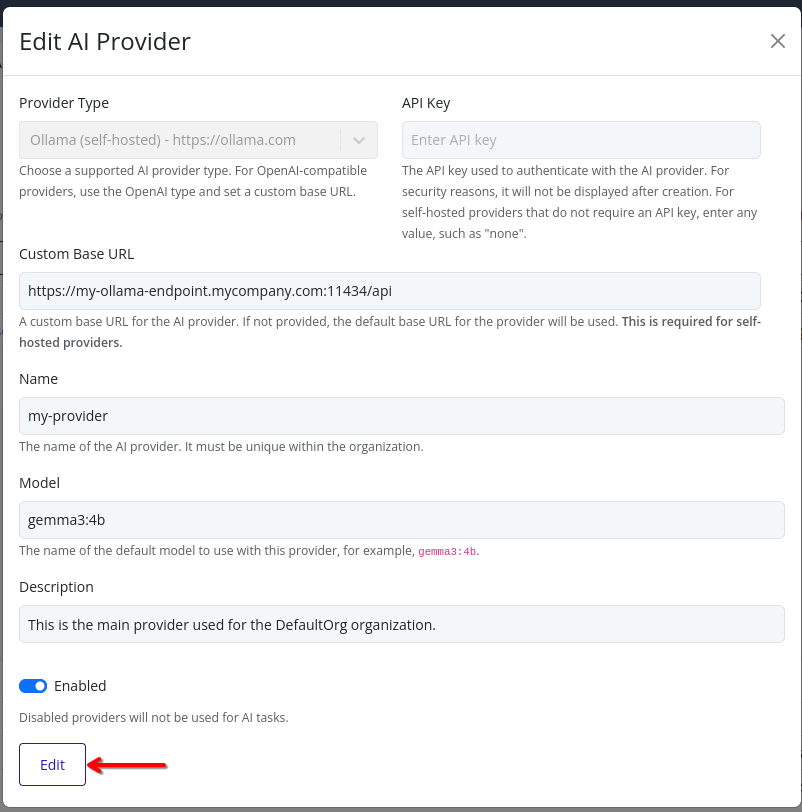
Edit AI Provider
Note
For security reasons, the API keys for AI providers are not displayed in the web interface. API keys cannot be retrieved once set. Store your API keys securely.
Web Interface
-
Select the organization in the resource tree and view the page on the right. Click on the AI Providers tab in the right pane. The AI providers will be listed.
-
Click the pencil icon next to the AI provider you want to edit.
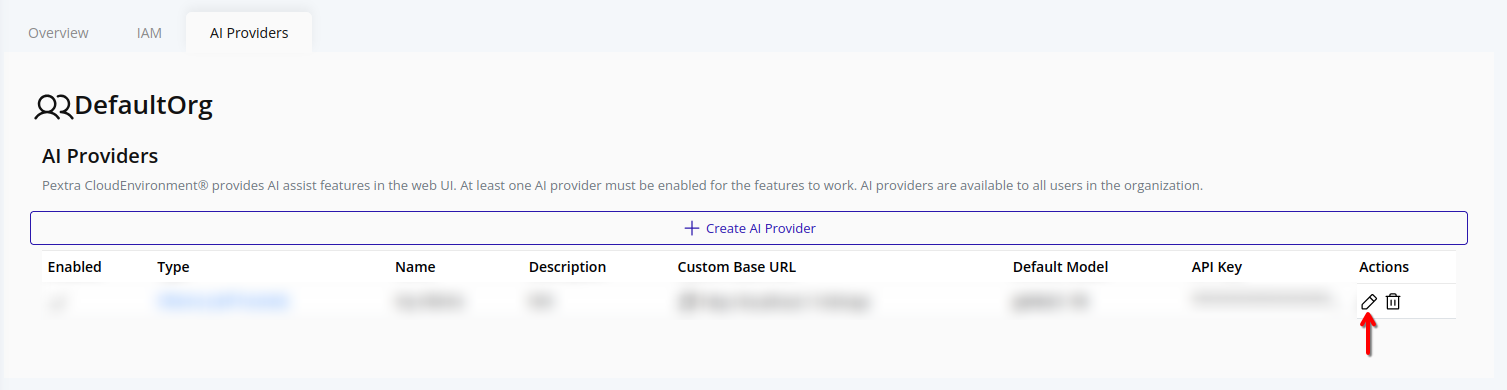
-
Update any fields as needed.
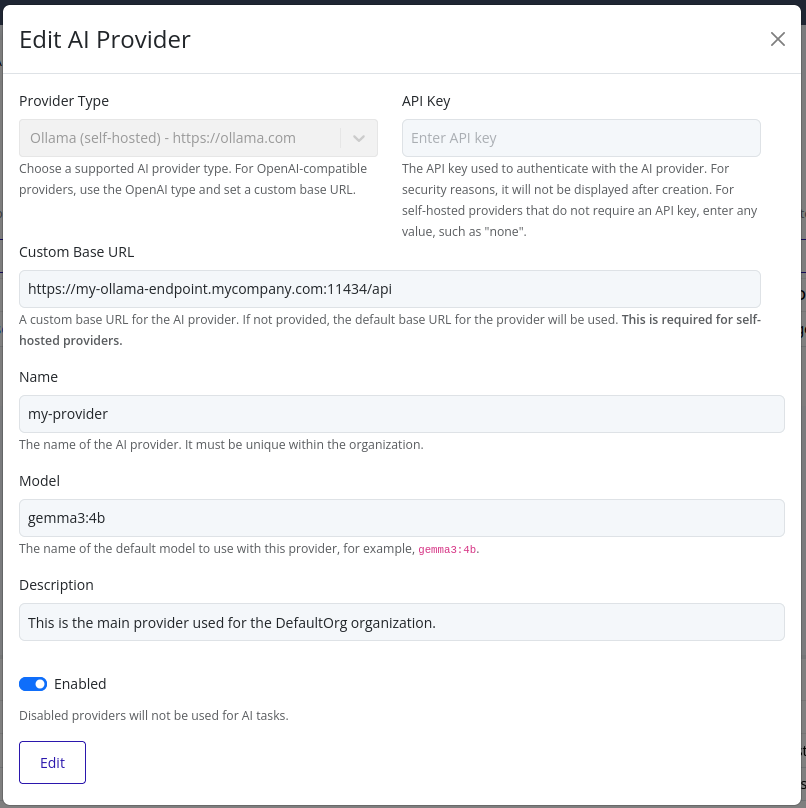
Note
The API key field will be empty for security reasons. If you need to change the API key, you must enter the new key in this field. The previous key will not be displayed.
- Click Edit to save your changes. The AI provider will be updated with the new configuration.
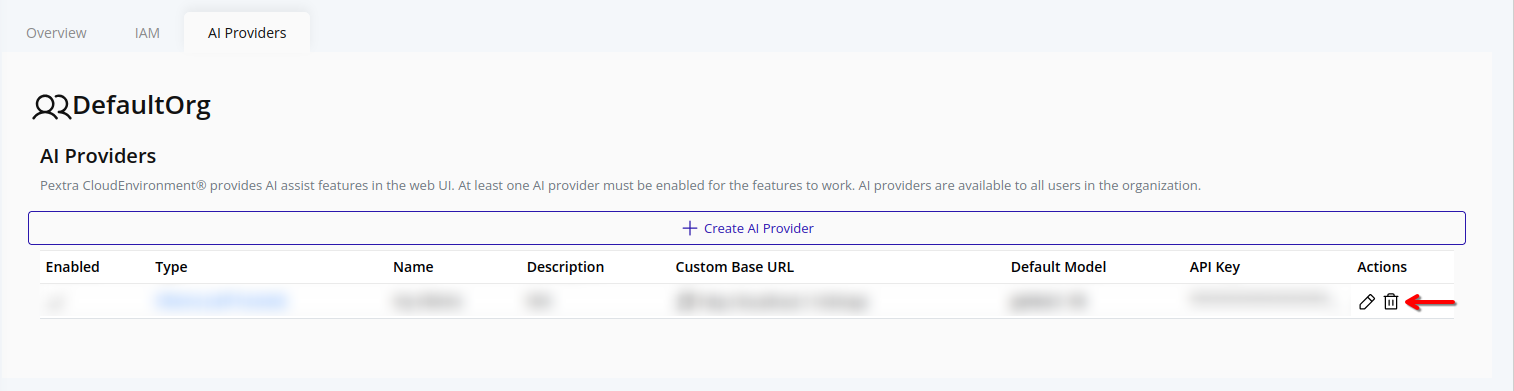
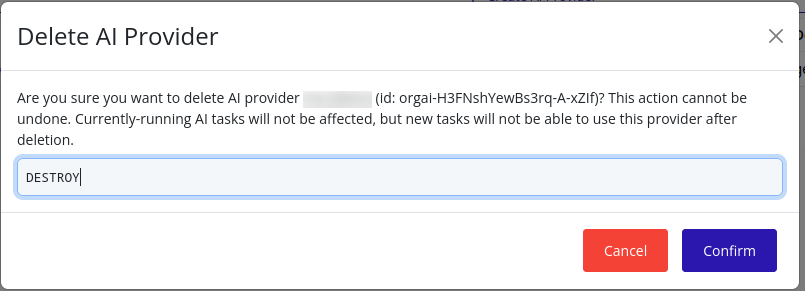
Delete AI Provider
Warning
If you delete the last AI provider in your organization, AI features will no longer be available in the web interface. At least one AI provider must be configured and enabled for AI features to function.
Web Interface
-
Select the organization in the resource tree and view the page on the right. Click on the AI Providers tab in the right pane. The AI providers will be listed:
-
Click the trash can icon next to the AI provider you want to delete:
-
A confirmation dialog will appear. Type in “DESTROY” and click Confirm to confirm the deletion of the AI provider:
Network Management
Networking in Pextra CloudEnvironment® is configured at the node (server) level. Each node has physical NICs that can be virtualized to create virtual networks for your instances.
To set up networking:
-
Click on the node in the left navigation panel.
-
On the right, select the Network tab.
From this tab, you can manage:
- vSwitches – Create and configure virtual switches to connect virtual machines.
- Port Groups – Define network segments and VLANs for instance traffic.
- NICs – Assign physical NICs to virtual switches or manage virtual NICs.
- Addresses – Stage and apply node IP addresses for various traffic types.
Tip
Plan your network layout carefully, including VLANs and port groups, before assigning NICs to virtual switches. This ensures proper isolation and connectivity between instances.
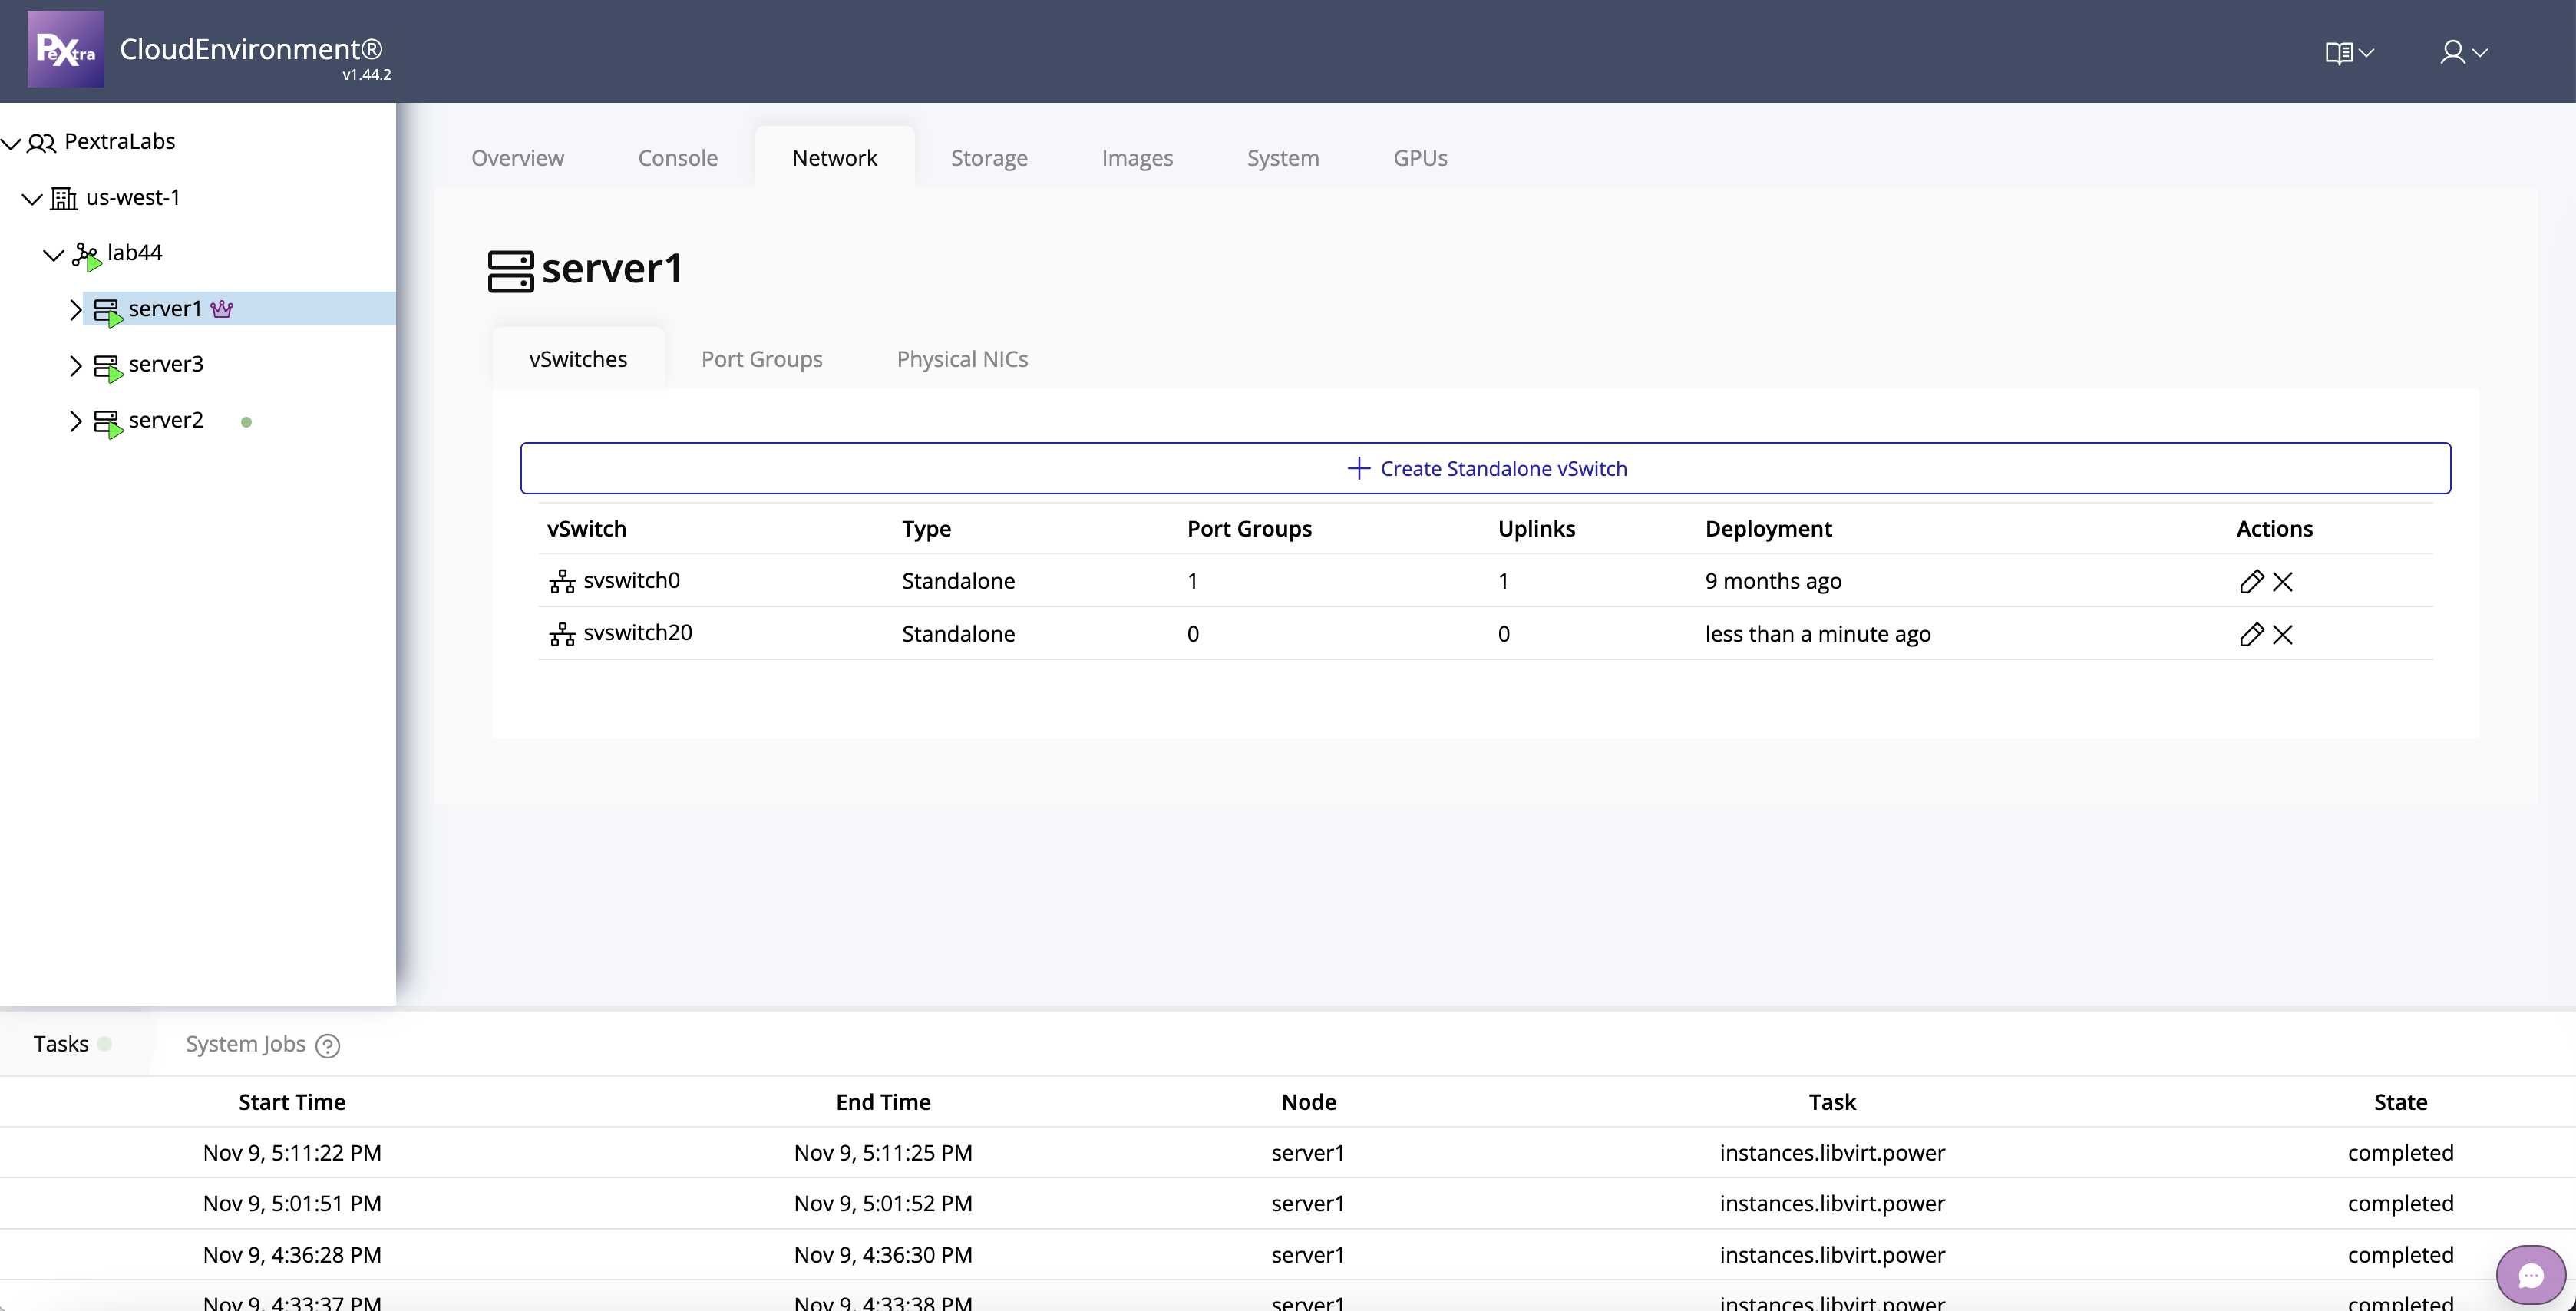
Creating a vSwitch
A vSwitch (virtual switch) connects virtual machines and network interfaces within a node. Each vSwitch acts as a bridge between virtual and physical networks.
To create a new vSwitch:
-
Click on the node in the left navigation panel.
-
Select the Network tab on the right.
-
Click on vSwitches.
-
Click Create vSwitch.
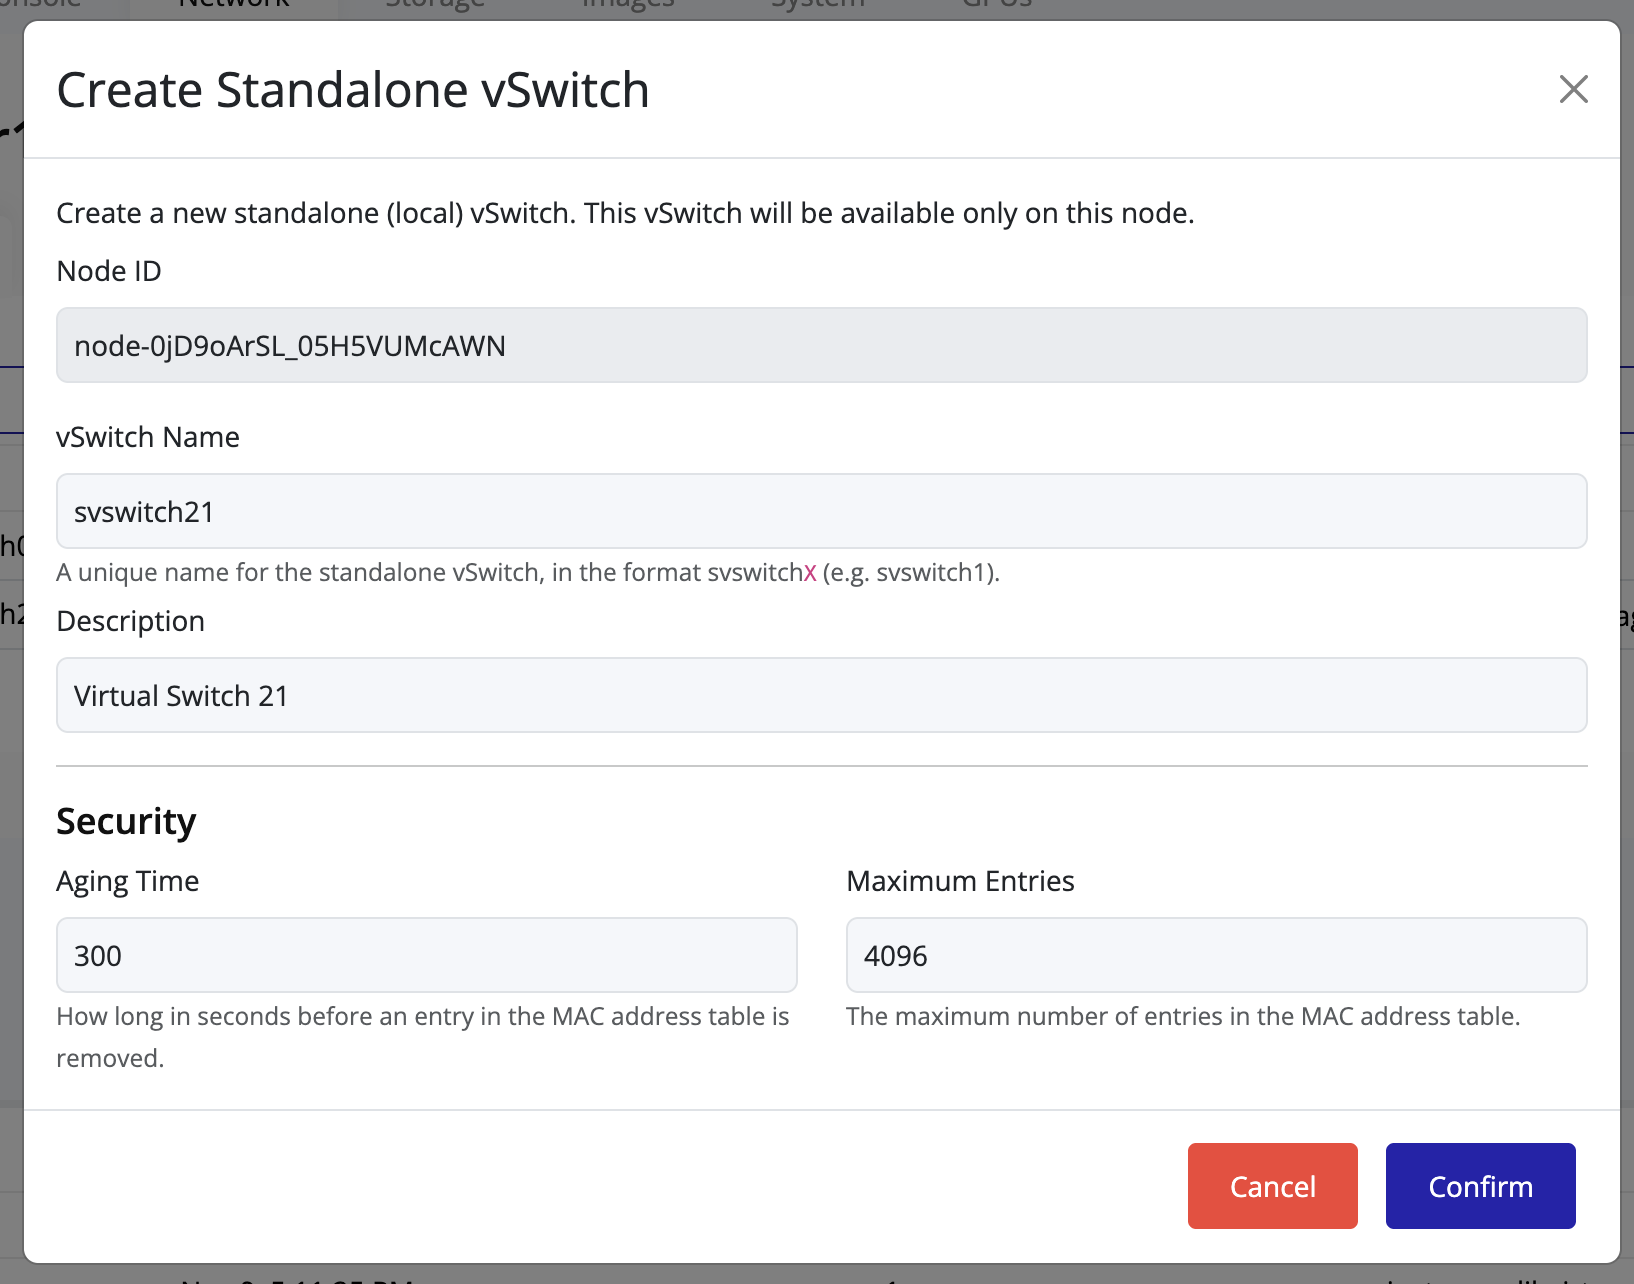
-
Enter a name for the vSwitch. The name must follow the required format:
Here, svswitch is the prefix and X is a positive integer.
Example: svswitch10, svswitch21.
-
Complete the configuration and click Create.
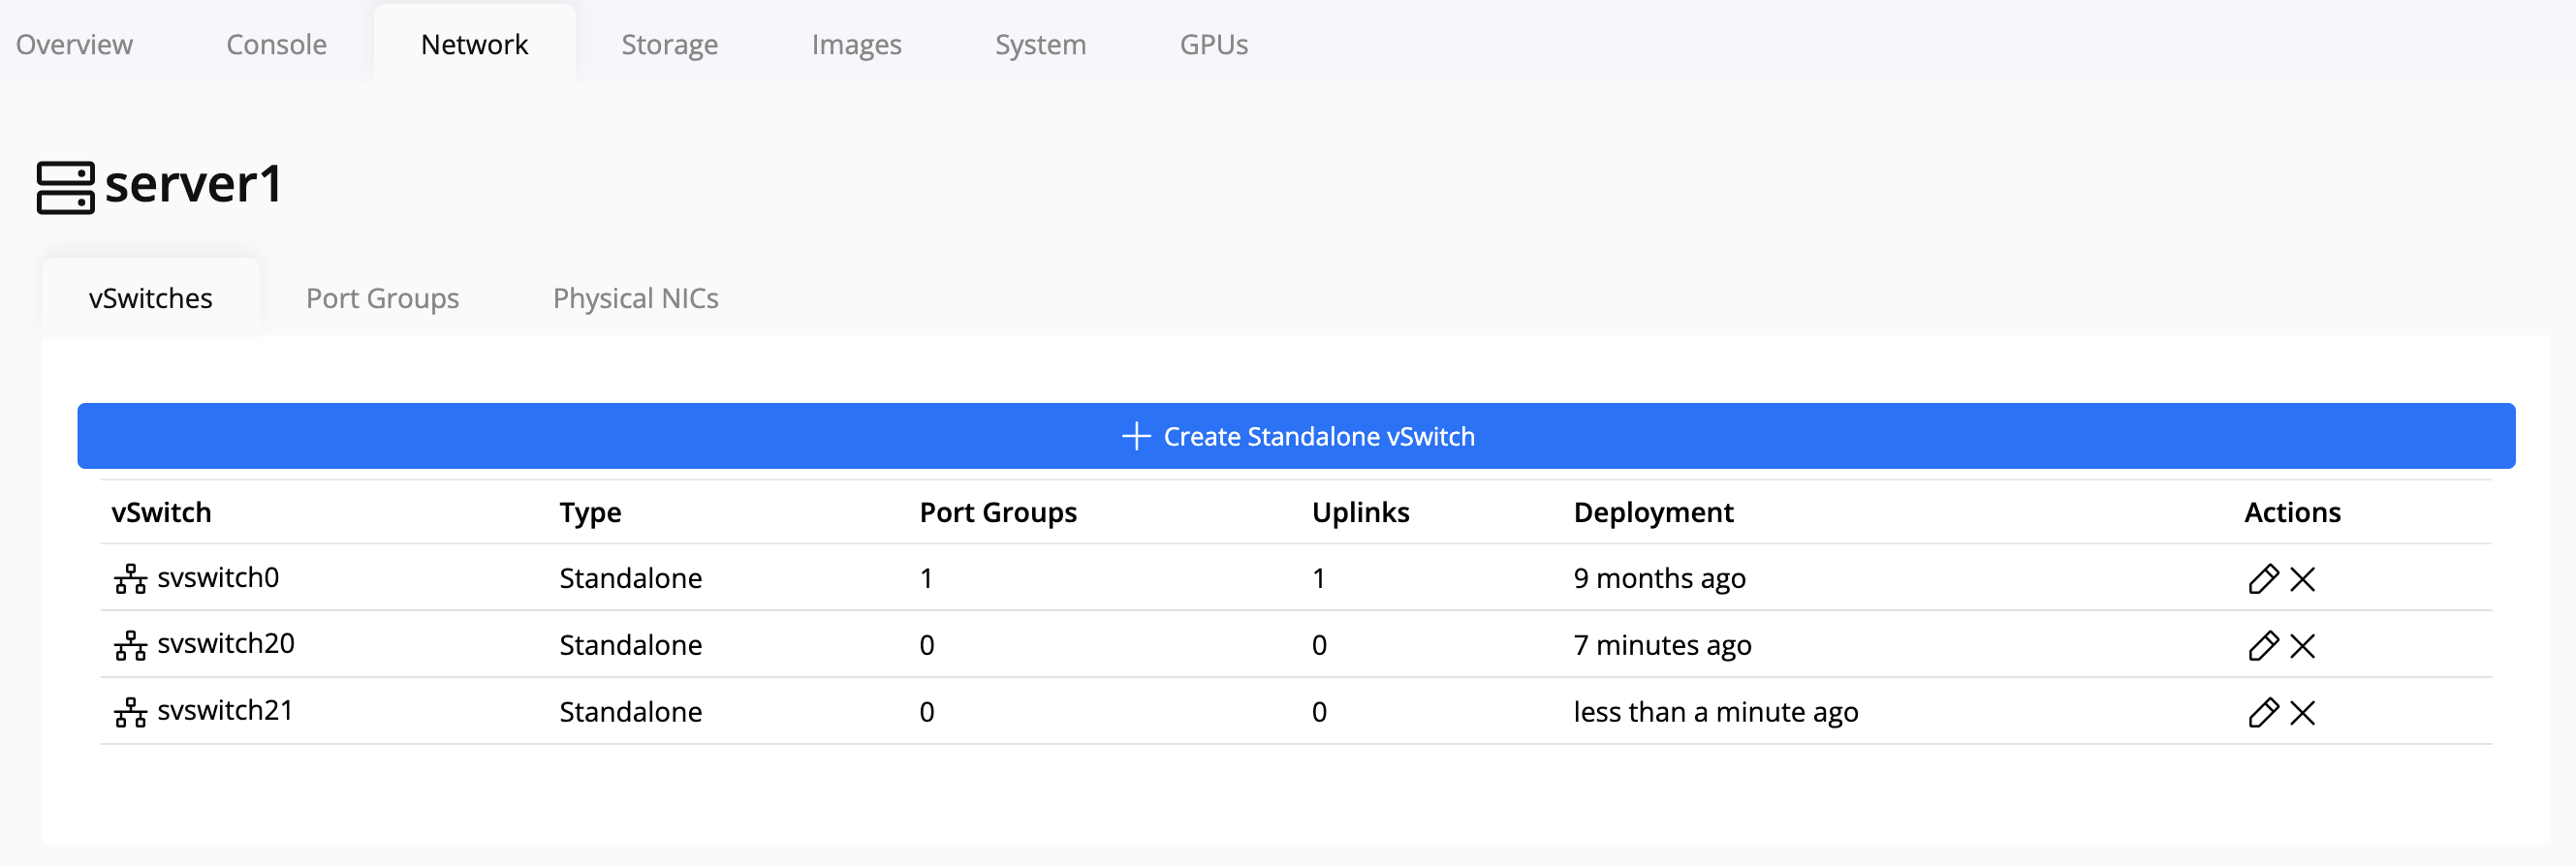
-
After creation, the new vSwitch will appear in the vSwitch list.
Tip
Use a consistent naming convention (e.g.,
svswitch10,svswitch20, etc.) to easily identify network mappings across multiple nodes.
Warning
Ensure the vSwitch name is unique cluster-wide to prevent conflicts.
The vSwitch will not be created if a name conflict is detected within the cluster.
Editing a vSwitch to Add Uplinks
You can add one or more uplinks to a vSwitch to connect it to physical network interfaces on a node. Adding multiple uplinks improves redundancy and fault tolerance, ensuring higher network availability.
Steps to Add Uplinks
-
Select the node in the left navigation panel.
-
Click the Network tab on the right.
-
Click on vSwitches.
-
Locate the vSwitch you want to modify and click the Edit icon.

-
From the Uplinks drop-down menu, select one or more network interfaces to attach as uplinks.
You can select multiple interfaces to enable redundancy.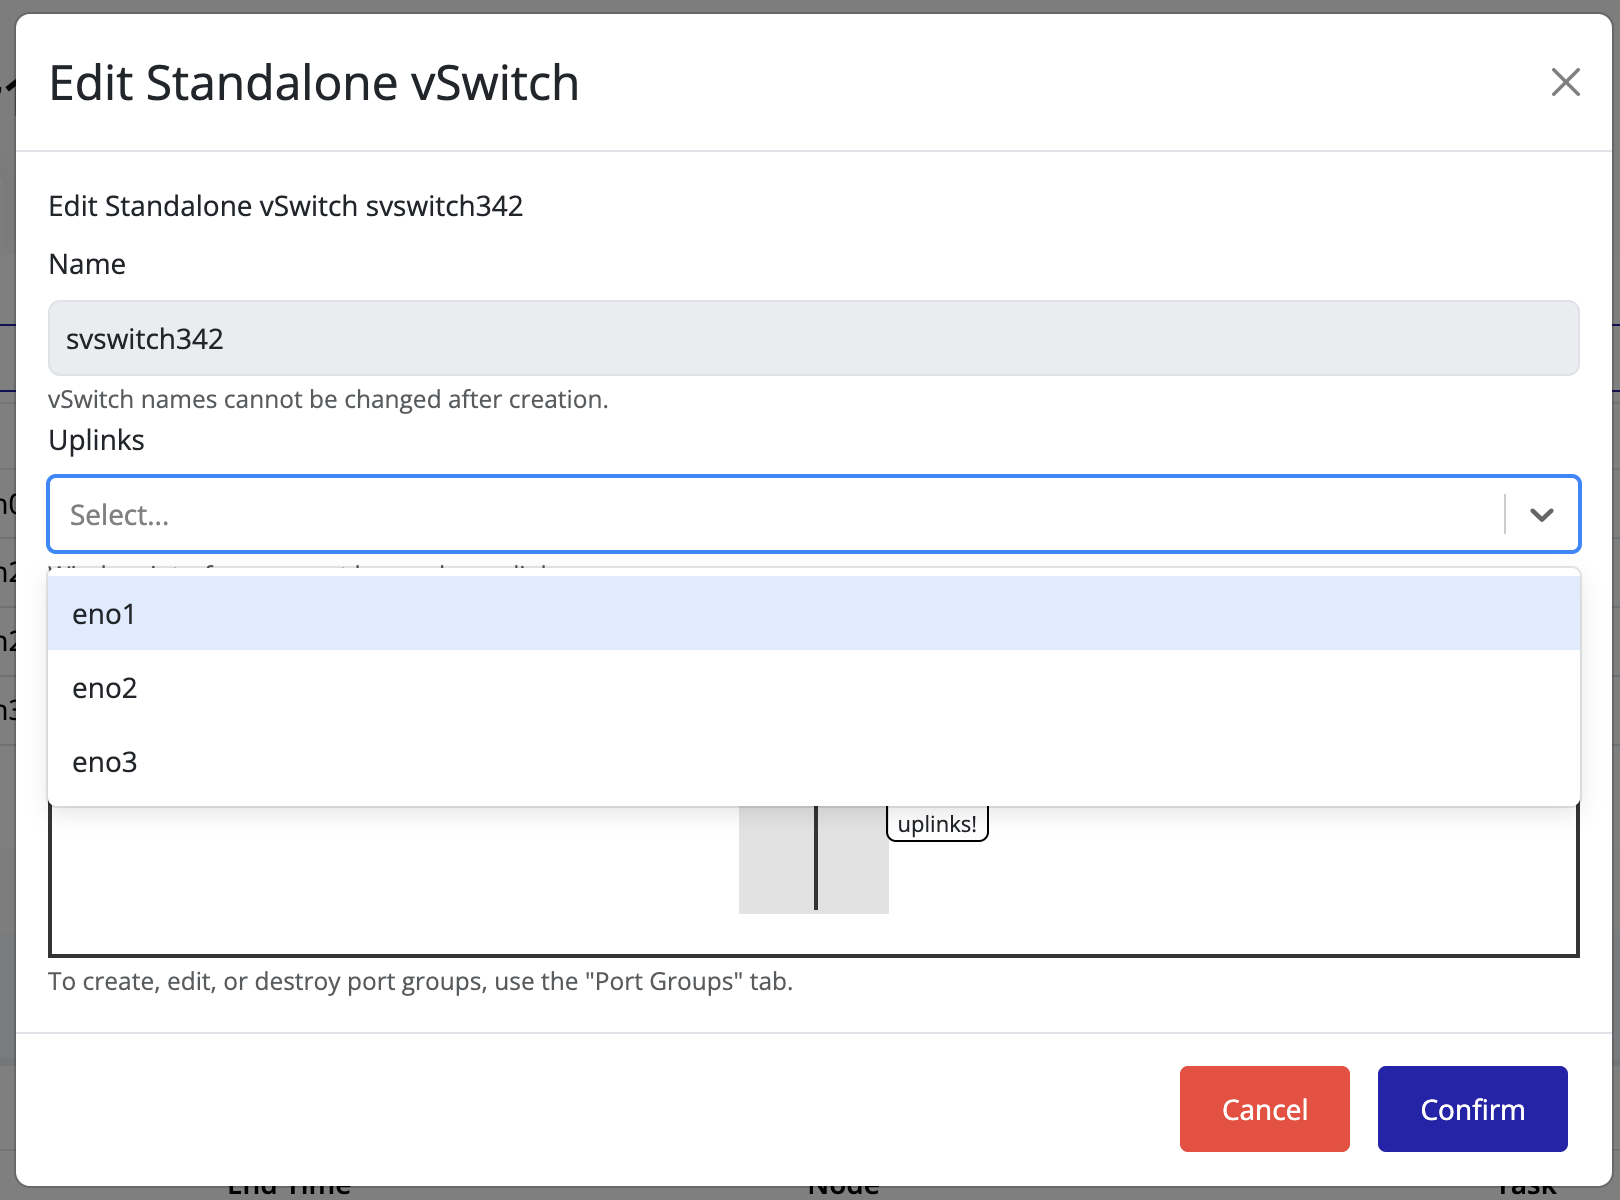
Tip
The image preview may not immediately reflect uplink changes.
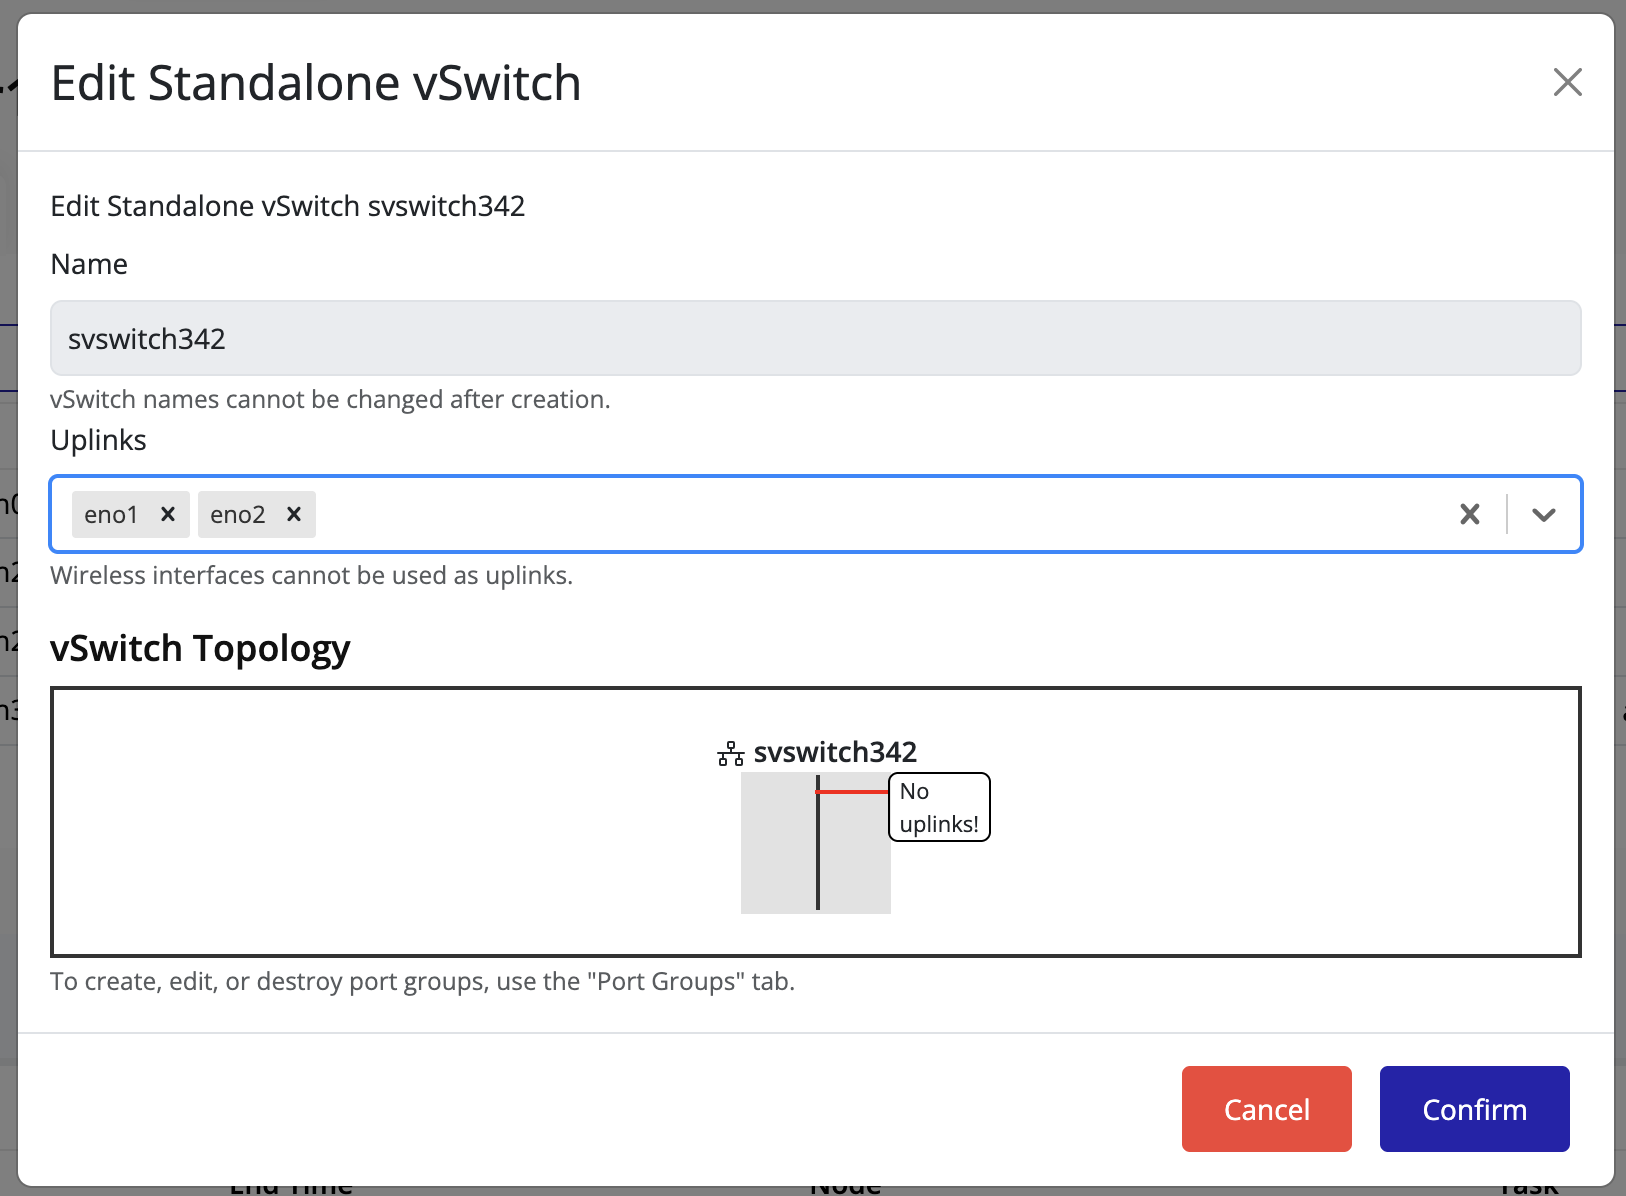
-
Click Confirm to apply the changes.
-
The Uplink Count column for the vSwitch updates to reflect the new configuration.

-
To verify or visualize the connected uplinks, click the Edit icon again.
The connected uplinks are listed in the vSwitch details view.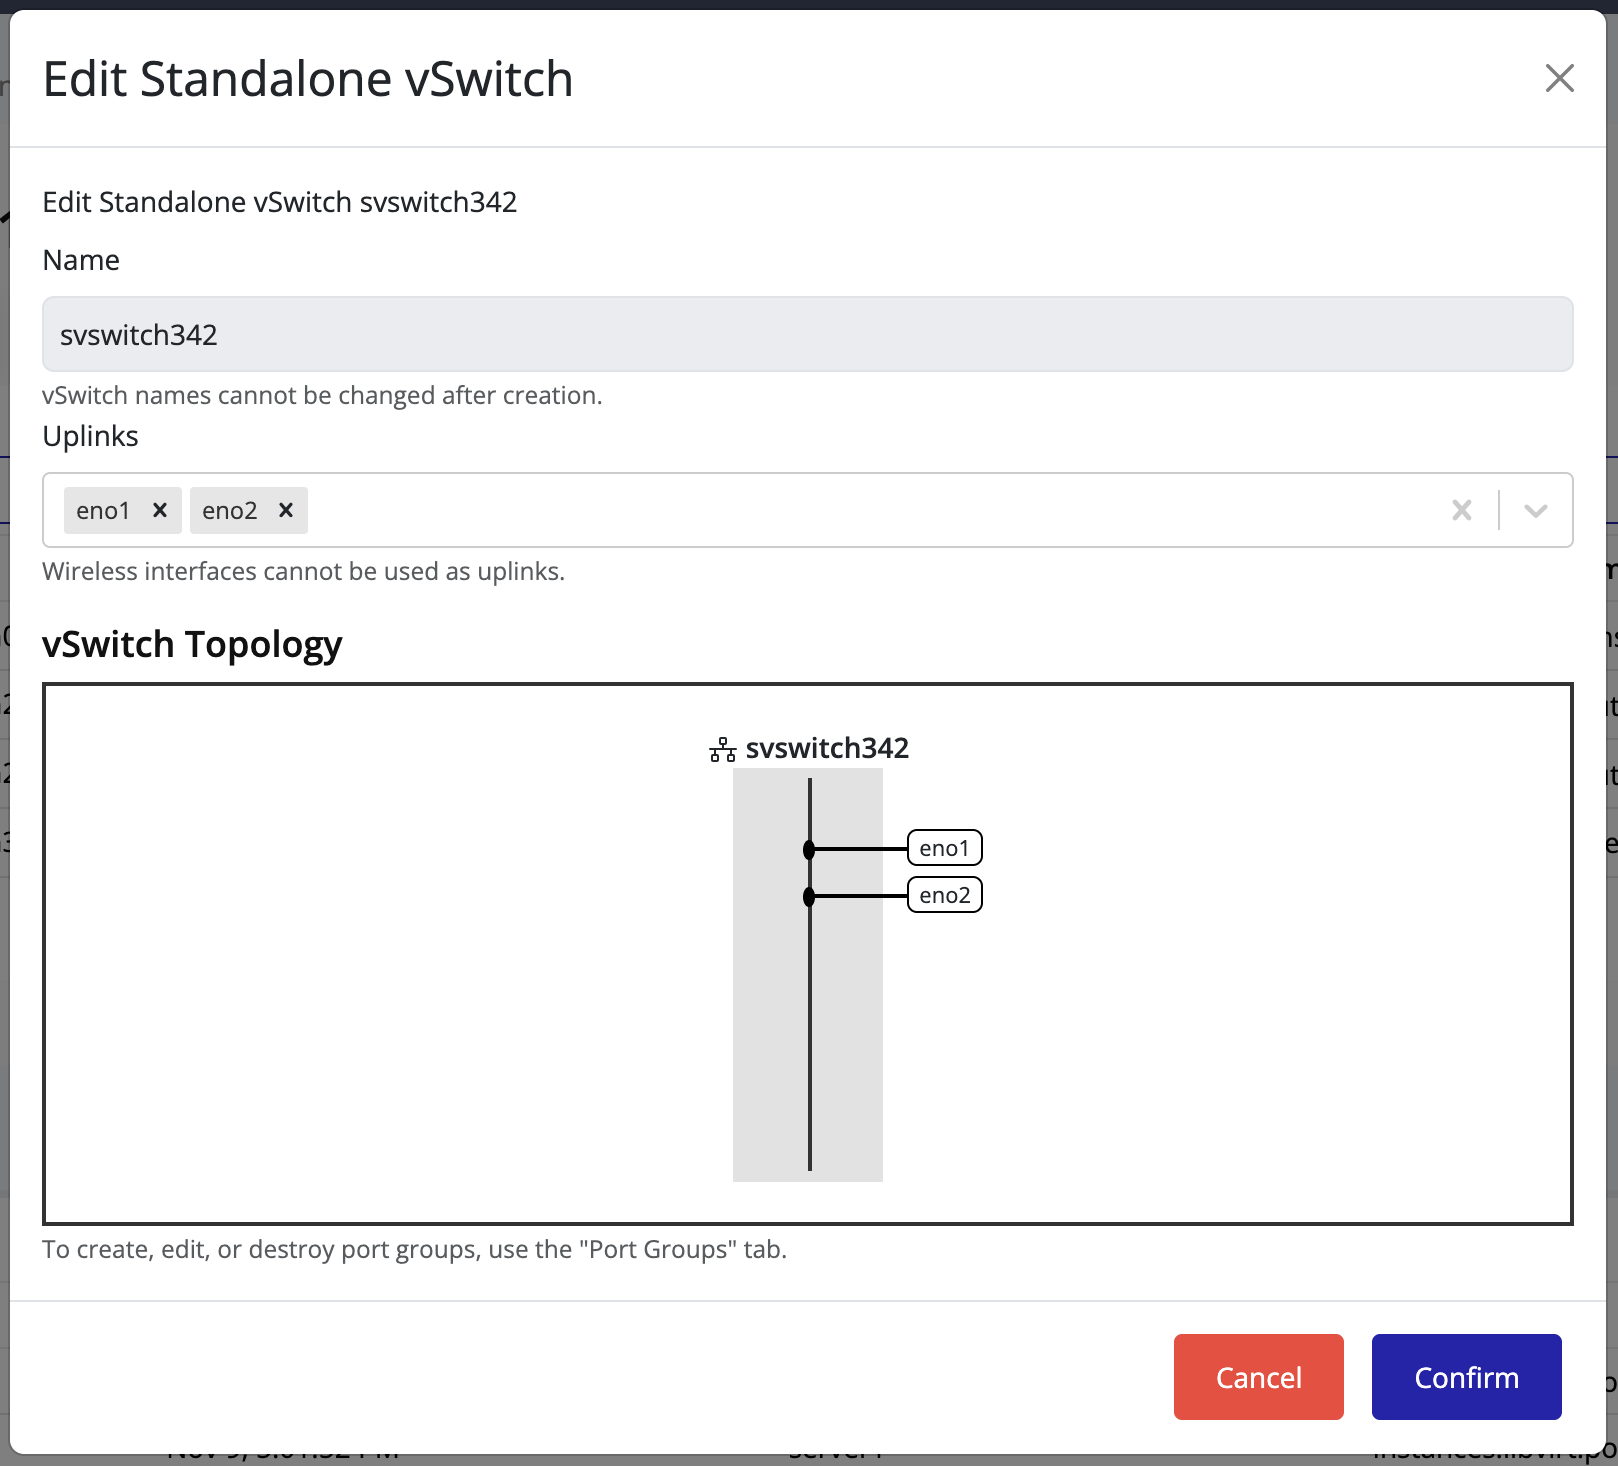
Tip
Adding multiple uplinks provides network redundancy.
If one uplink fails, the remaining uplinks continue handling network traffic seamlessly.
Creating and Managing Port Groups
Port groups define how virtual machines connect to a vSwitch and access the physical network.
Each port group is associated with a specific vSwitch and can include custom network configurations.
Creating a Port Group
-
Select the node in the left navigation panel.
-
Click the Network tab on the right.
-
Open the Ports tab to view existing port groups.
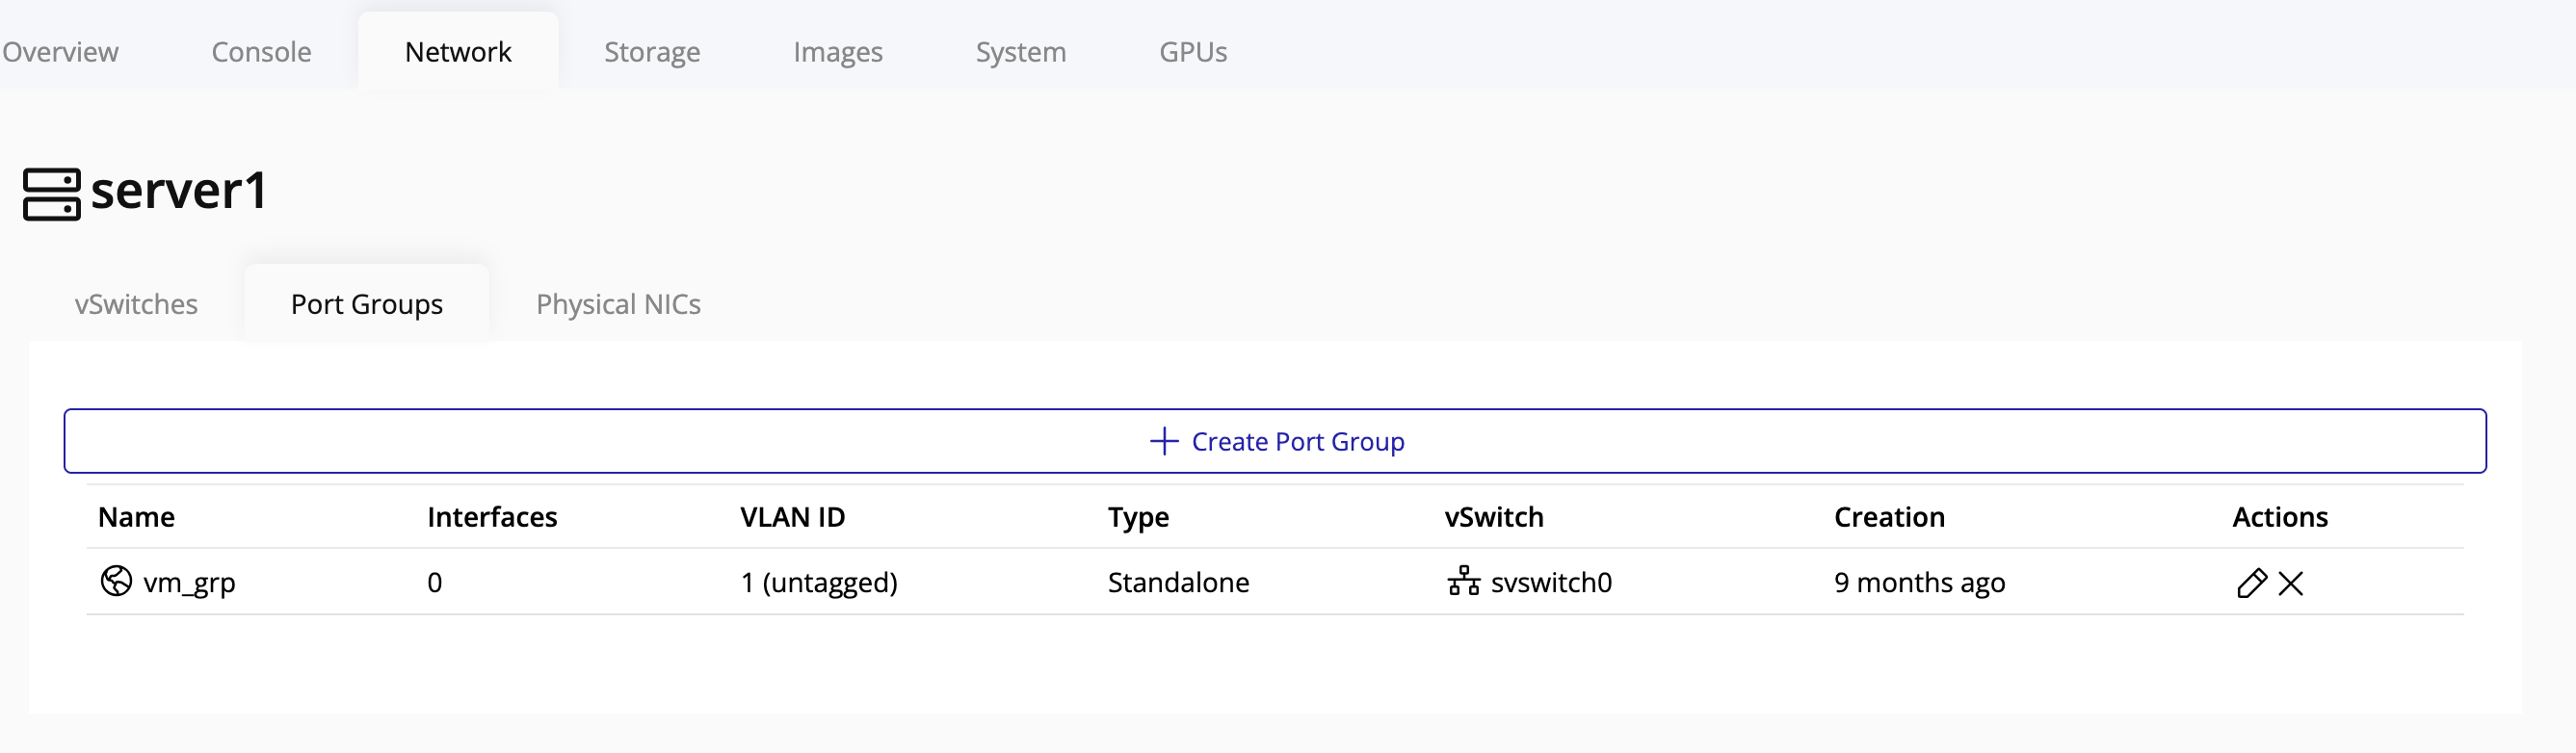
-
Click the Create Port Group button at the top of the page.
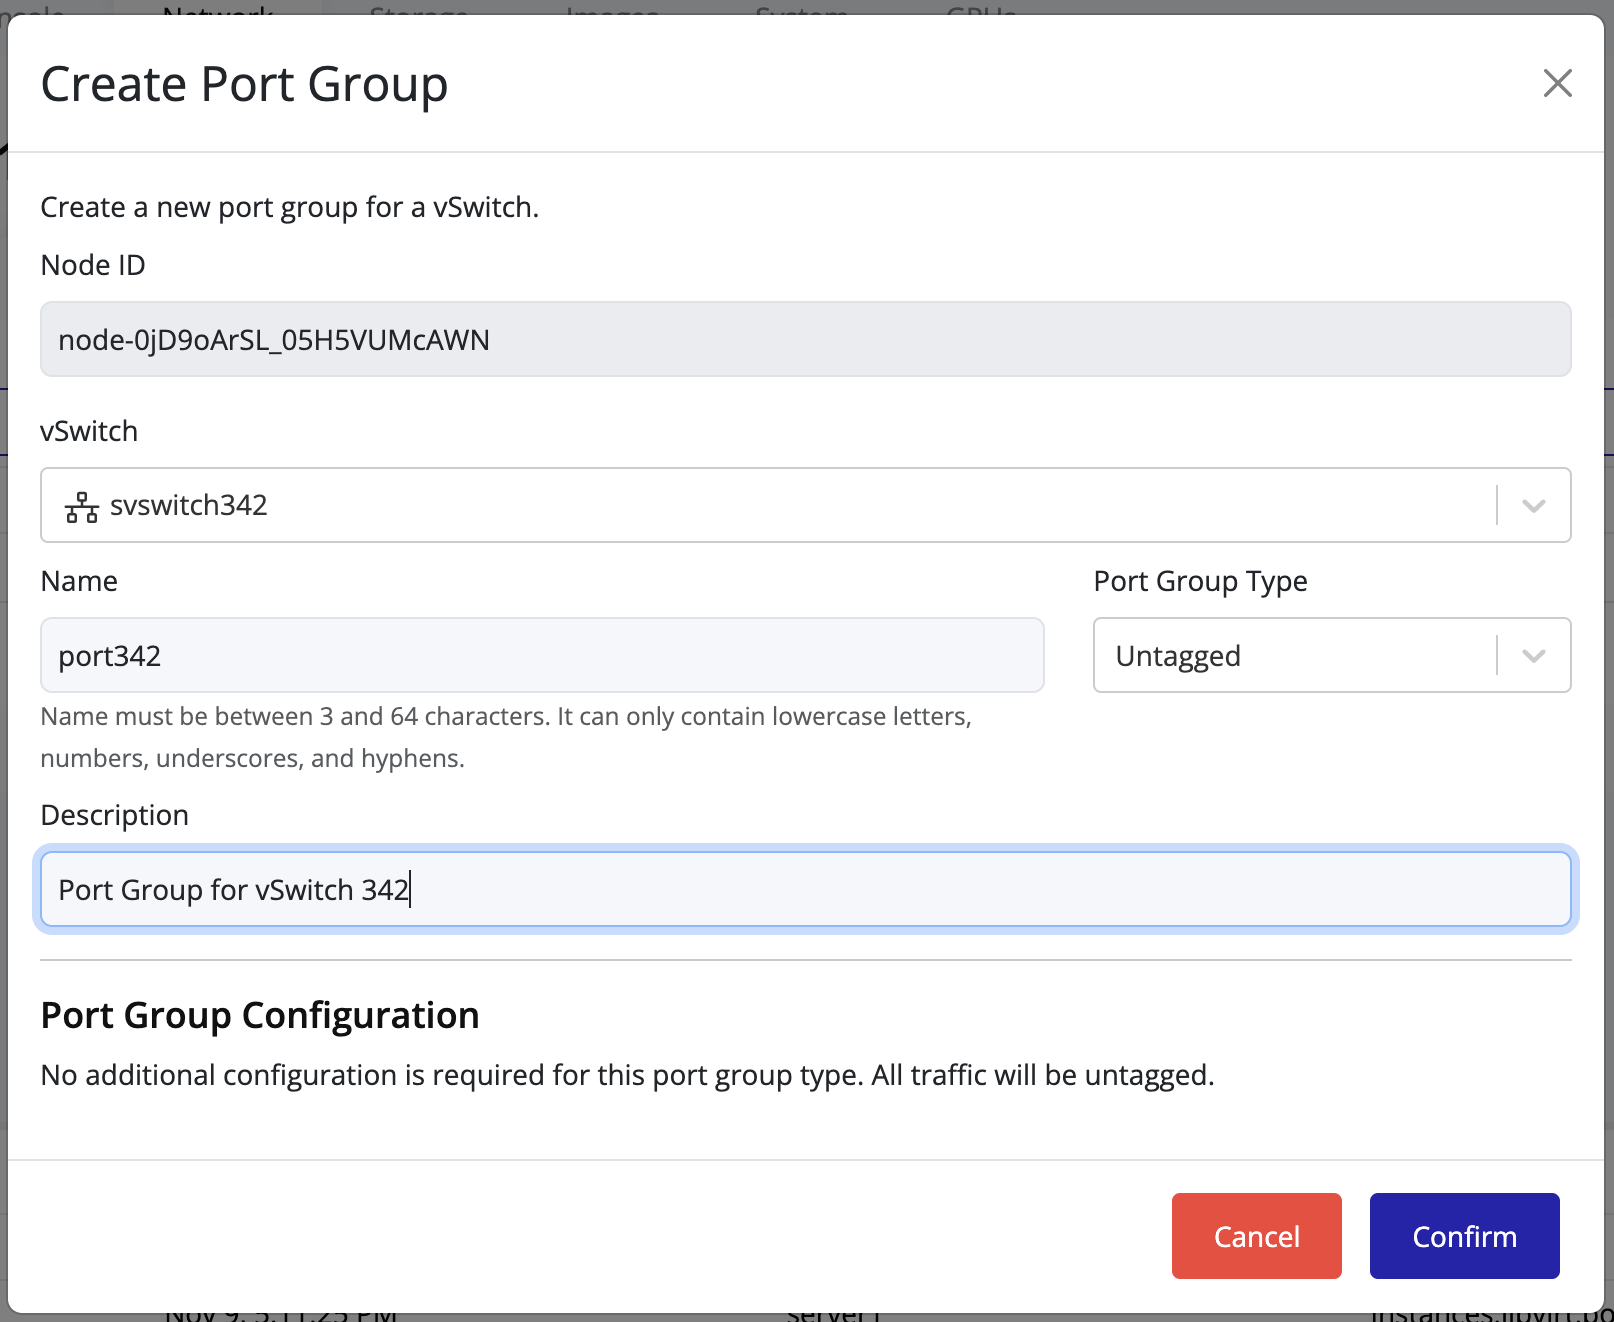
-
In the creation form:
- Select the vSwitch to associate the new port group with.
- Fill in the remaining configuration fields as needed (for example: VLAN ID, description, or security settings).
- Click Confirm to save.
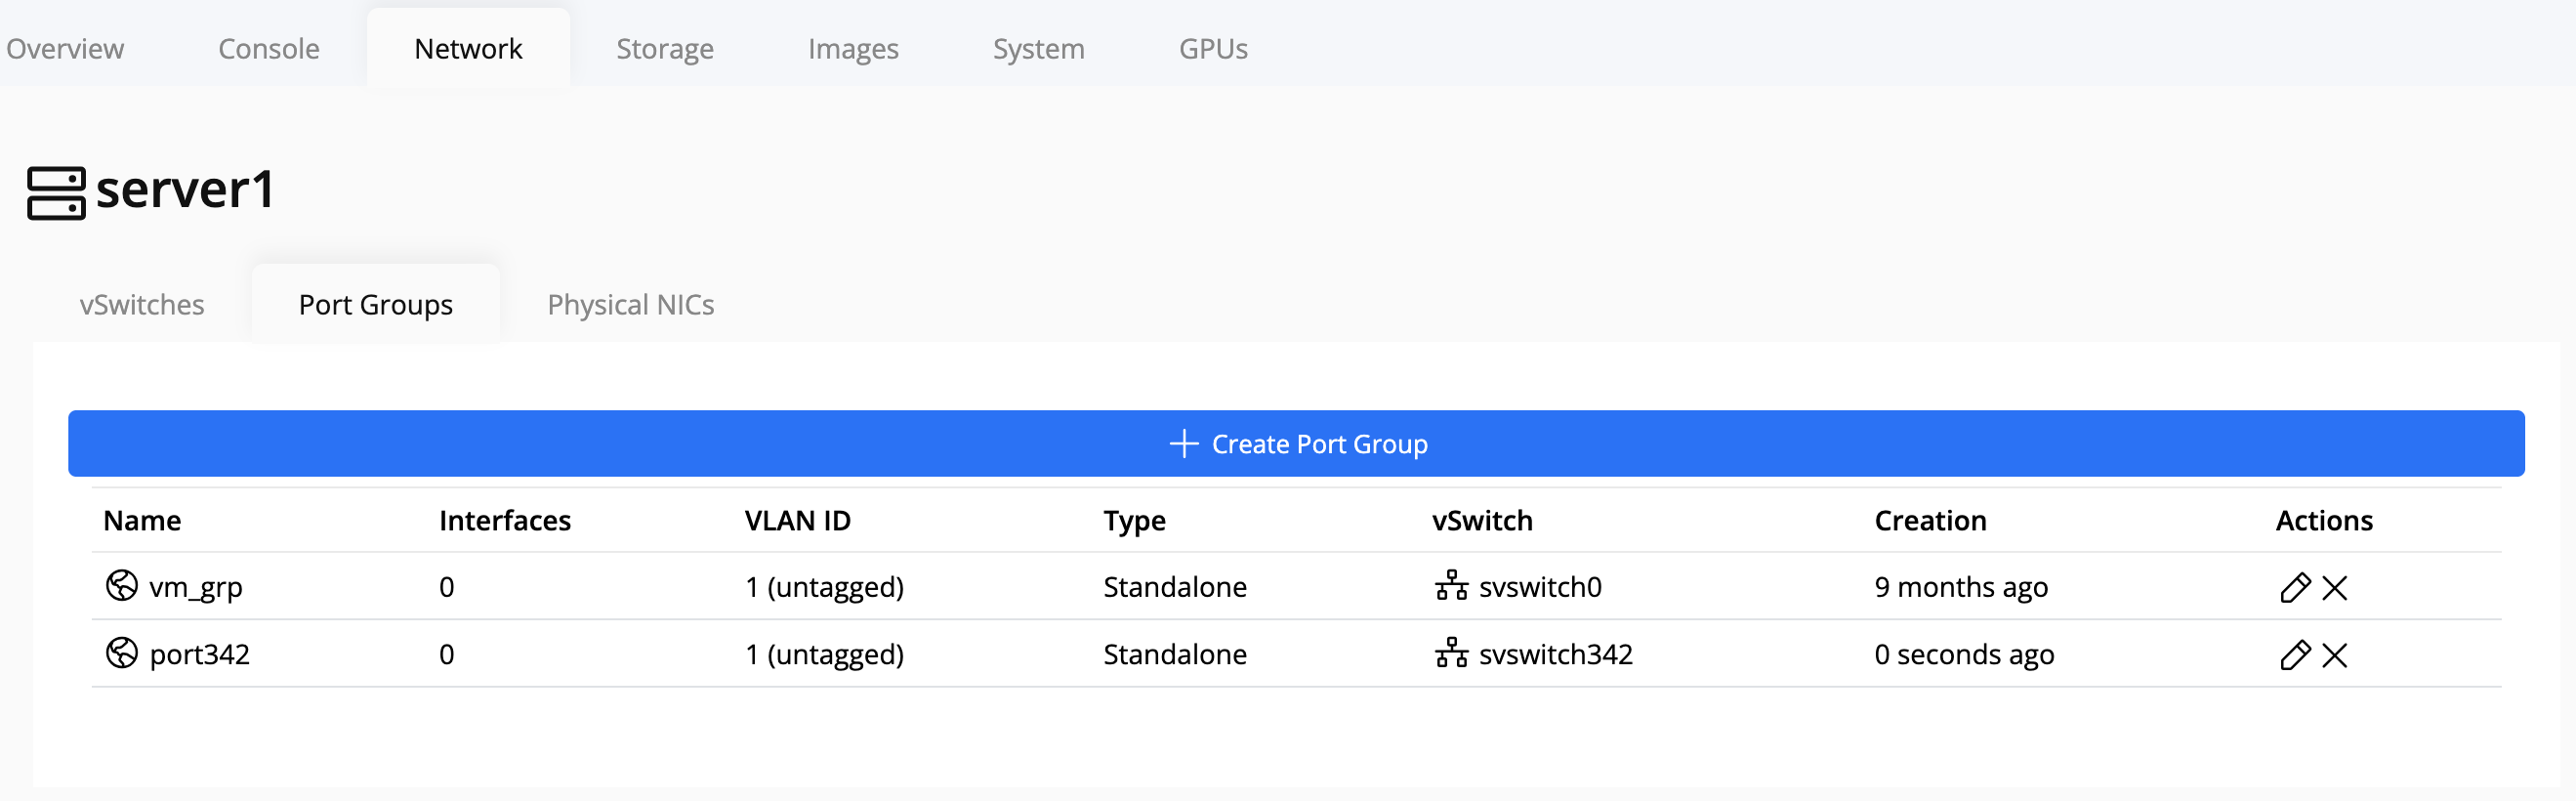
Tip
When managing multiple networks, naming port groups clearly (e.g., Production, Backup, DMZ) makes maintenance and troubleshooting much easier.
Editing a Port Group
To modify an existing port group:
- Locate the desired port group in the list.
- Click the Edit icon in the same row.
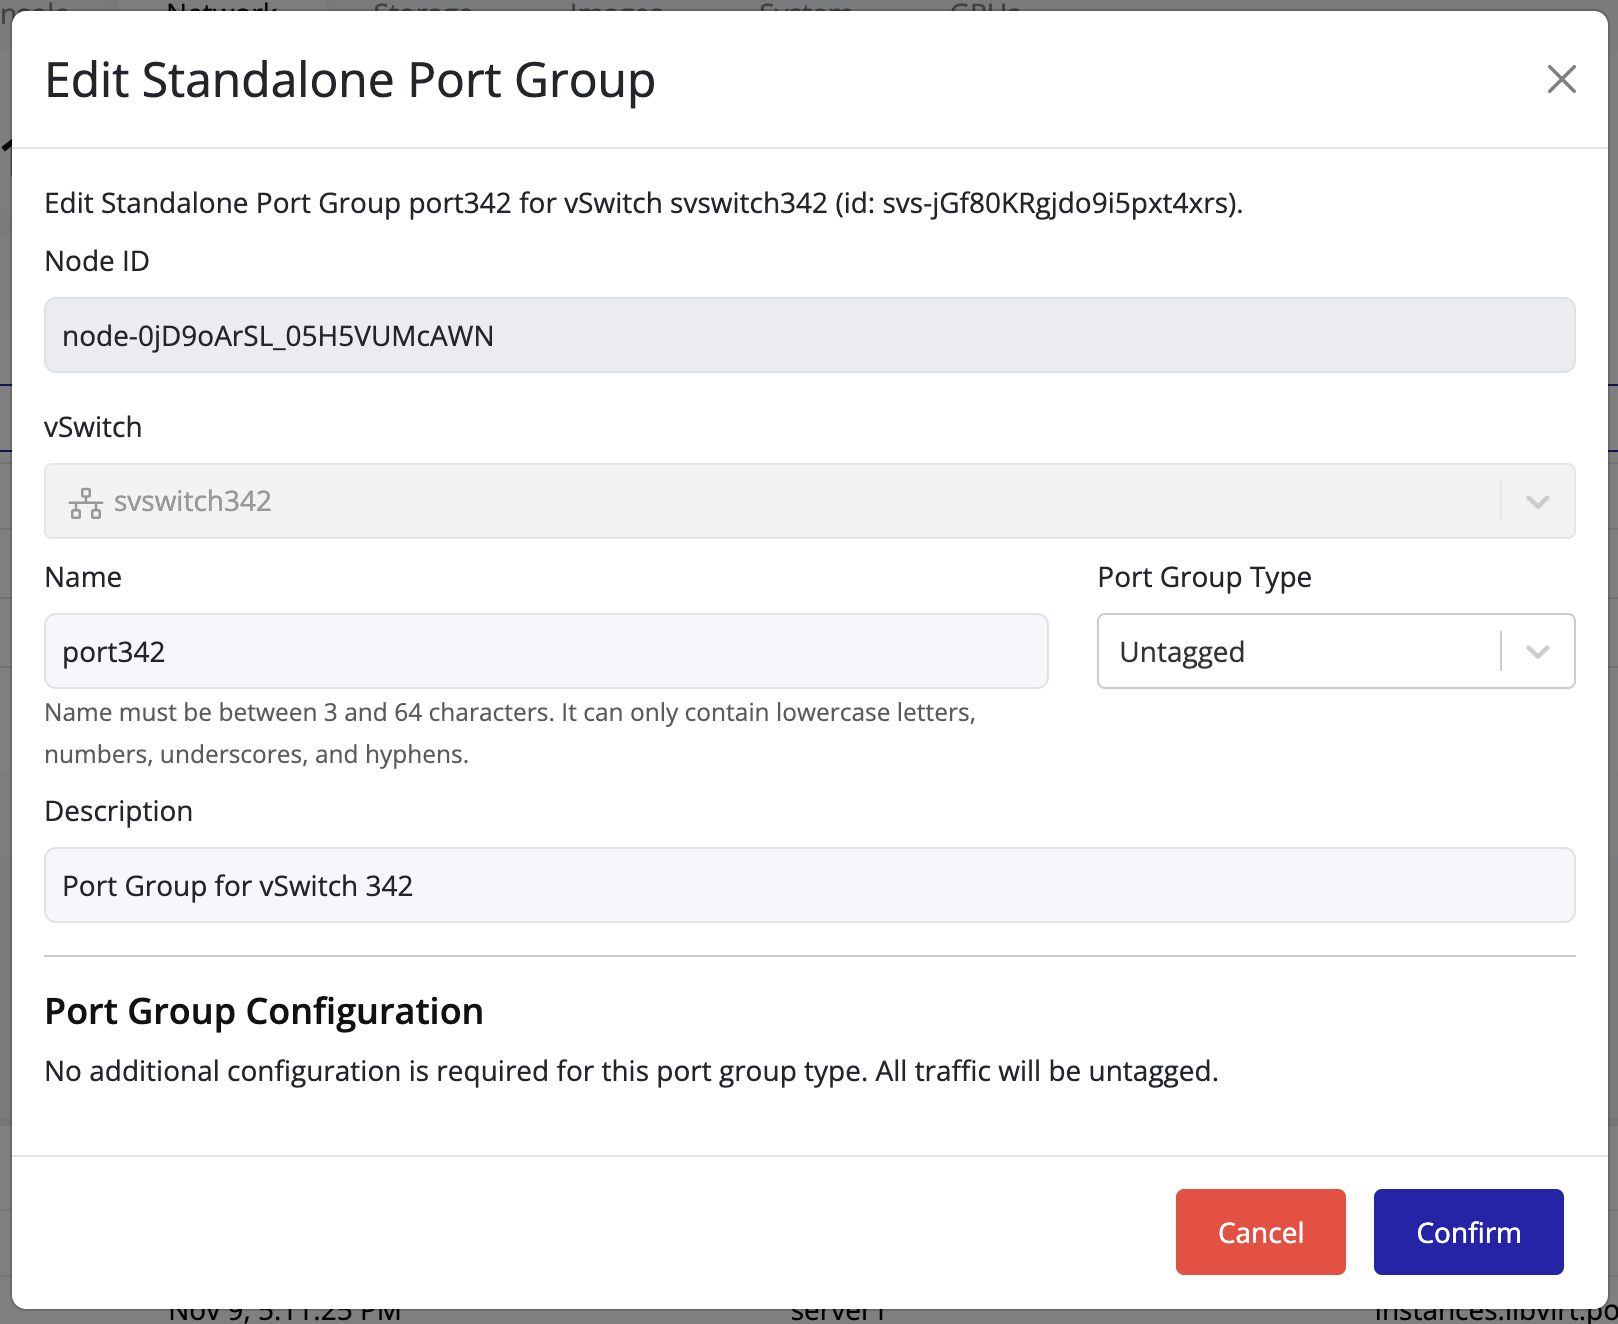
- Adjust the configuration fields as needed.
- Click Confirm to apply the changes.
Viewing Available NICs on a Node
To view the network interface cards (NICs) available on a node:
-
In the left navigation panel, click on the node you want to inspect.
-
Select the Network tab on the node’s details page.
-
Click on NICs.
-
The page will display all available NICs for the selected node.
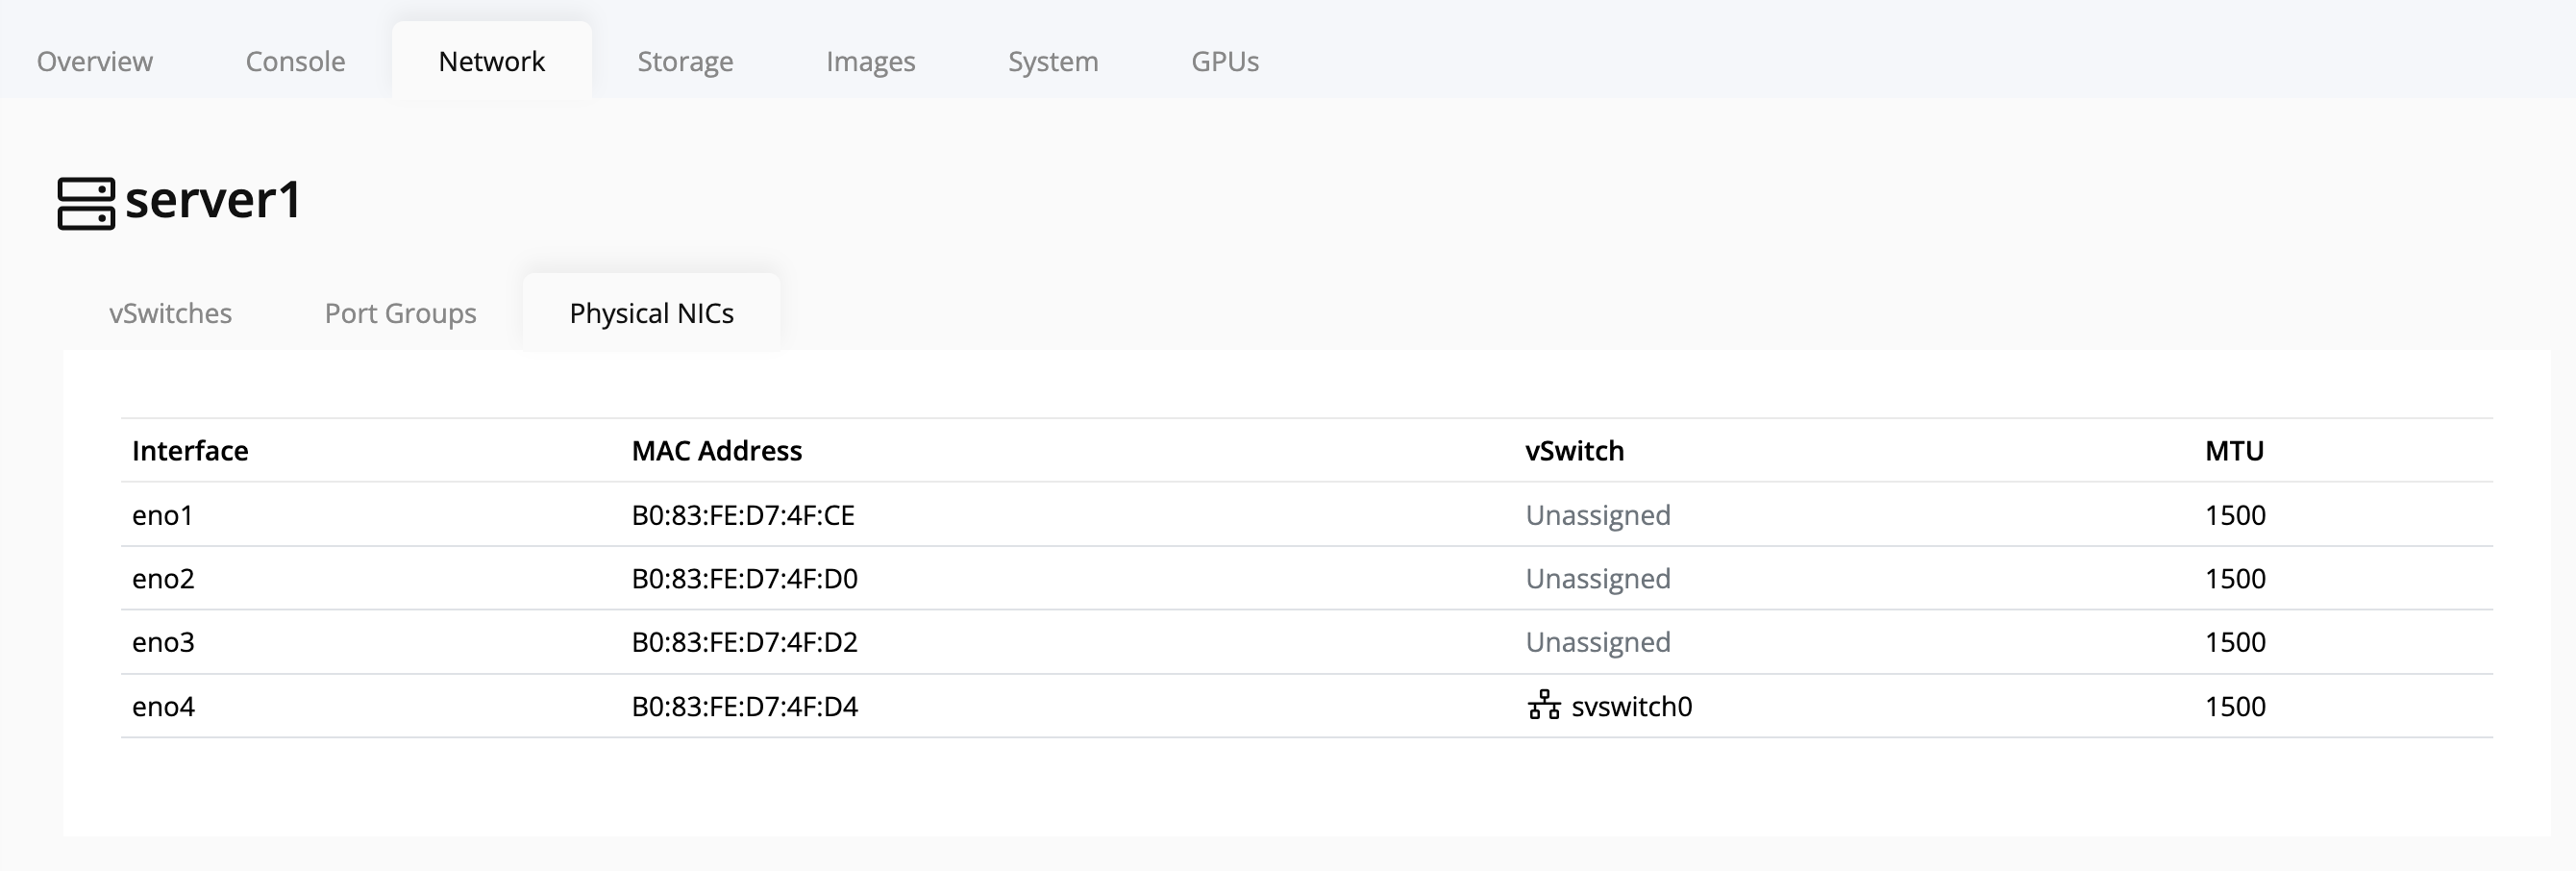
Node Addresses
Node addresses are configured at the node level and control which IPs Pextra CloudEnvironment® uses for various types of traffic, including management and internal cluster communication. Each address can be assigned one or more roles, with a default address implicitly assigned any role not explicitly assigned to another address.
Warning
All node addresses assigned to a role must be mutually reachable (each address with that role can reach every other address with that role). Connections using unreachable addresses may fail, which can result in cluster instability or loss of management access.
Limitations
- As of
v2.3.0, only one address per interface is supported (no dual-stack). This will be addressed in a future release. - You cannot assign a node address to a vSwitch uplink. This will result in connectivity loss after applying changes.
- In a two-node cluster, changing an address assigned to the
cluster_internalrole is not supported. This triggers a race condition and results in a loss of quorum that requires manual intervention to restore. This limitation will be addressed in a future release.
Forbidden Subnets
Pextra CloudEnvironment® blocks node addresses in the following subnets:
Note
Addresses in these subnets are reserved for special purposes by the IANA and cannot be used for node addresses.
- IPv4
0.0.0.0/8(“This” Network)127.0.0.0/8(Loopback)169.254.0.0/16(IPv4 Link-Local)100.64.0.0/10(CGNAT)224.0.0.0/4(Multicast)255.255.255.255/32(Limited Broadcast)192.0.2.0/24(TEST-NET-1)240.0.0.0/4(Reserved for Future Use)192.51.100.0/24(TEST-NET-2)203.0.113.0/24(TEST-NET-3)192.88.99.0/24(6to4 Relay Anycast, deprecated)198.18.0.0/15(Network Interconnect Device Benchmark Testing)
- IPv6
::/128(“This” Network, Unspecified)::1/128(Loopback)::/96(IPv4-mapped IPv6 addresses)::ffff:0:0/96(IPv4-mapped IPv6 addresses)100::/64(Discard-Only)2001::/23(6to4)2001:2::/48(Benchmarking)2001:10::/28(Deprecated, previously ORCHID)2001:20::/28(ORCHIDv2)2001:db8::/32(Documentation)64:ff9b::/96(IPv4/IPv6 Translation)64:ff9b:1::/48(IPv4/IPv6 Translation)fe80::/10(Link-Local)ff00::/8(Multicast)
The ID prefix for node addresses is naddr-1.
Notes
-
Resources in Pextra CloudEnvironment® are identified by unique IDs. Node address IDs will have the prefix
naddr-, followed by a unique identifier (e.g.,naddr-RqP1zhgvLT3qasUOvI5DW). ↩
List Node Addresses
View managed and staged addresses for a node.
Note
Pending changes are visible here, but are not applied until you Apply Changes.
Web Interface
-
Select a node in the navigation tree.
-
Select the Network tab.
-
Select the Addresses subtab. Both managed and staged addresses are listed.
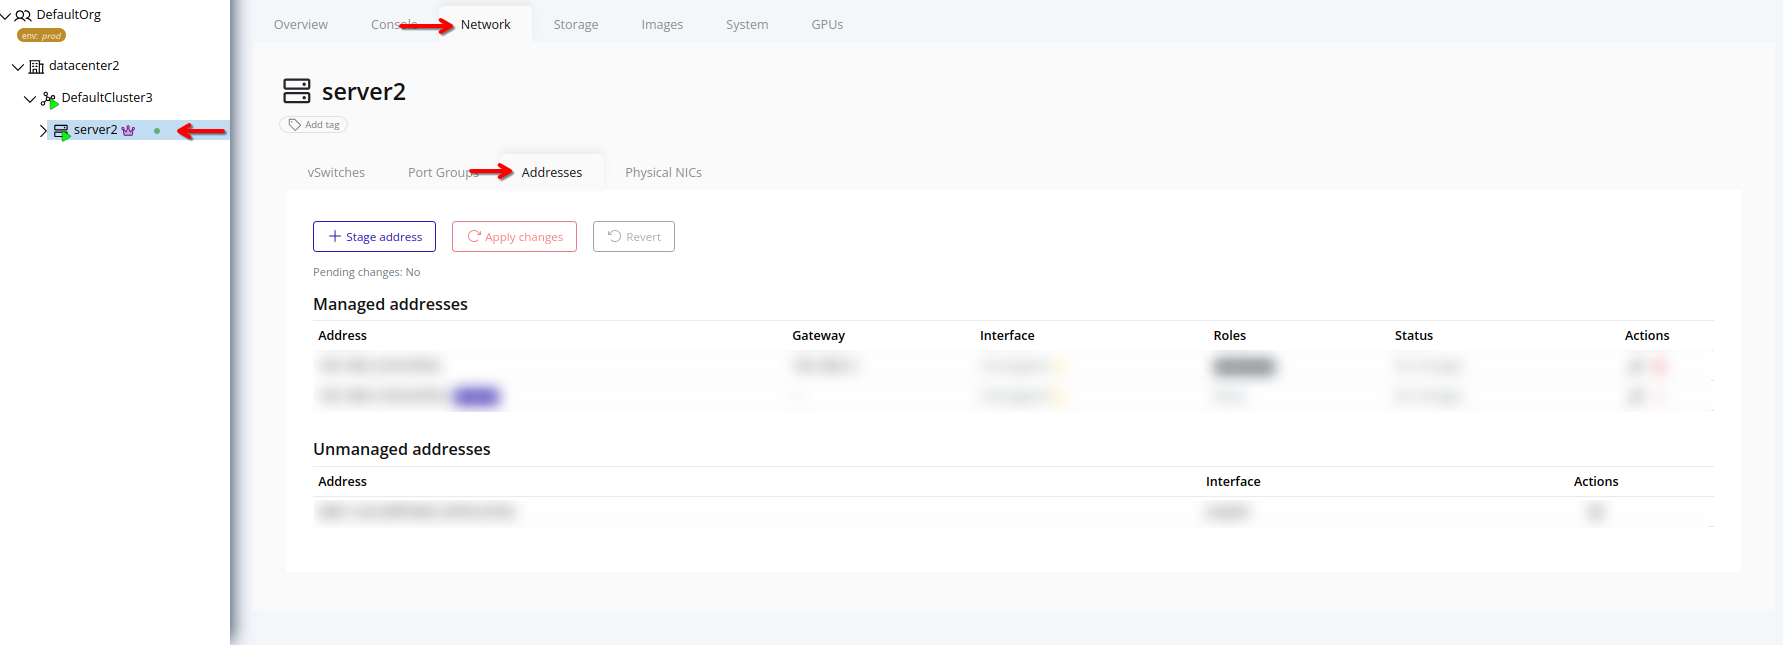
Create (Stage) A New Address
Stage a new address on the node and assign roles before applying changes.
Note
Staged addresses are pending until you Apply Changes.
Web Interface
-
Click Stage address.
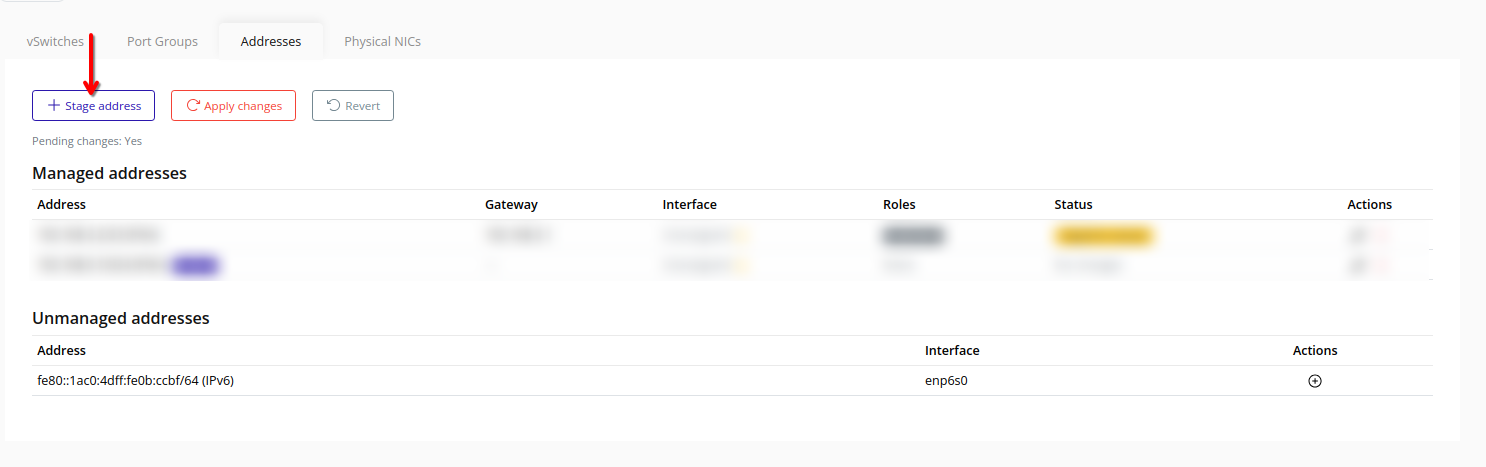
-
Enter an address, CIDR, and optionally a gateway.
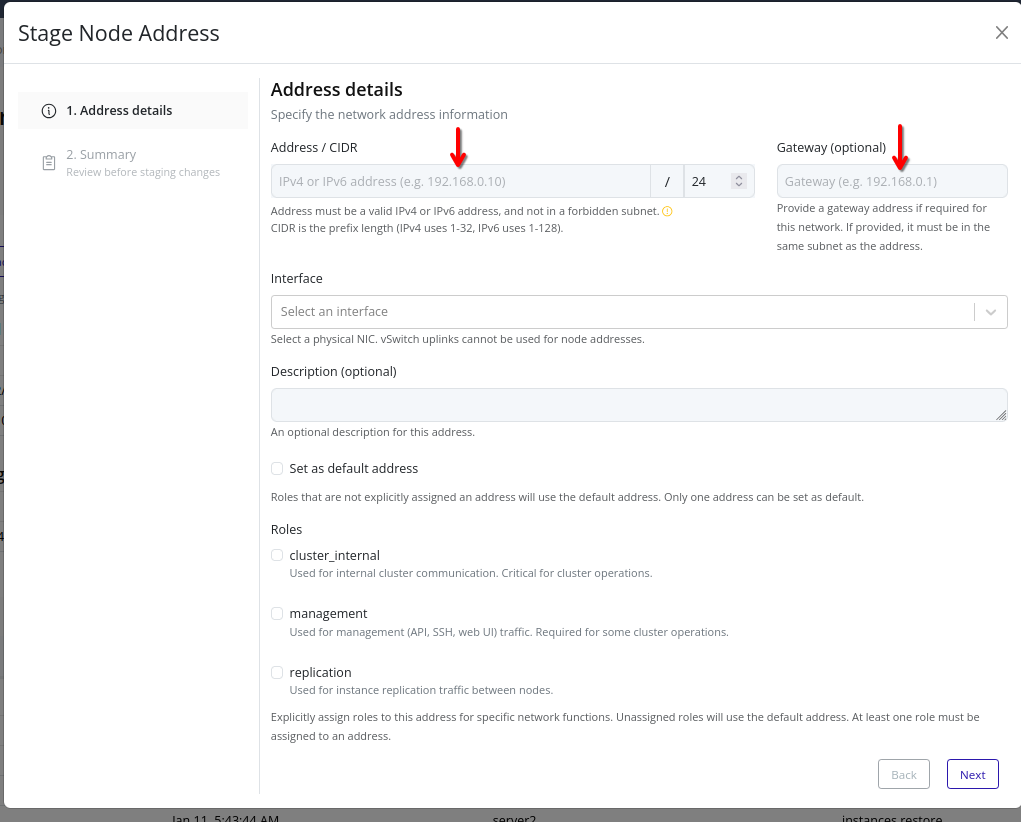
-
Select a physical NIC.
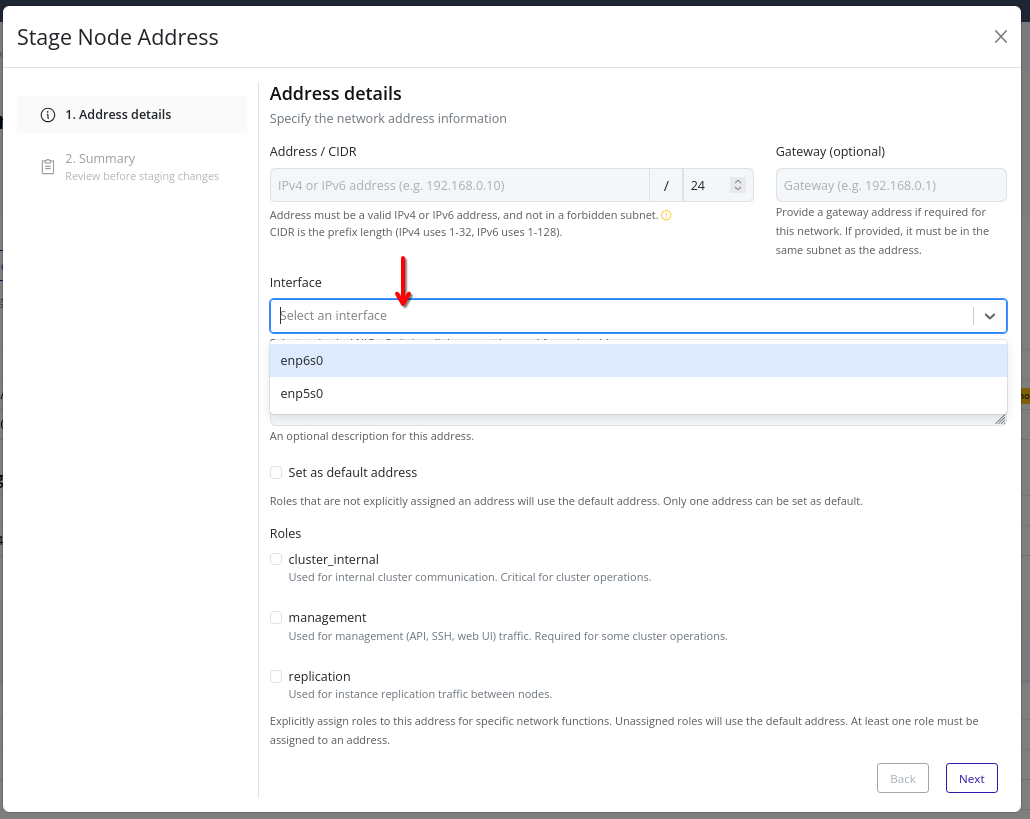
-
Optionally enter a description, and select at least one role. If the address will be the default for any role, enable Set as default address.
-
Review the summary and click Finish to stage the change.
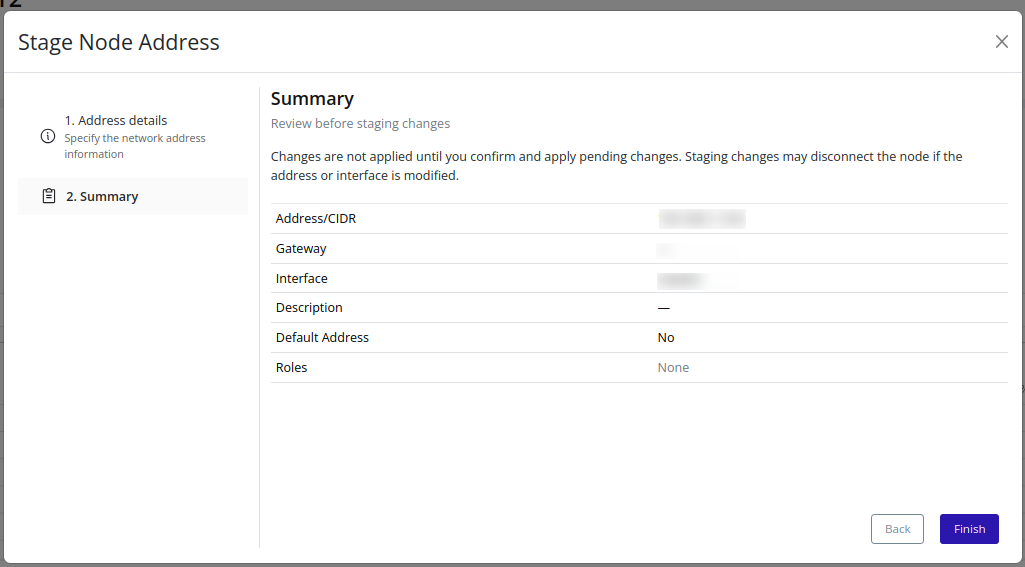
Update (Stage) An Address
Stage changes to an existing address, including role assignments and gateway settings.
Note
Updating a staged or existing address is pending until you Apply Changes.
Tip
To unstage removal of an existing address, edit the address and click Finish without making changes.
Web Interface
-
In Managed addresses, click the edit icon.
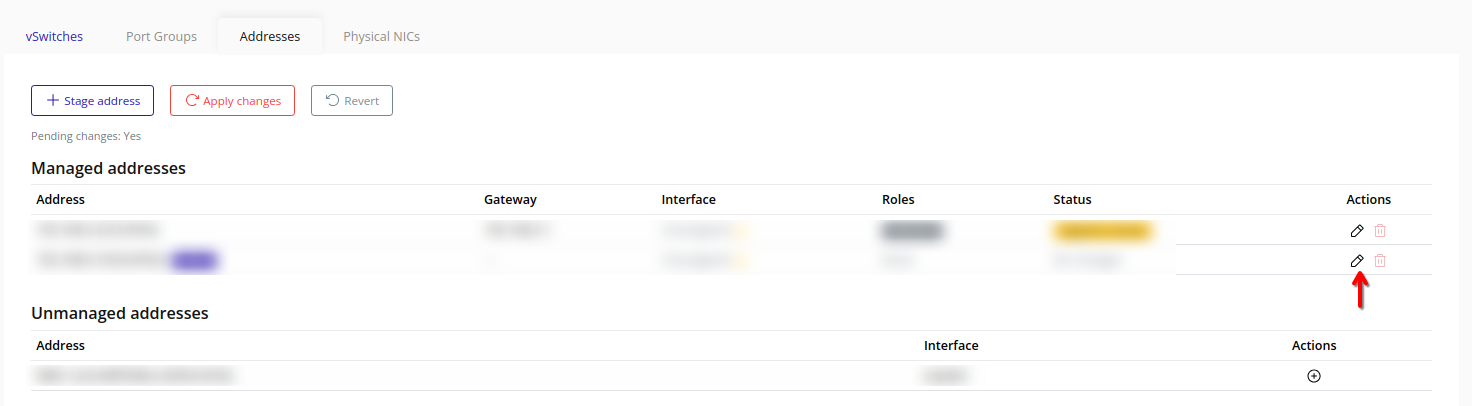
-
Update fields or role assignments.
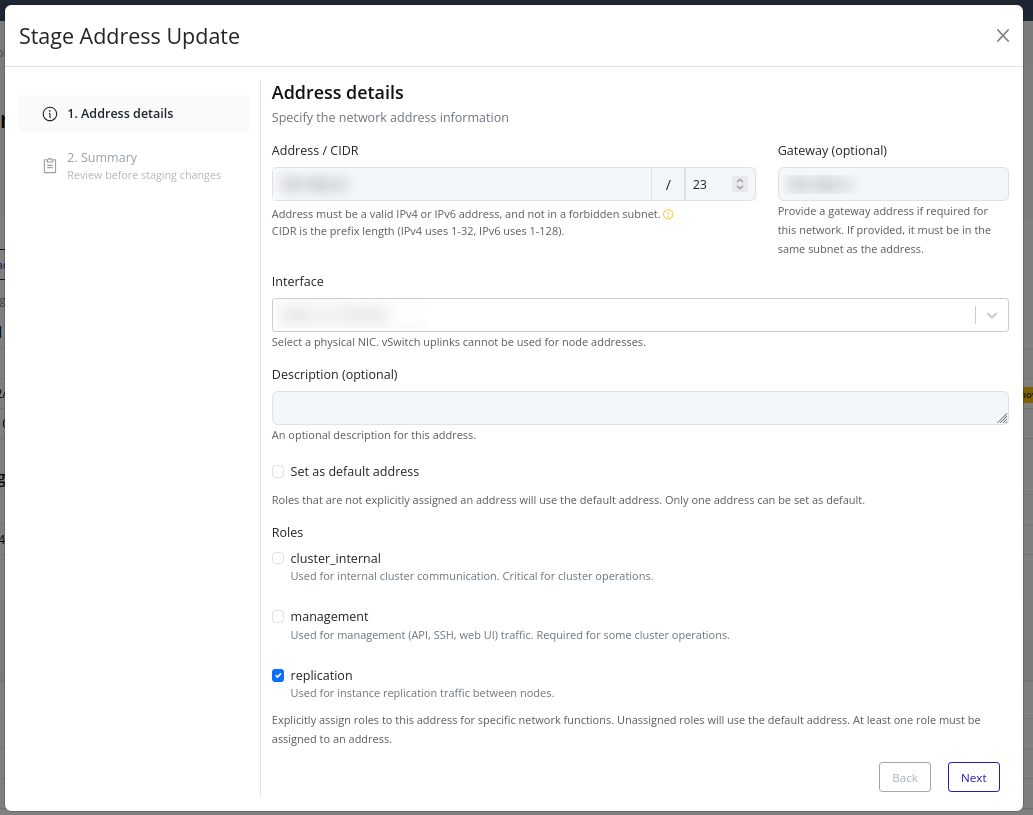
-
Review the summary and click Finish.
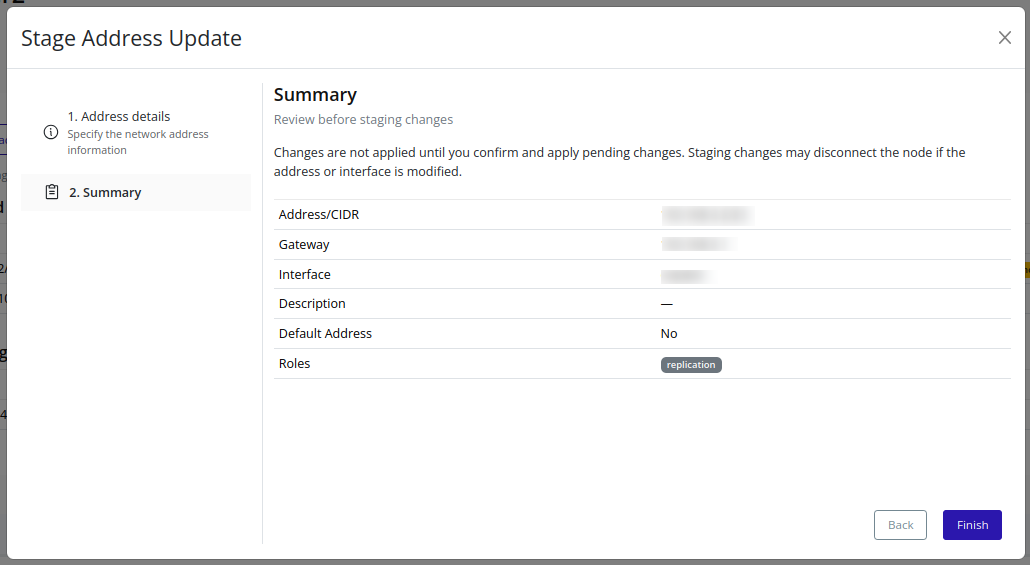
For additional field details, see Create a New Address.
Delete (Stage) An Address
Stage the removal of a managed address from the node. The default address cannot be removed.
Note
Deleting a staged address becomes permanent once the staged changes are applied and cannot be undone. Until then, you can undo the staged removal of a managed address by opening Stage Address Update for that address and clicking Finish to unstage the removal.
Note
Staged removals are pending until you Apply Changes.
Web Interface
-
Click the trash icon next to the address under Managed addresses.
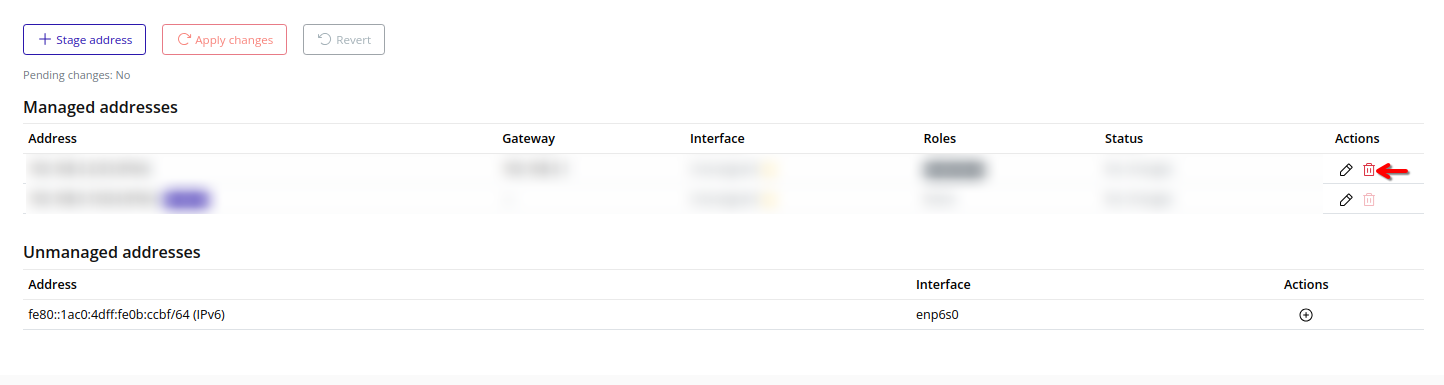
-
Review the confirmation dialog and click Finish to stage the removal.
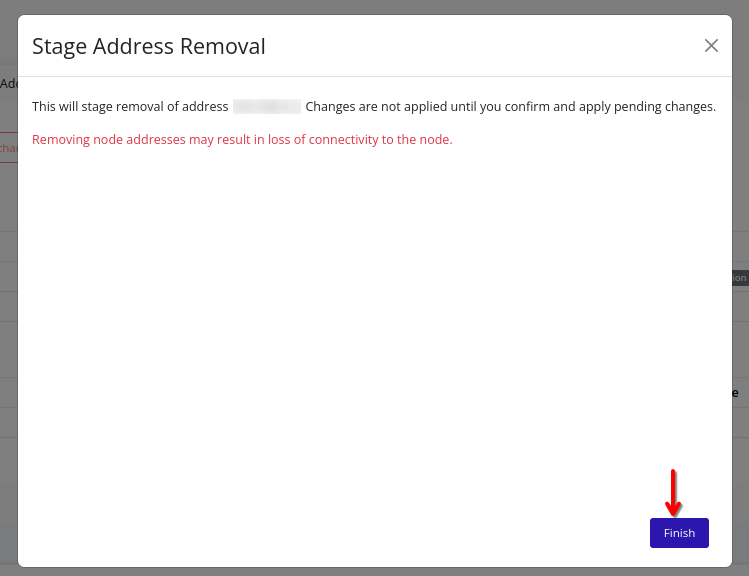
-
A badge “Staged for removal” will appear next to the address in the list.
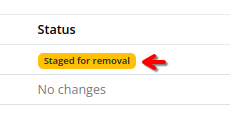
Convert An Unmanaged Address
Convert an unmanaged address into a staged node address so it can be managed by Pextra CloudEnvironment®.
Note
Only addresses already detected on the node appear in Unmanaged addresses.
Web Interface
-
In Unmanaged addresses, click the plus icon next to the address you want to convert.
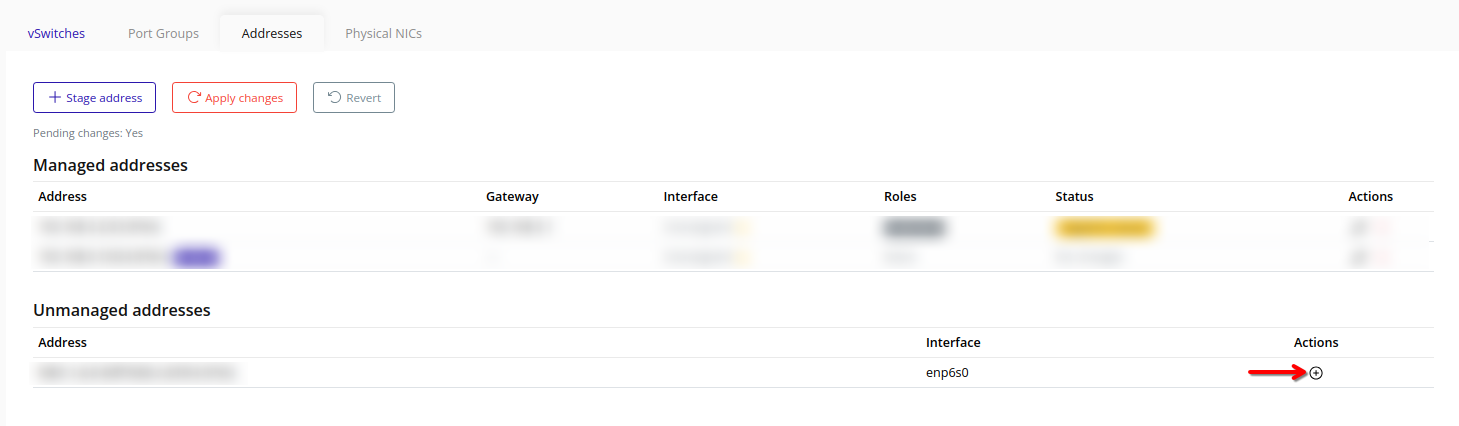
-
Confirm the pre-filled address, CIDR, and interface. Add a gateway if required, and select roles.
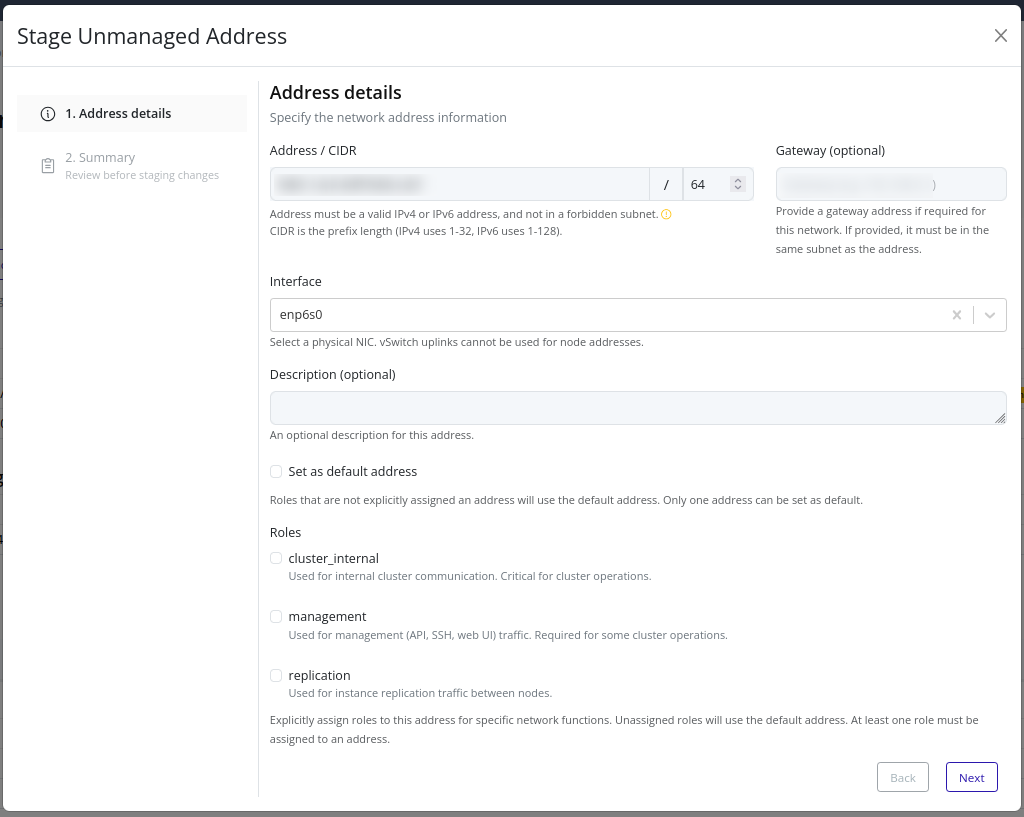
-
Review the summary and click Finish to stage the address.
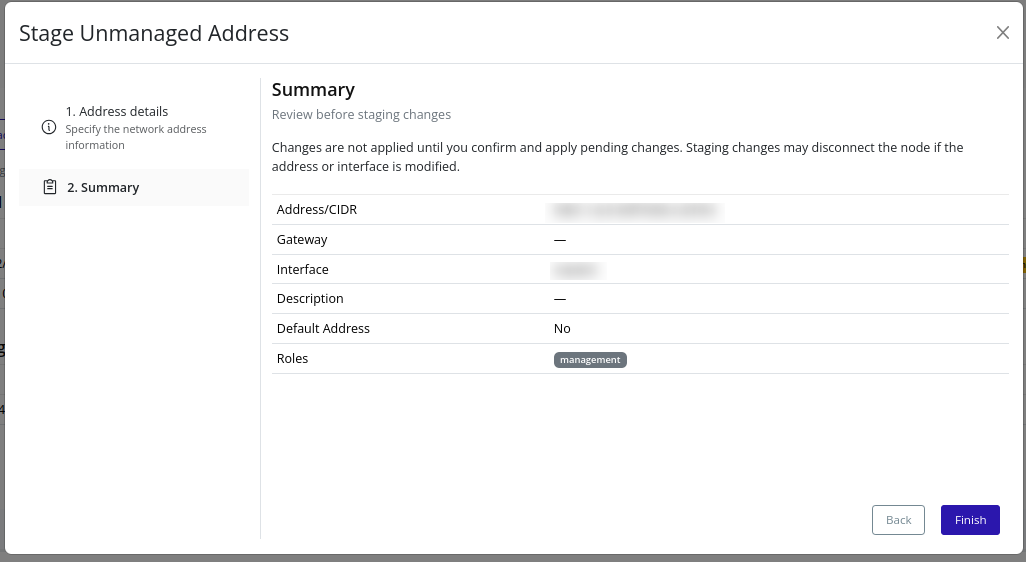
Apply Changes
Apply pending address changes to write updated network configuration on the node. Applying changes can interrupt management connectivity.
Caution
Applying changes is destructive and can break connectivity to the management interface or the cluster.
Web Interface
-
Click Apply changes.
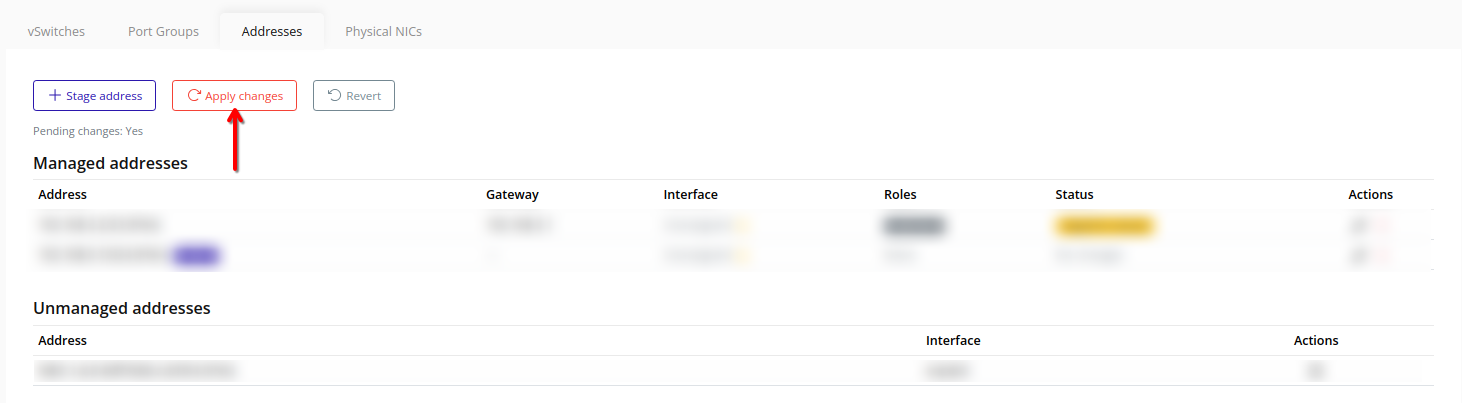
-
Review the confirmation dialog and click Finish to apply the changes.
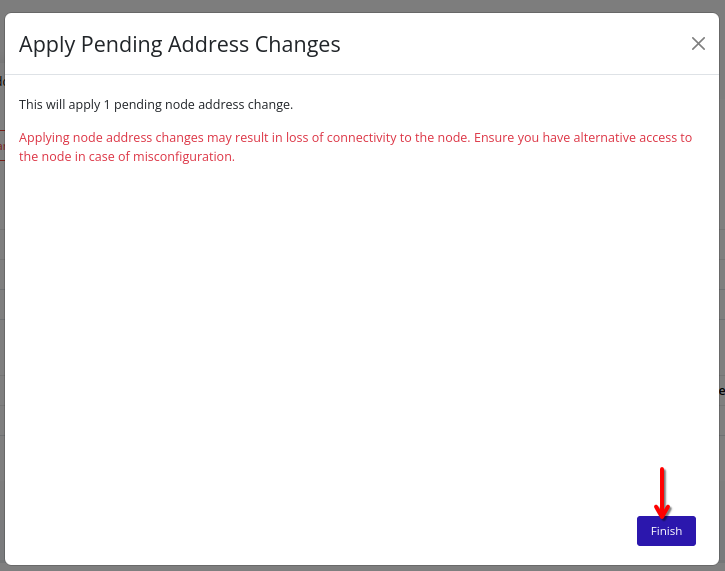
-
The changes will be applied to the node. During this process, connectivity to the node may be temporarily interrupted.
Revert Changes
Discard all pending address changes on the node without applying them.
Note
Reverting removes all staged changes and cannot be undone.
Web Interface
-
Click Revert.
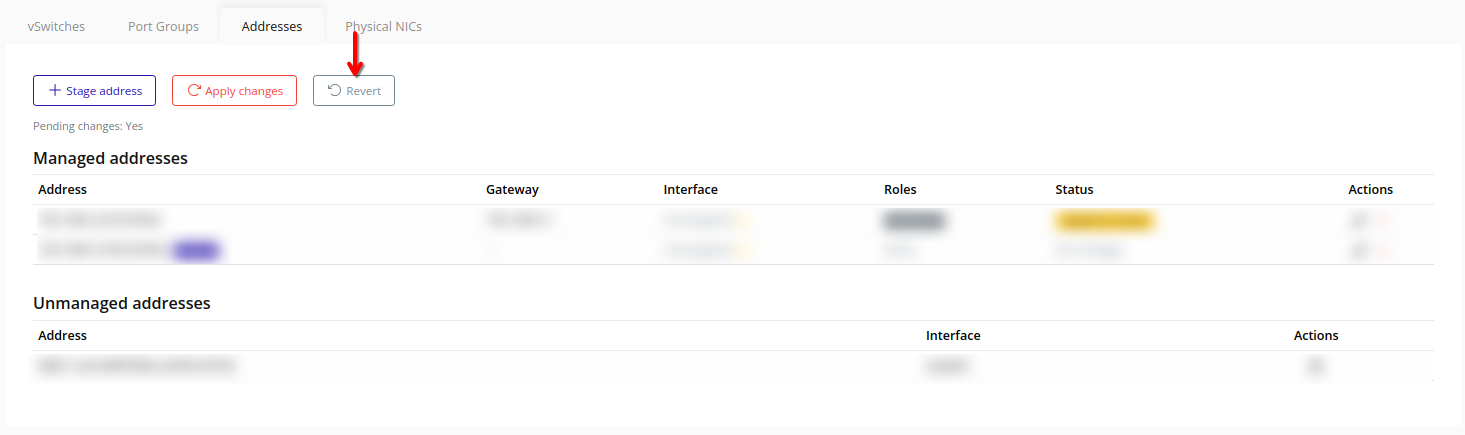
-
Confirm the discard.
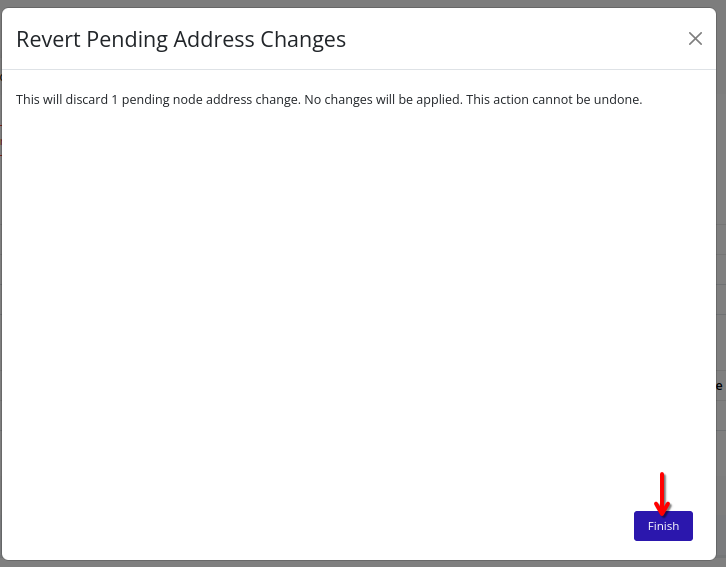
Node DNS
To configure DNS servers for a node, refer to the FAQ: How do I change the DNS servers of a node?.
Storage Management
This section provides a guide to managing storage within your deployment. The Pextra CloudEnvironment® storage engine supports a variety of storage technologies, from local disks to distributed storage systems.
Storage Pools
Storage pools are software-defined storage resources. Storage pools are configured on clusters and propagated to nodes. One configuration can be used across multiple nodes, allowing for flexible storage management.
The ID prefix for storage pools is pool-1.
Storage Pool Types
The following storage pool configurations are supported in Pextra CloudEnvironment®:
| Pool Type | Volume Backing2 | Networked | Description | Notes |
|---|---|---|---|---|
Directory (directory) | File | ❌ | Uses a directory on the node. | The default local storage pool is a directory pool. |
NetFS (netfs) | File | ✅ | Mounts a network filesystem (NFS or CIFS/SMB) on the node as a storage pool. Similar to a directory pool, but allows for networked storage. | Target path must not conflict with other netfs or directory pools. |
iSCSI (iscsi) | Block | ✅ | Uses an iSCSI target. | N/A |
Ceph RBD (rbd) | Block | ✅ | Uses a Ceph RBD pool. | N/A |
ZFS (zfs) | Block | ❌ | Uses a ZFS pool. | A ZFS pool with the same name as the storage pool must exist on each enabled node. |
LVM (lvm) | Block | ❌ | Uses an LVM volume group. | An LVM volume group with the same name as the storage pool must exist on each enabled node. |
Notes
-
Resources in Pextra CloudEnvironment® are identified by unique IDs. Storage pool IDs will have the prefix
pool-, followed by a unique identifier (e.g.,pool-qthm_iLrflJ_DtSS1l4Gx). ↩ -
A storage pool can back volumes using either file-based or block-based storage. File-based storage pools use files to store data, while block-based storage pools use raw data blocks. Block-based storage pools typically provide better performance, while file-based storage pools are easier to manage. ↩
List Storage Pools
Storage pools can be listed to view the current storage configuration in the cluster. This includes details about the storage pools, their status, and the nodes they are associated with.
Web Interface
- Select the cluster in the resource tree and view the page on the right. Click on the Storage tab in the right pane. The storage pools will be listed:
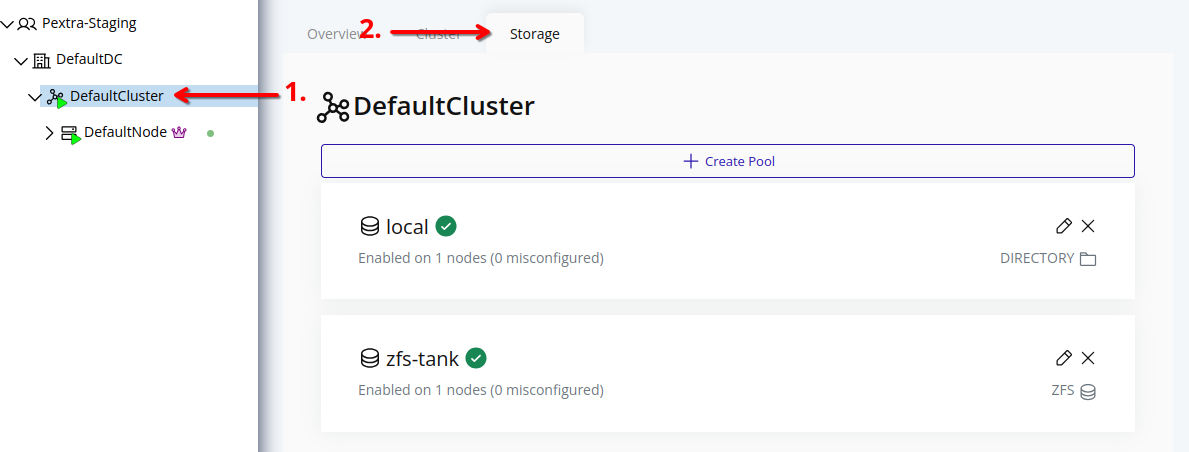
To edit associated nodes of a storage pool, refer to the Edit Storage Pool section.
Storage Pool Status
Each storage pool has a status indicator that provides information about its availability and configuration across the nodes in the cluster. The status can be one of the following:

The storage pool has not been enabled on any nodes.

The storage pool is available on all enabled nodes.

An error has occurred while propagating the storage pool configuration to enabled nodes. Manual intervention may be required to resolve the issue.
Create Storage Pool
Web Interface
-
Select the cluster in the resource tree and view the page on the right. Click on the Storage tab in the right pane.
-
Click the Create Pool button.
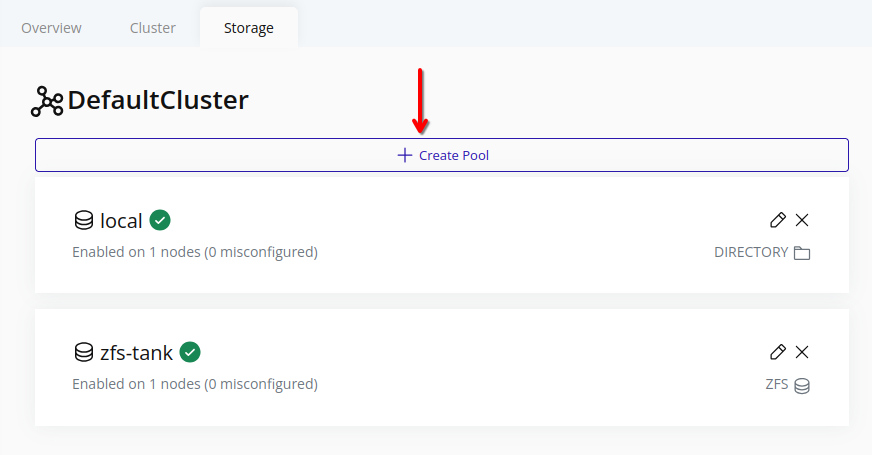
-
Choose the storage pool type, enter a name, and enter the required configuration metadata.
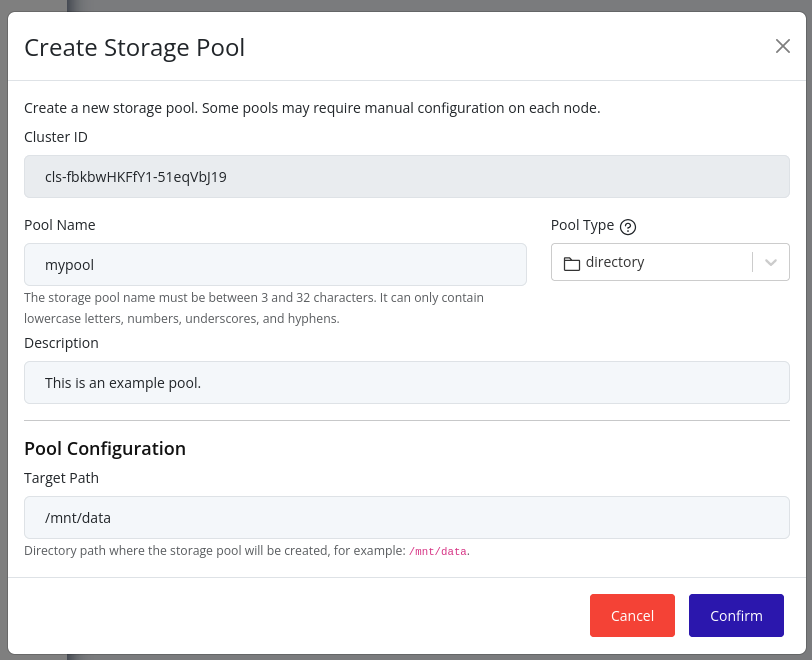
-
Click Create to create the storage pool. Initially, the new storage pool will not be enabled on any nodes. To enable the new storage pool on nodes, refer to the Edit Storage Pool section.
Edit Storage Pool
Currently, only node associations with storage pools can be modified. The name of a storage pool cannot be changed after creation.
Web Interface
-
Select the cluster in the resource tree and view the page on the right. Click on the Storage tab in the right pane.
-
Click on the pencil icon in the card of the storage pool you want to edit.
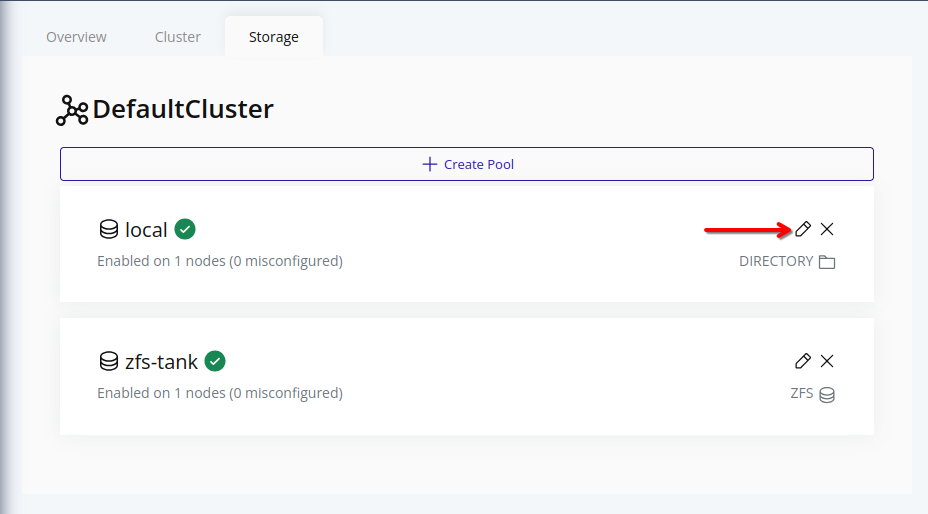
-
In the edit form, you can select the nodes on which this storage pool should be enabled. The nodes that are already associated with this storage pool will be selected by default.
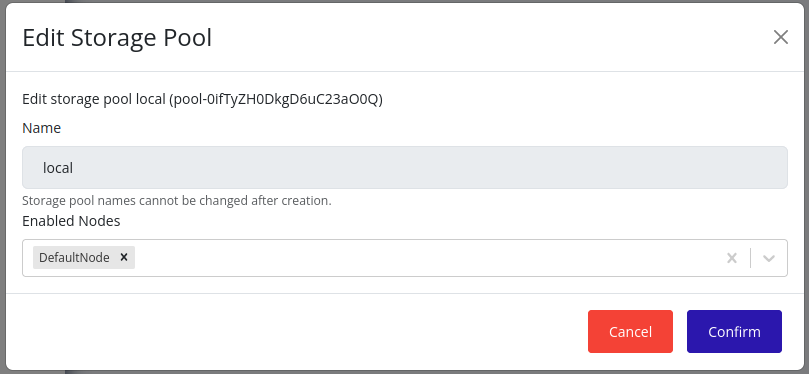
-
Click Save to apply the changes. The storage pool will be enabled on the selected nodes, and the changes will be propagated according to the storage pool propagation algorithm. This may take some time.
Destroy Storage Pool
Note
Storage pools cannot be destroyed if there are volumes on enabled nodes. All volumes must be destroyed, or all enabled nodes with volumes must have their associations removed. This limitation will be addressed in the future.
Web Interface
-
Select the cluster in the resource tree and view the page on the right. Click on the Storage tab in the right pane.
-
Click on the X icon in the card of the storage pool you want to destroy.
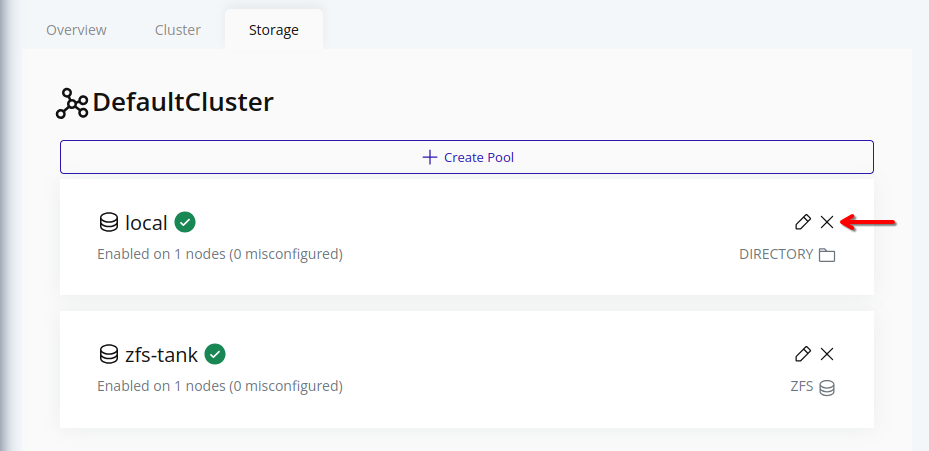
-
A confirmation dialog will appear. Type in “DESTROY” and click Confirm to confirm the destruction of the storage pool.

-
The storage pool will be marked for destruction, and will be cleaned up according to the storage pool propagation algorithm. This may take some time. During this time, the storage pool’s name will be unavailable for reuse.
Storage Pool Propagation
Storage pools are propagated across the cluster at regular intervals by a system job, ensuring that all nodes have the latest configuration and state. This propagation process is crucial for maintaining consistency and availability of storage resources.
Note
Creating a storage pool with the same name as a storage pool that is marked for deletion is not allowed. If you need to reuse the name, you must wait for the storage pool to be fully cleaned up.
Propagation Algorithm
The propagation algorithm is illustrated in the following diagram:
View sourceStorage Volumes
Storage volumes (or just “volumes”) are virtual storage devices that can be attached to instances. Volumes are allocated from storage pools, stored on individual nodes, and are used to store instance disks, snapshots, and other data.
Volumes can be attached to instances to provide additional storage capacity. Volumes can be resized, detached, and destroyed as needed.
The ID prefix for volumes is vol-1.
Notes
-
Resources in Pextra CloudEnvironment® are identified by unique IDs. Storage volume IDs will have the prefix
vol-, followed by a unique identifier (e.g.,vol-qthm_iLrflJ_DtSS1l4Gx). ↩
List Volumes
Web Interface
-
Select the node in the resource tree and view the page on the right. Click on the Storage tab in the right pane.
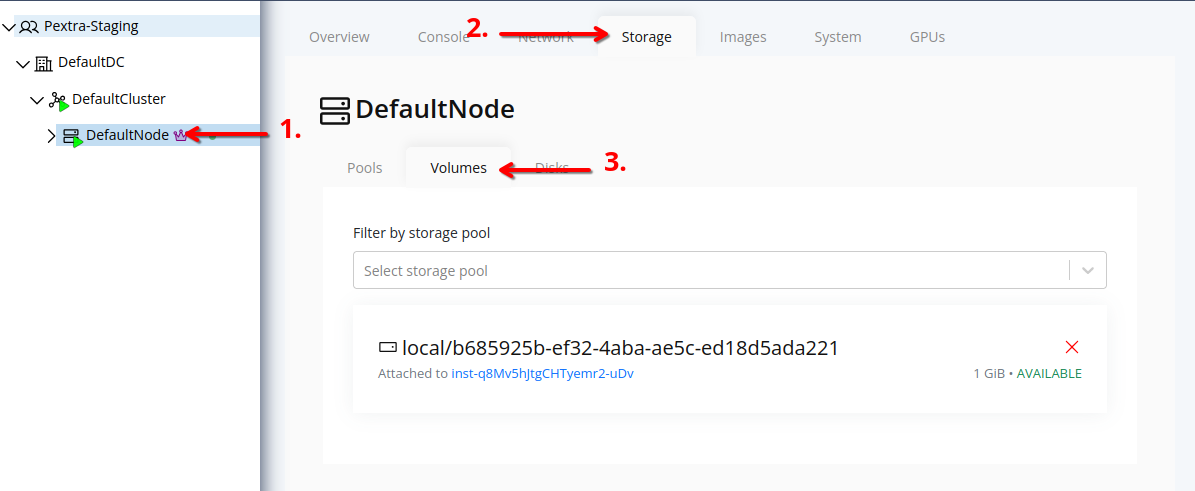
-
Click on the Volumes tab to view the list of volumes associated with the node.
-
The list displays all volumes associated with the node. To filter by storage pool, use the Storage Pool dropdown at the top of the list.
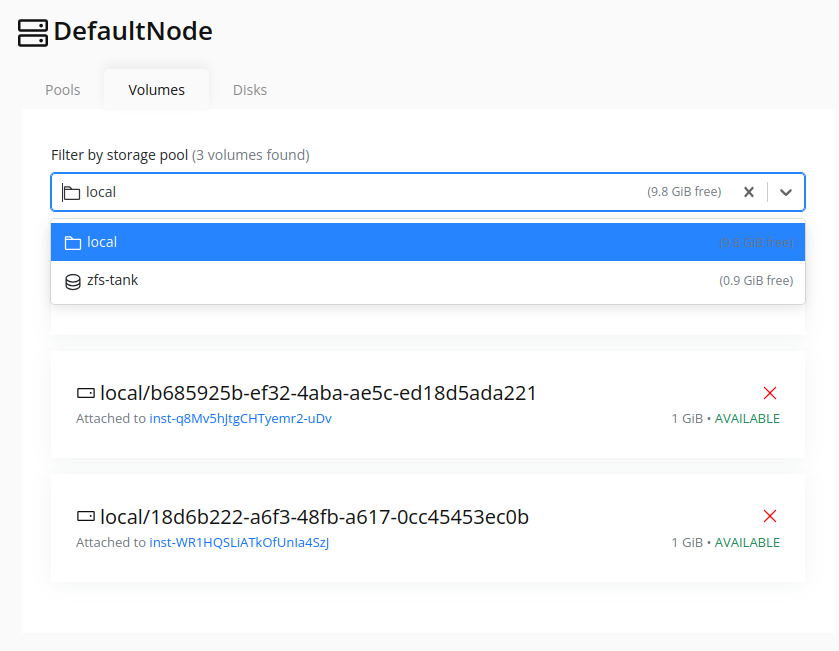
Create Volume
Web Interface
Currently, volumes can only be created when creating a new instance, or through the Volumes API. This will change in the future.
Resize Volume
Warning
Resizing a volume while it is in use may lead to data corruption or loss. Proceed with caution.
Note
After resizing, you may need to resize the filesystem on the volume to utilize the new size, which must be done inside the instance.
Web Interface
Currently, volumes can only be resized through the Resources tab in the instance details page. This will change in the future.
-
Select the instance in the resource tree and view the page on the right. Click on the Resources tab in the right pane.
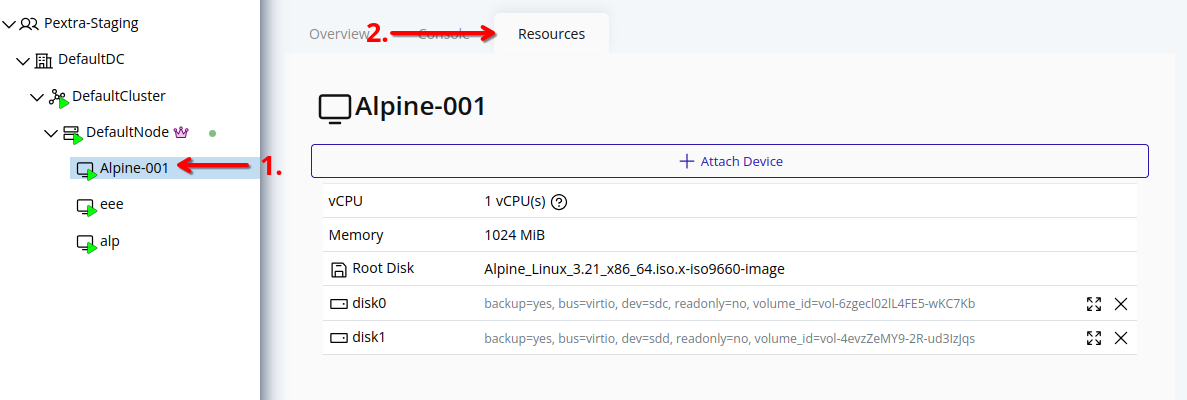
-
Click on the resize icon next to the volume you want to resize.
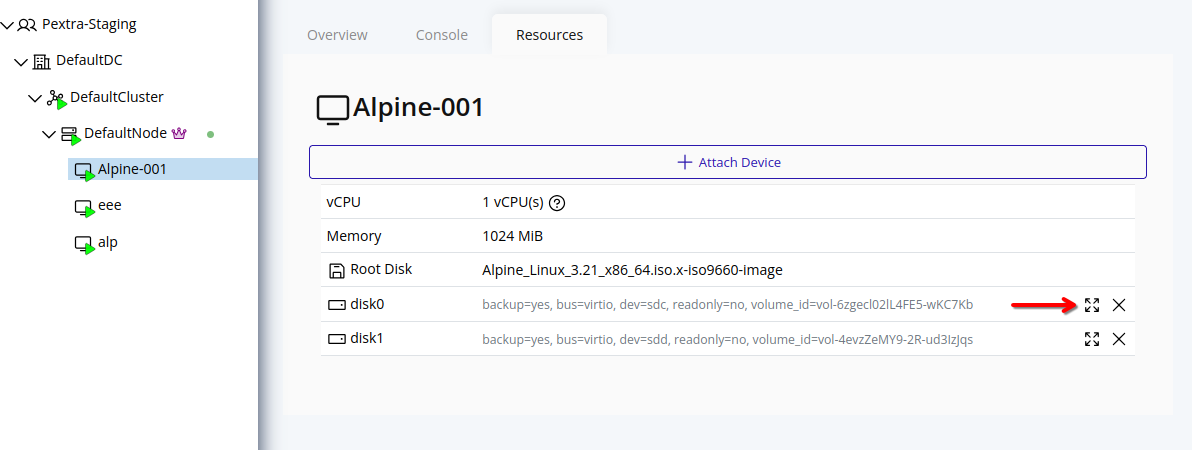
-
In the resize form, enter the delta size in GiB. This value will be added to the current size of the volume.
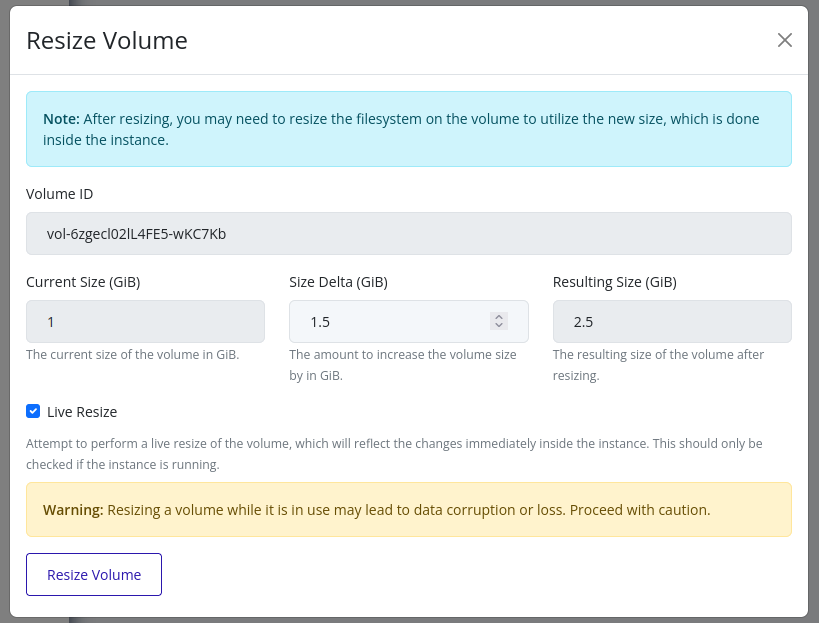
-
If the instance is running, the Live Resize option will be checked. This allows the volume to be resized without stopping the instance.
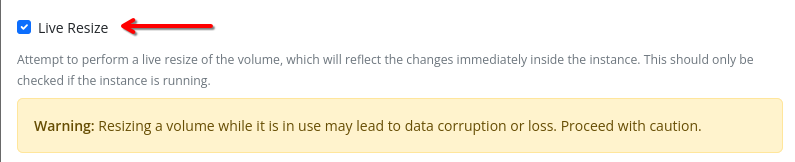
-
Click Resize Volume to apply the changes. The volume will be resized according to the specified delta size.
Tip
To perform a cold resize, you can stop the instance first, then follow the same steps as above without selecting the Live Resize option. This will ensure that the volume is resized safely without any risk of data corruption.
Destroy Volume
Note
A volume cannot be destroyed if it is attached to an instance. You must first detach the volume from the instance before destroying it.
Web Interface
-
Select the node in the resource tree and view the page on the right. Click on the Storage tab in the right pane.
-
Click on the Volumes tab to view the list of volumes associated with the node.
-
Click on the X icon next to the volume you want to destroy.
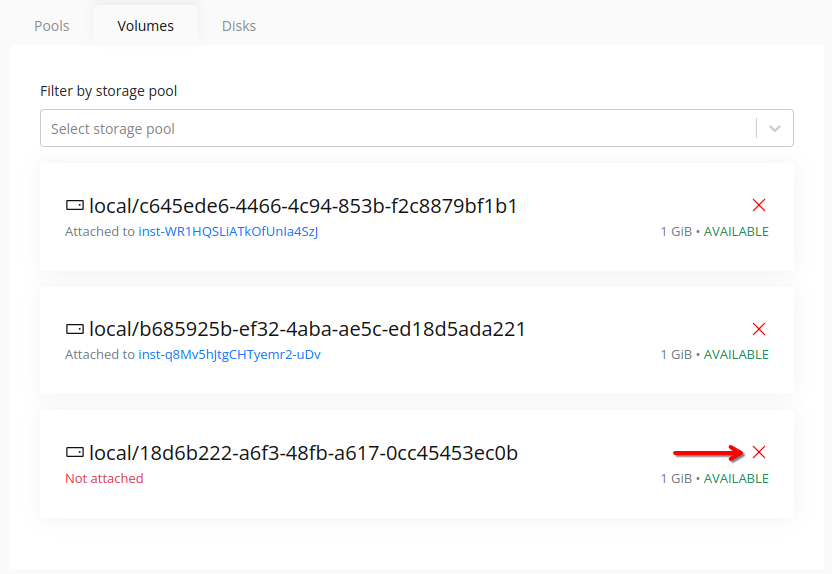
-
In the confirmation dialog, type “DESTROY” and click Confirm to confirm the destruction of the volume.
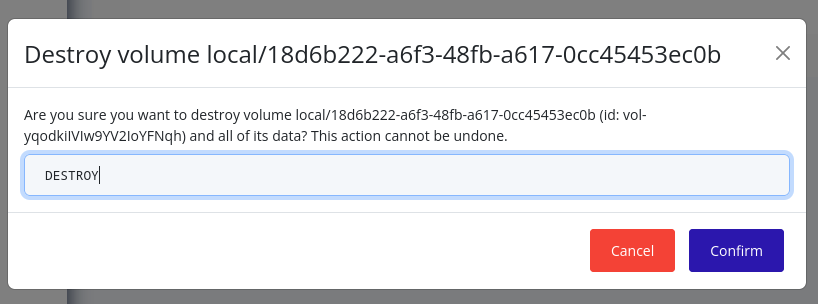
-
The volume will be destroyed, and it will no longer be available in the list of volumes.
Note
If the volume was attached to an instance, you may need to restart the instance to ensure it no longer references the destroyed volume.
Instance Management
Instances represent virtualized compute resources (VMs or containers) that run workloads within nodes in a cluster. Pextra CloudEnvironment® supports the open-source KVM hypervisor for instance virtualization, and LXC for containerization.
The ID prefix for instances is inst-1.
Notes
-
Resources in Pextra CloudEnvironment® are identified by unique IDs. Instance IDs will have the prefix
inst-, followed by a unique identifier (e.g.,inst-RqP1zhgvLT3qasUOvI5DW). ↩
Instance Deploy
To deploy a new instance (VM or container):
- Right-click on the target node and select Deploy.
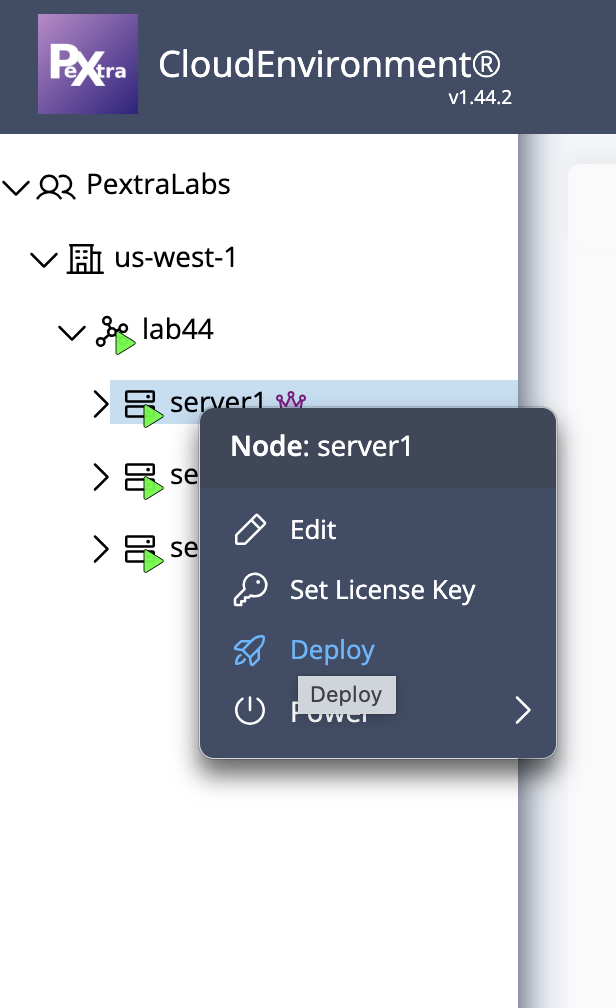
-
The Deploy Instance overlay will appear for configuration.
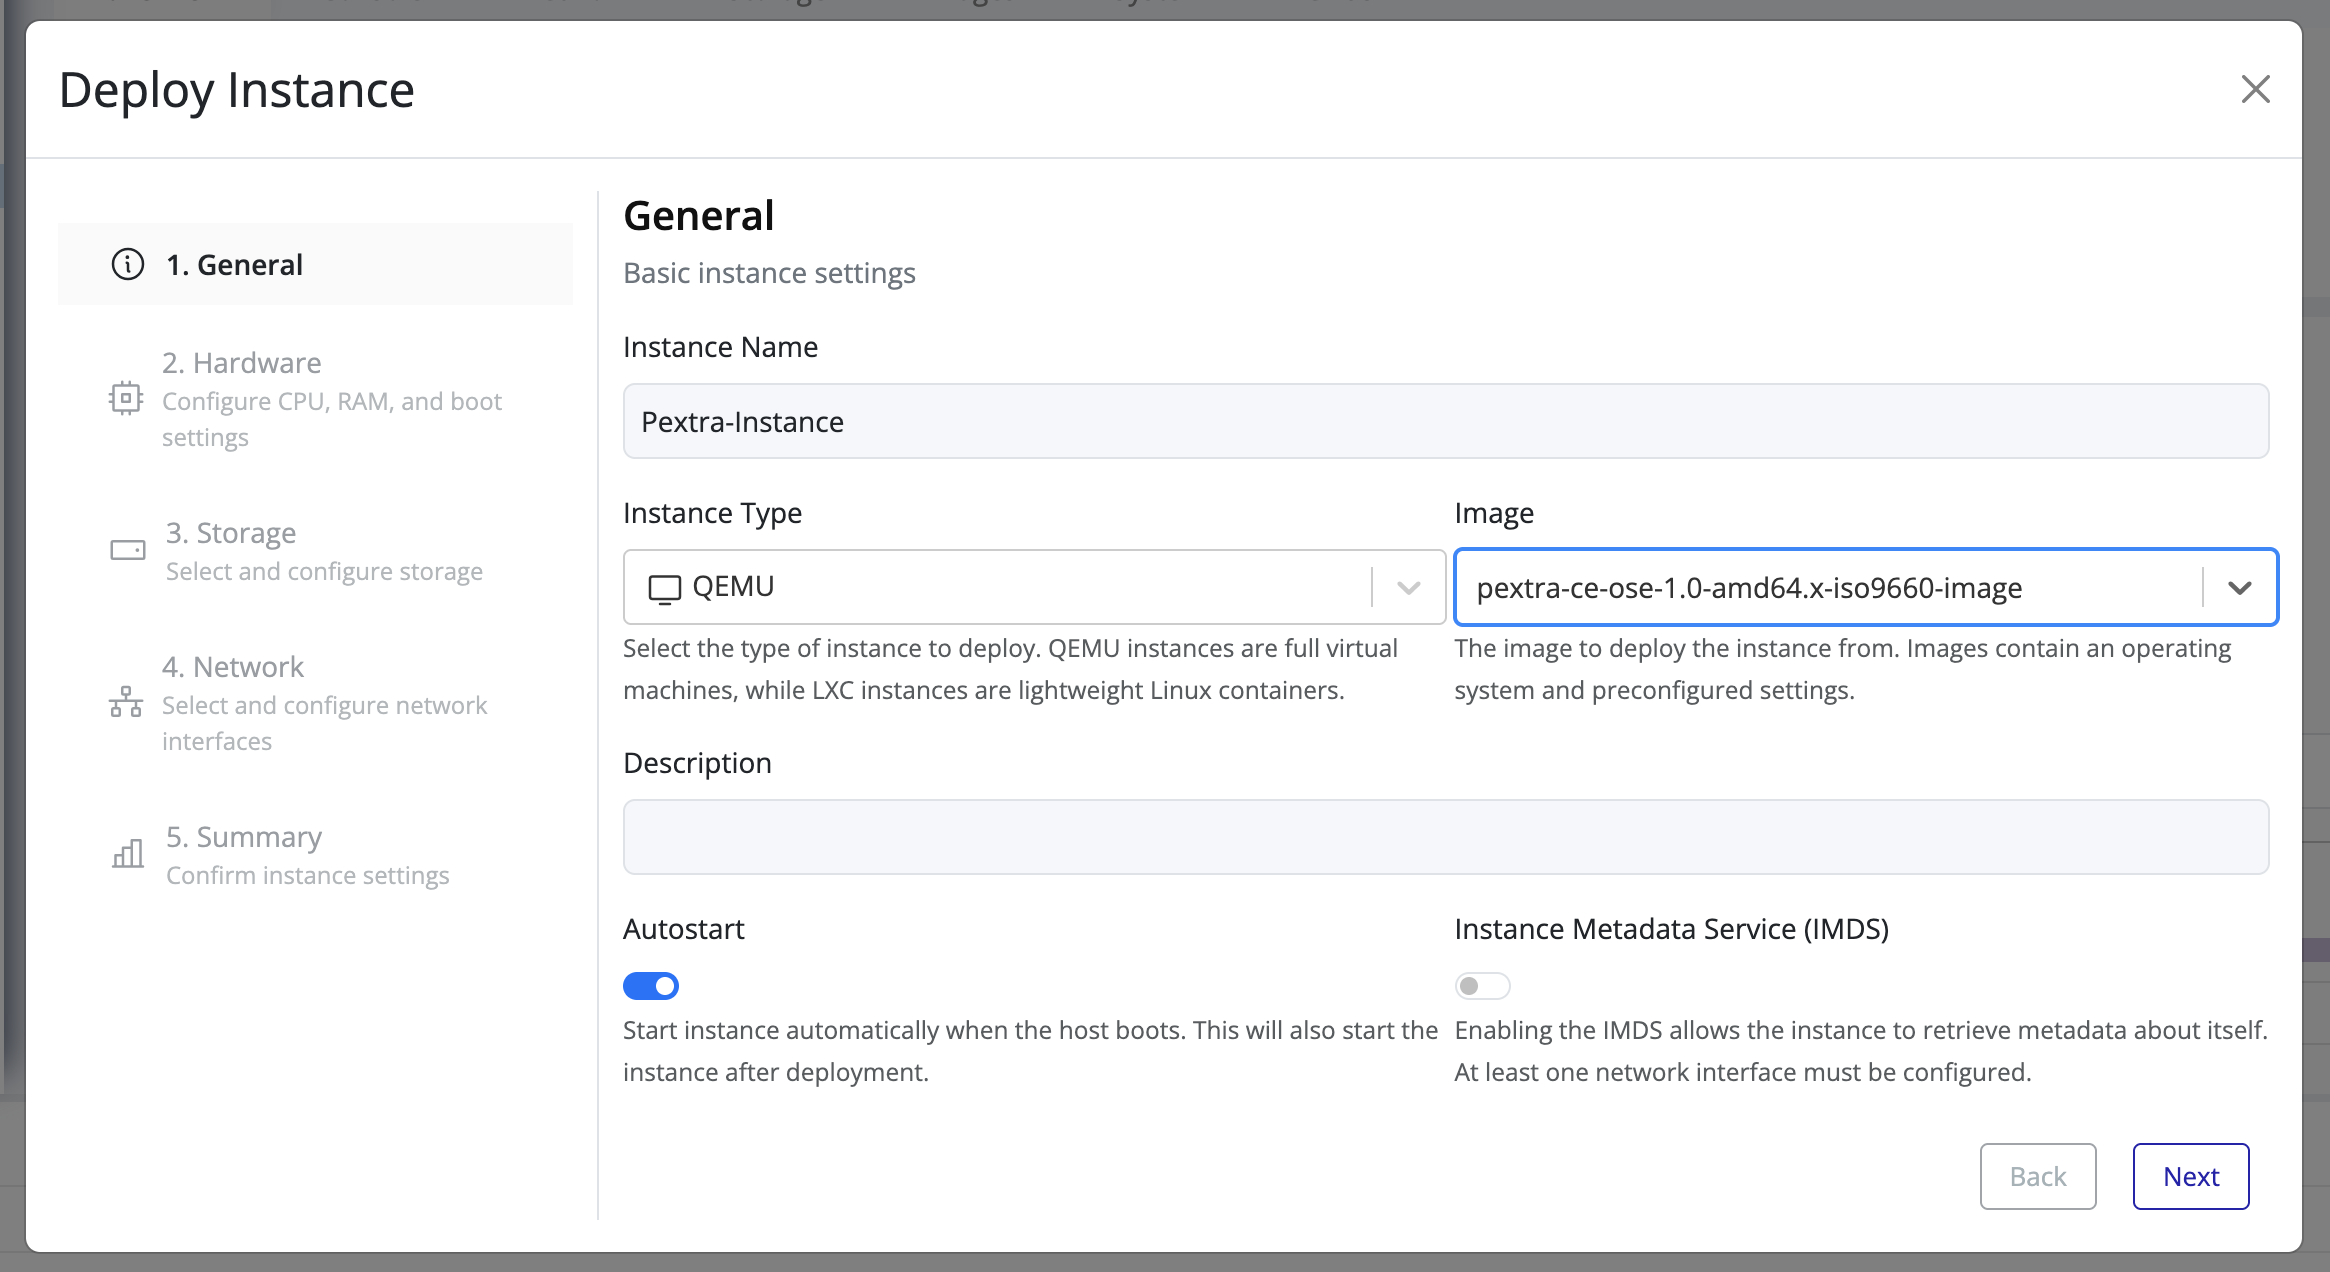
-
Fill in the required general instance information and click Next for customizations.
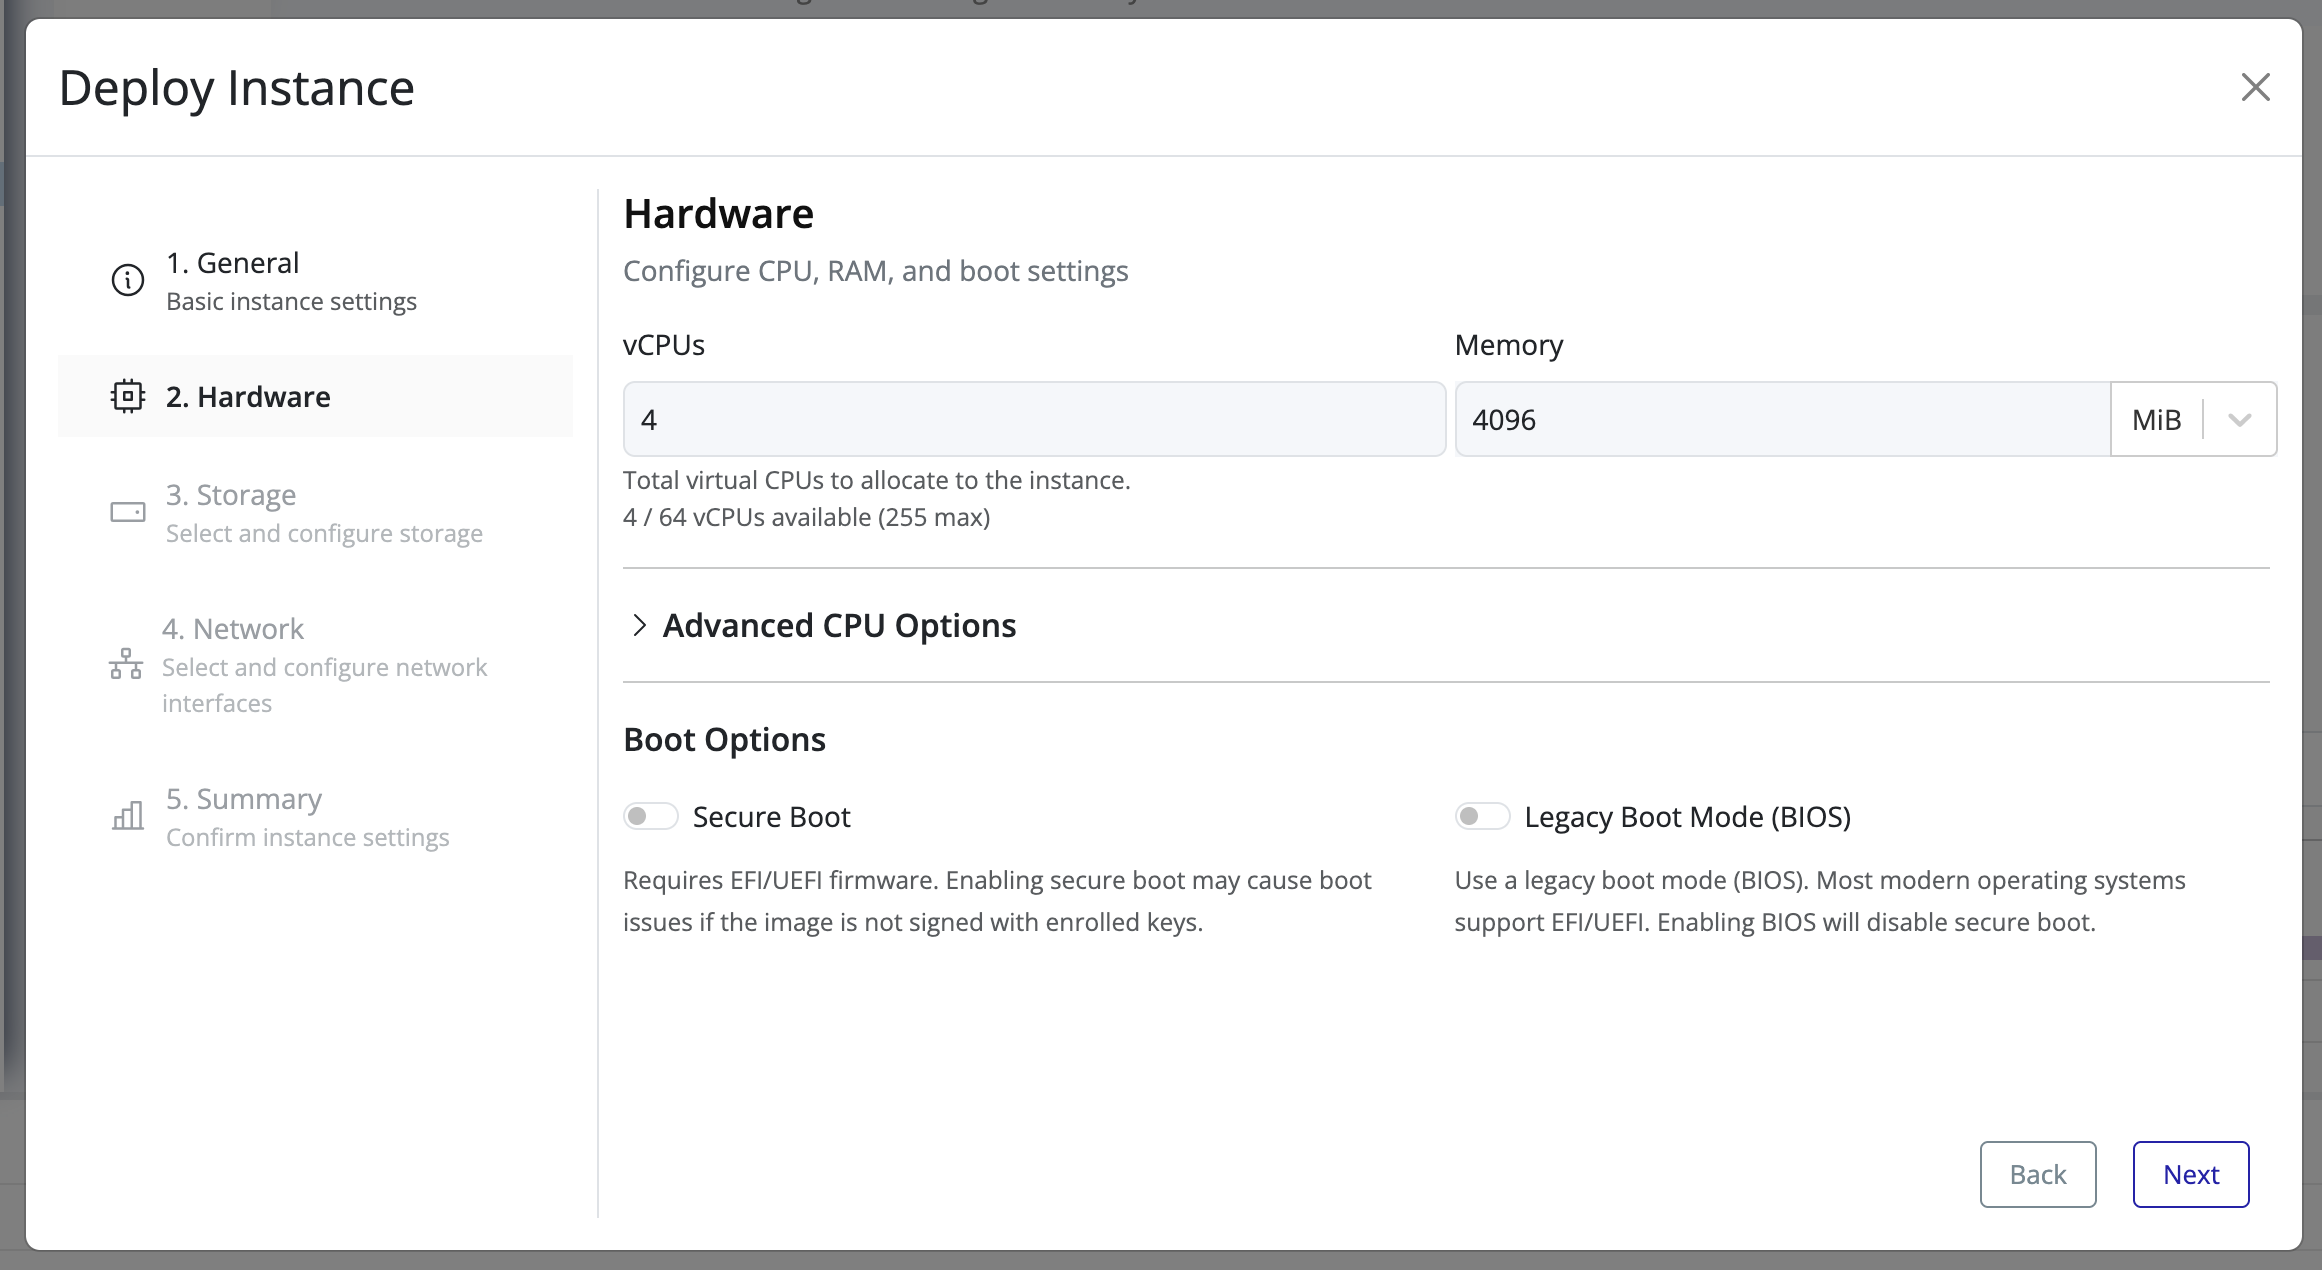
-
Add a volume (disk space) as needed and click Next.
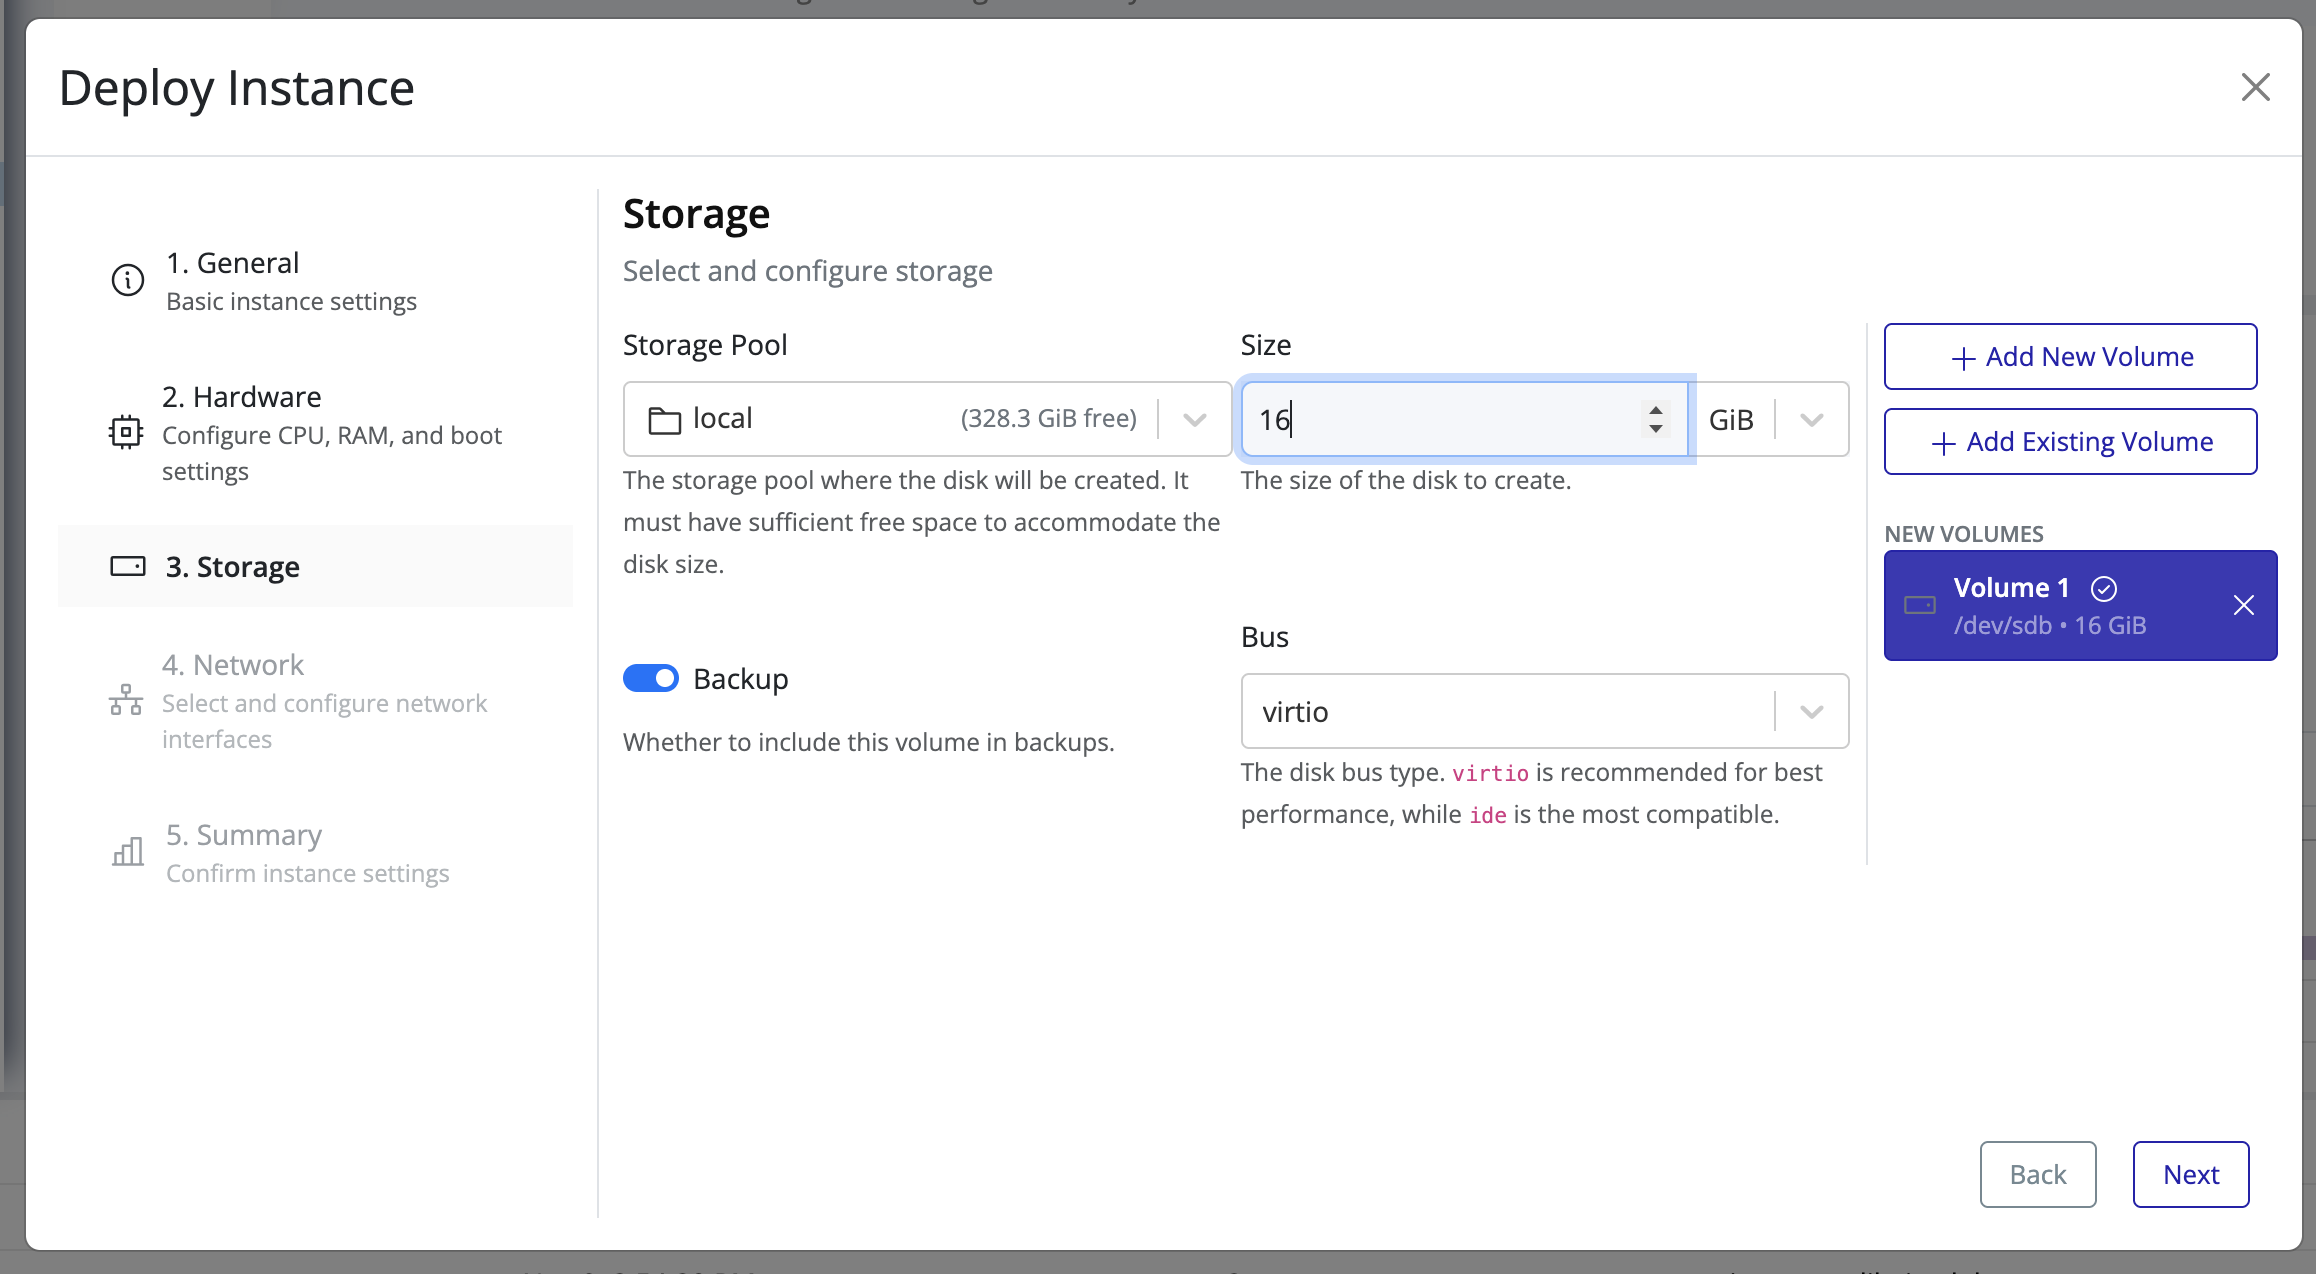
-
Configure networking for connectivity if required and click Next.
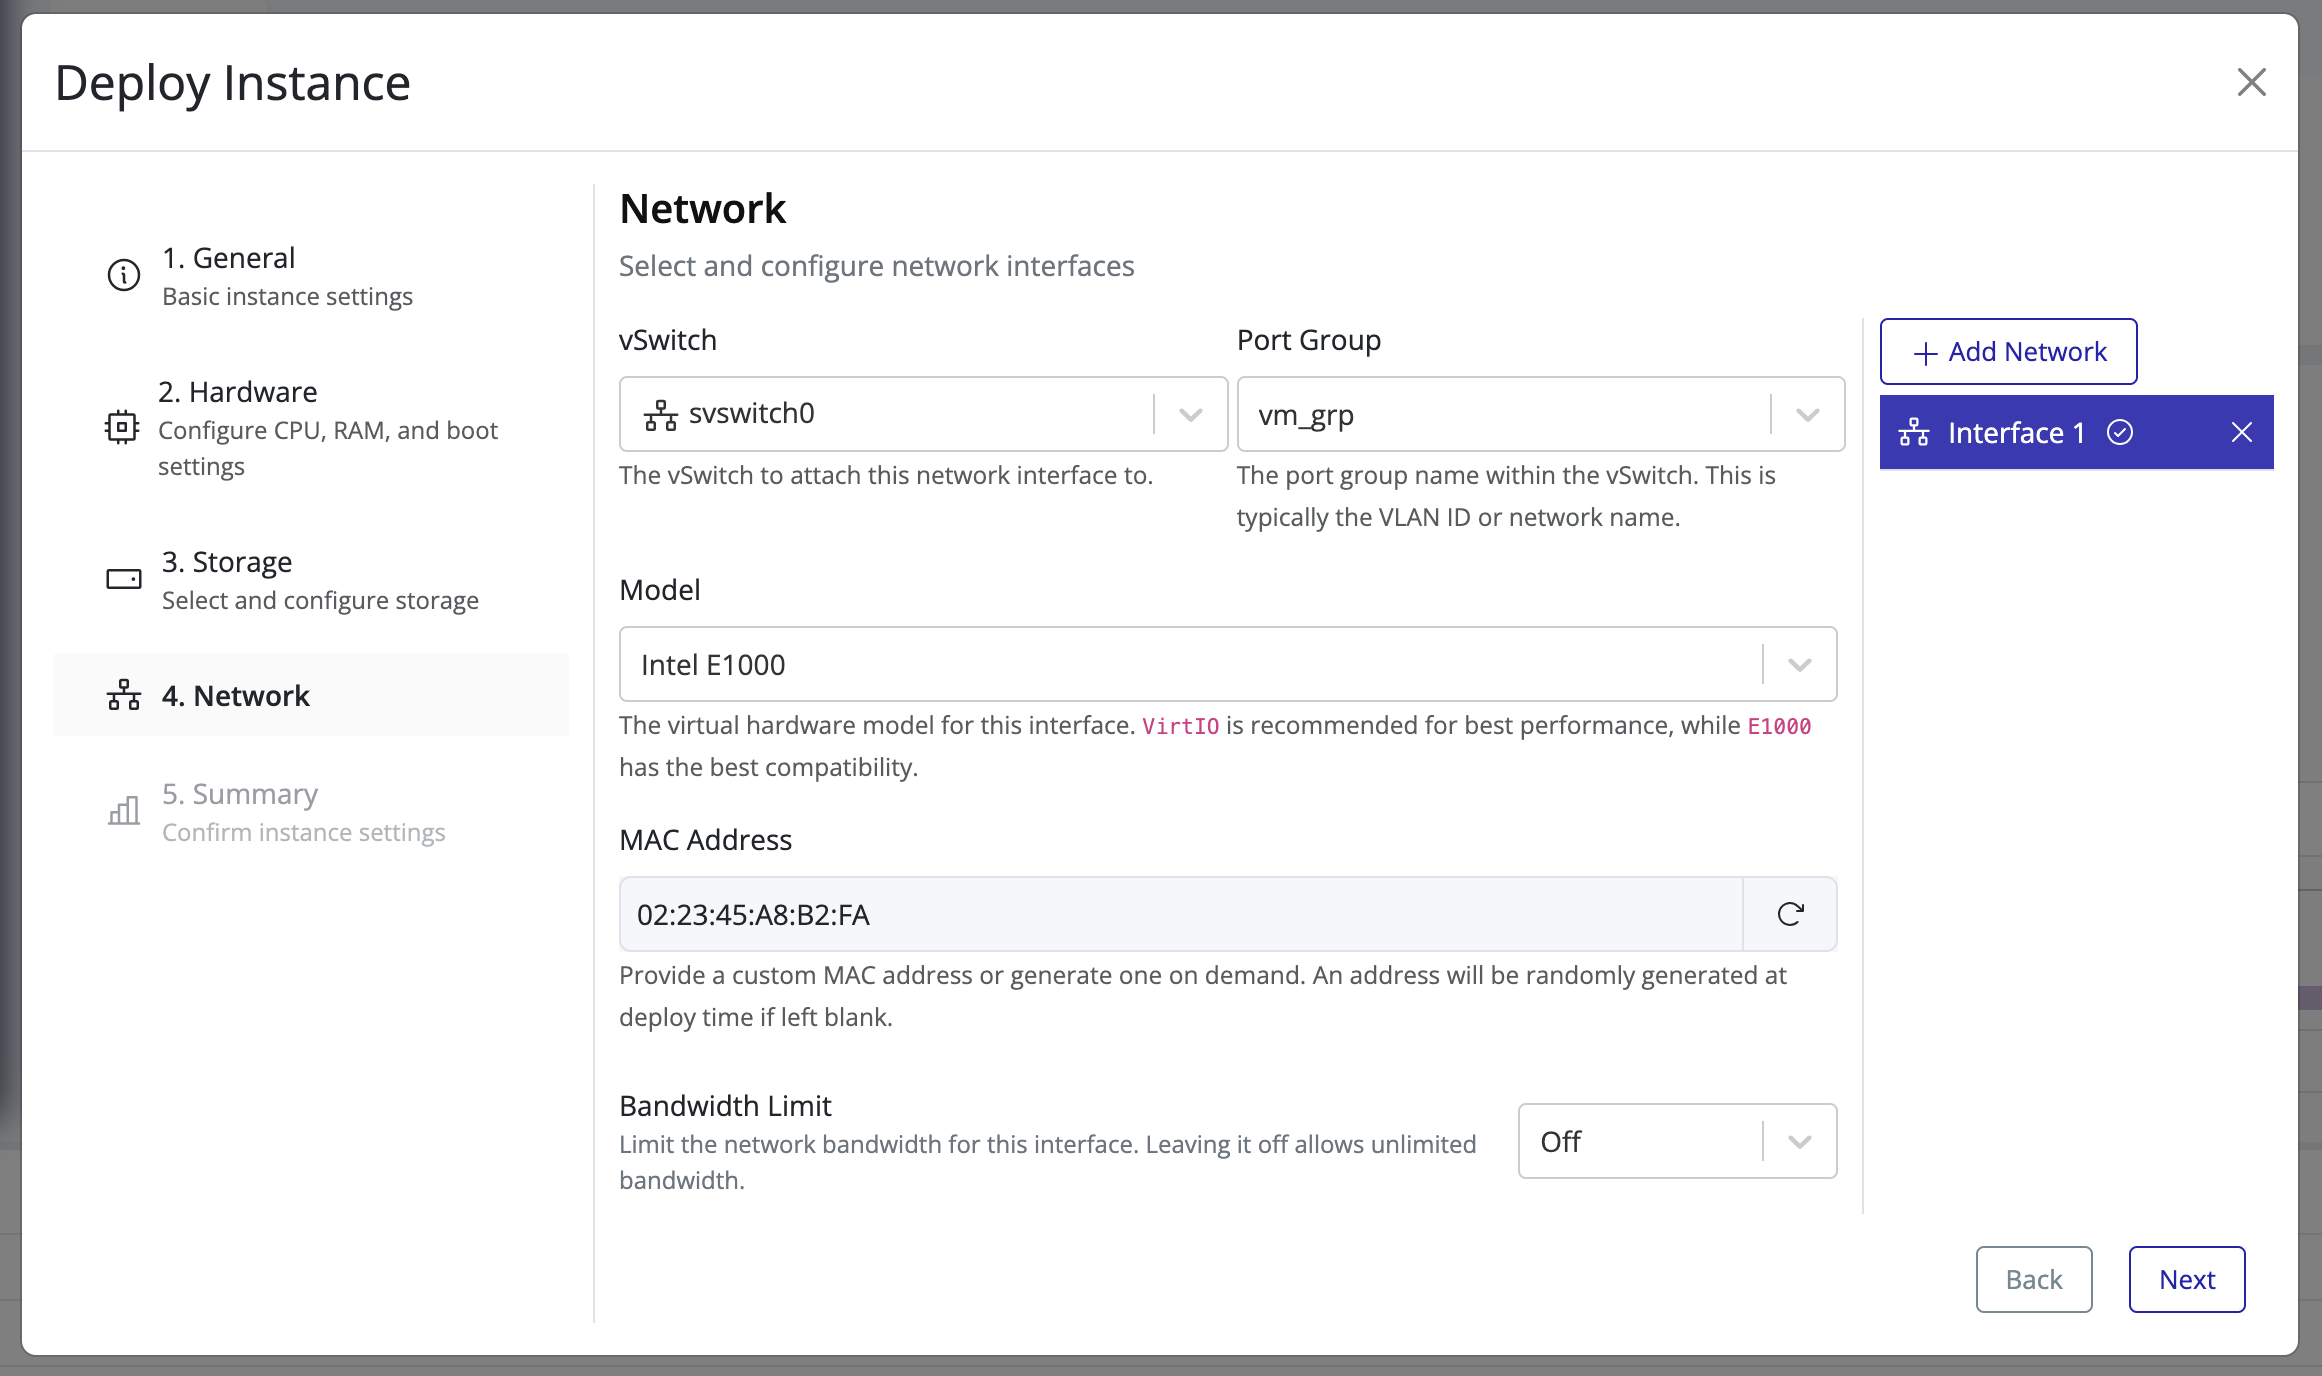
-
Review the configuration and click Finish.
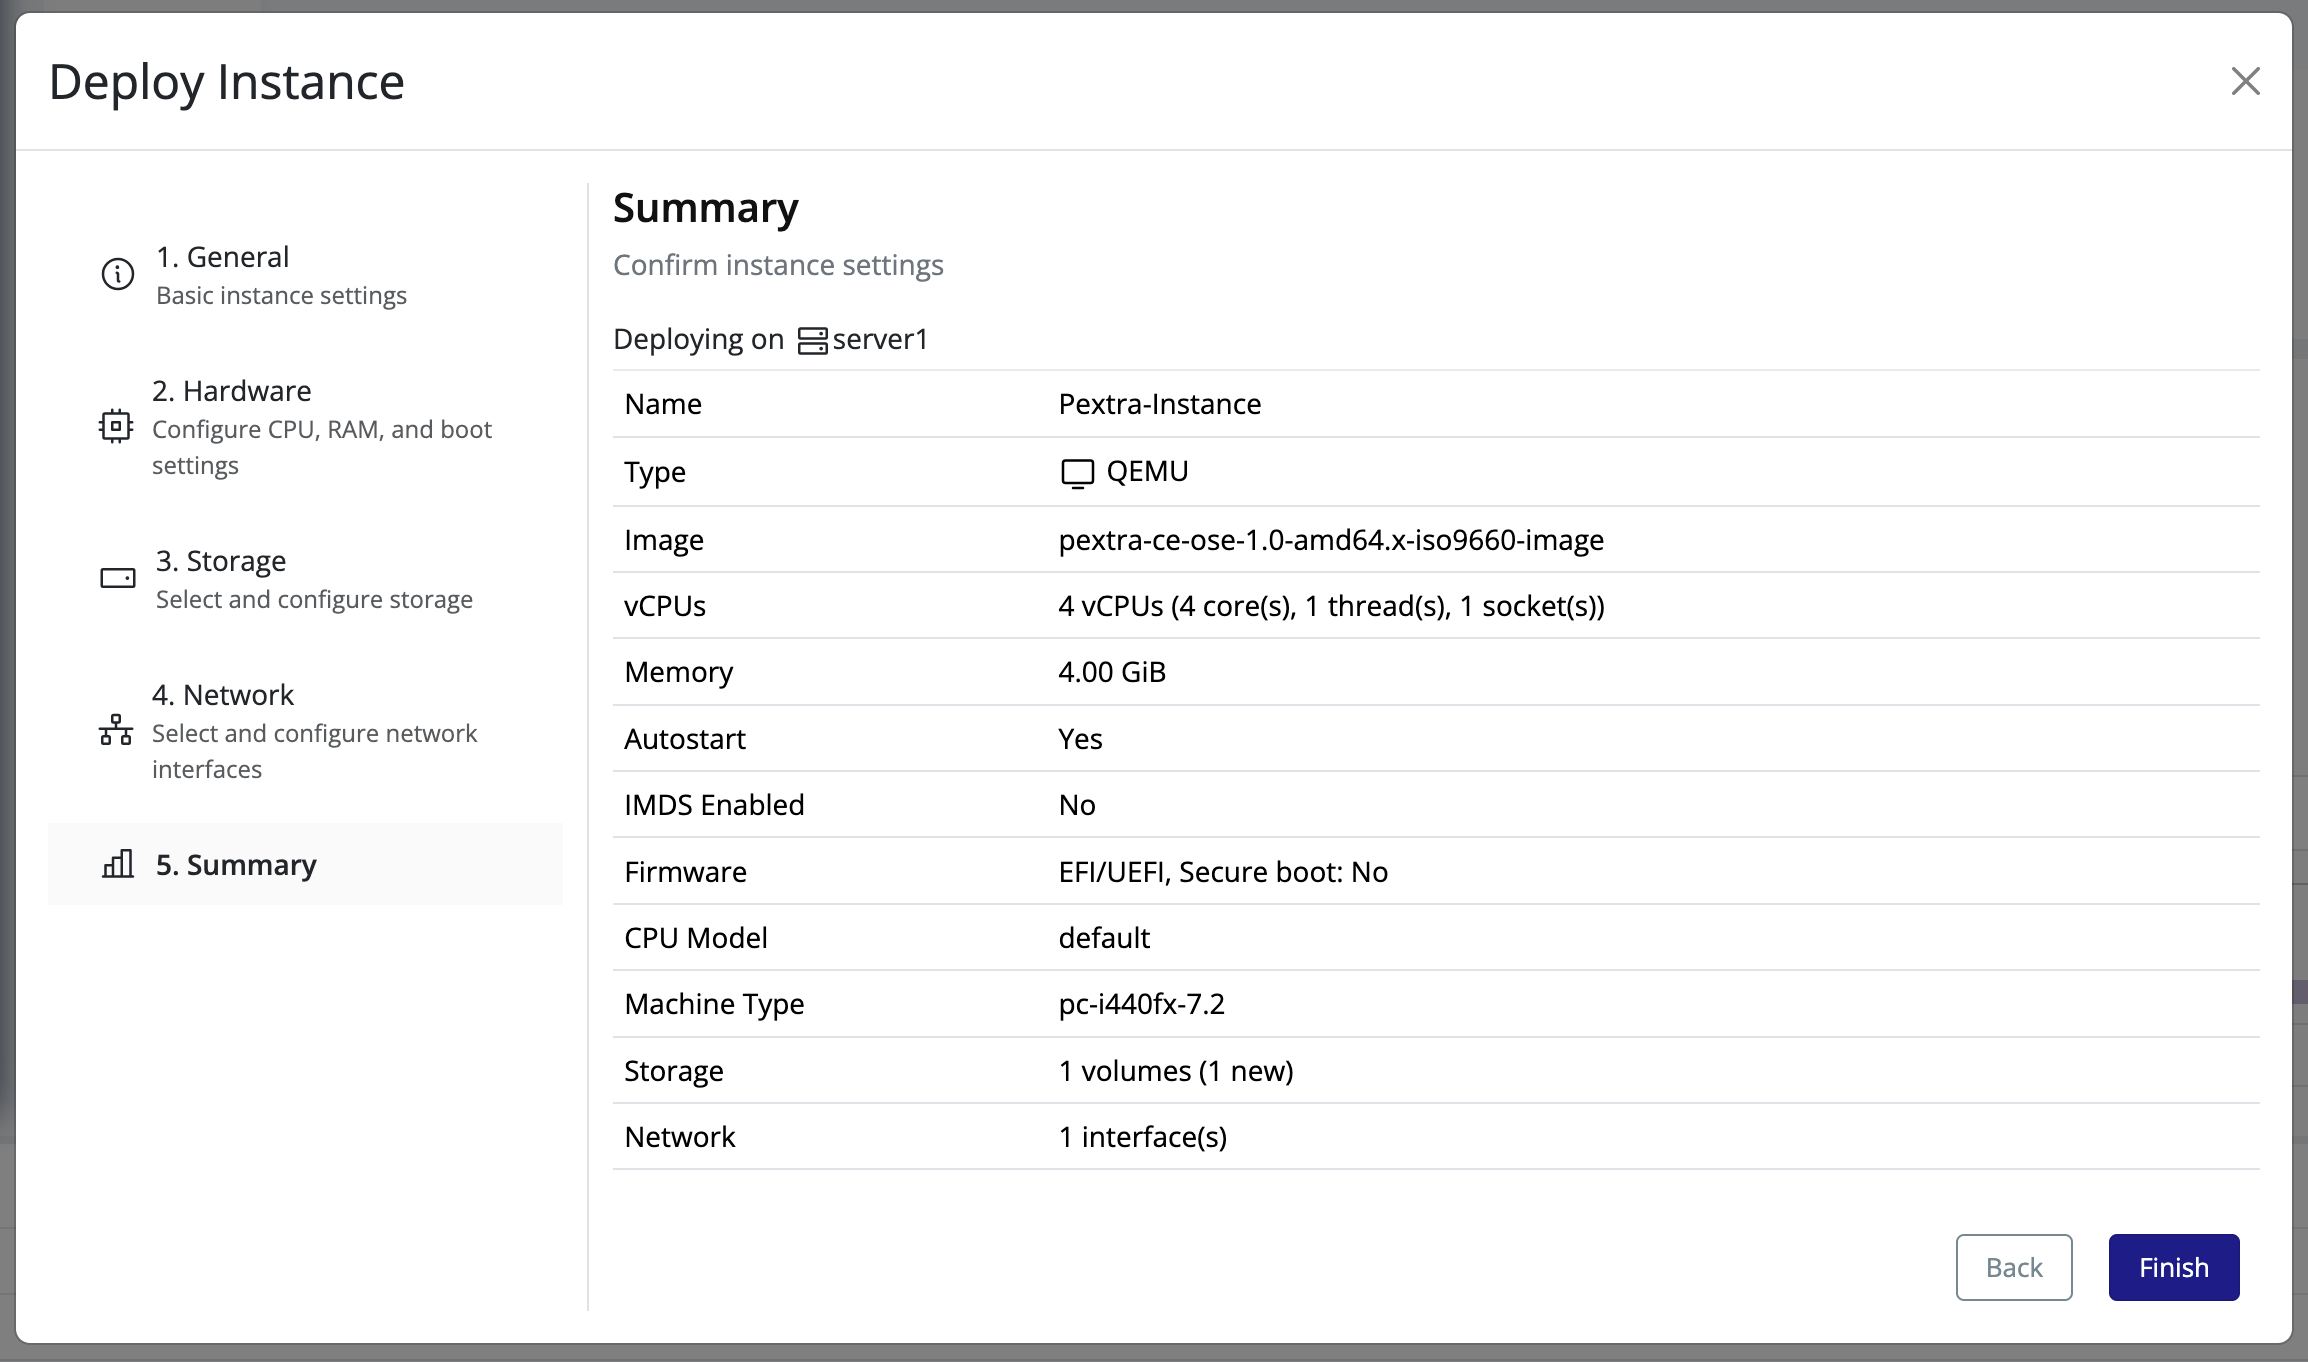
-
The new instance will appear under the selected node.
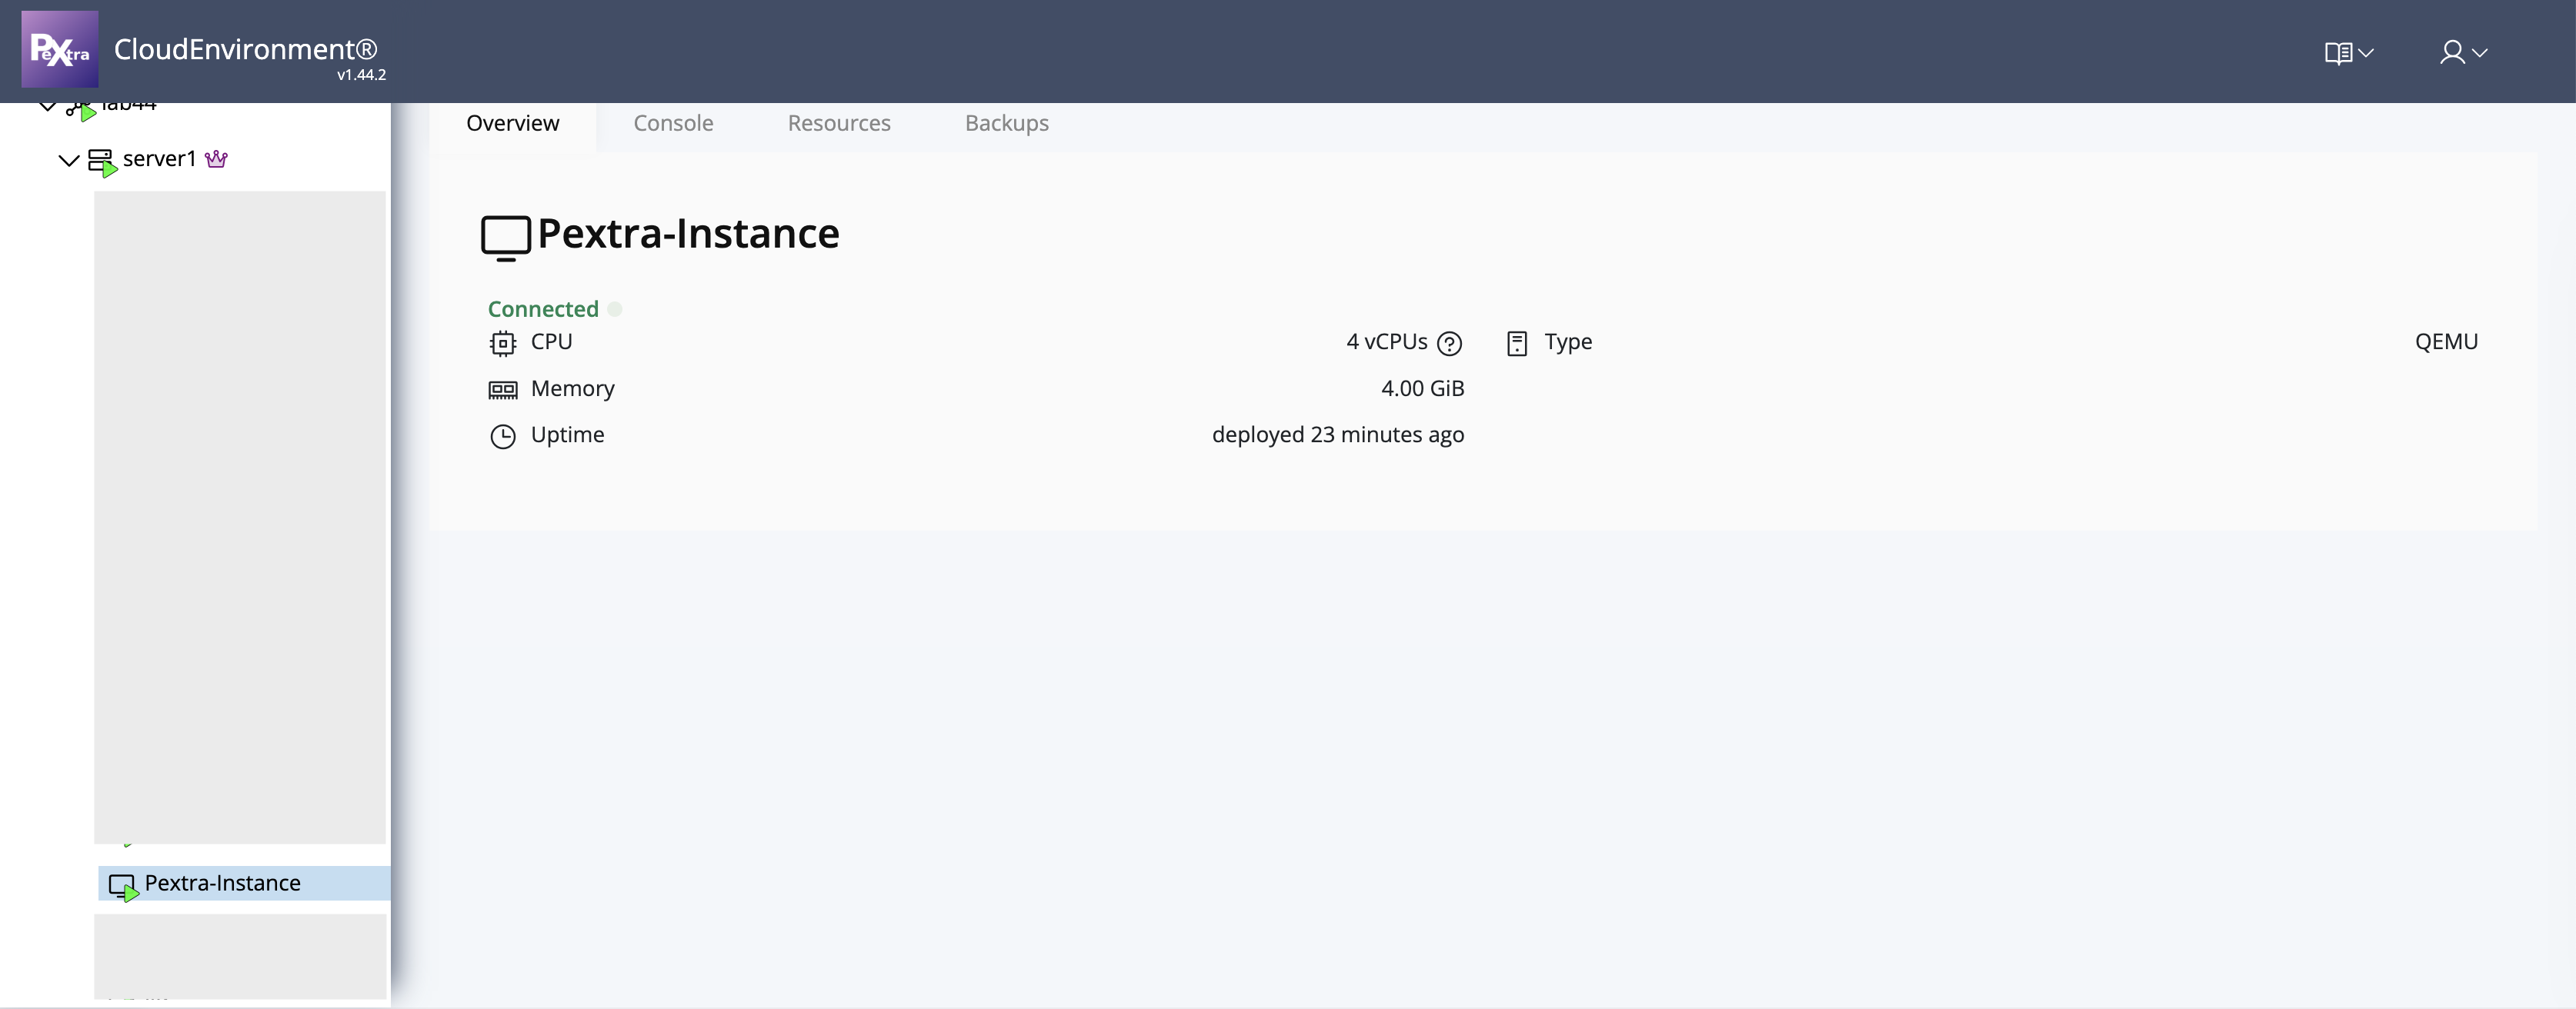
-
Click on the instance to view its properties and access the console.
-
Click on the instance to view its details:
-
To access the console, select the Console tab.
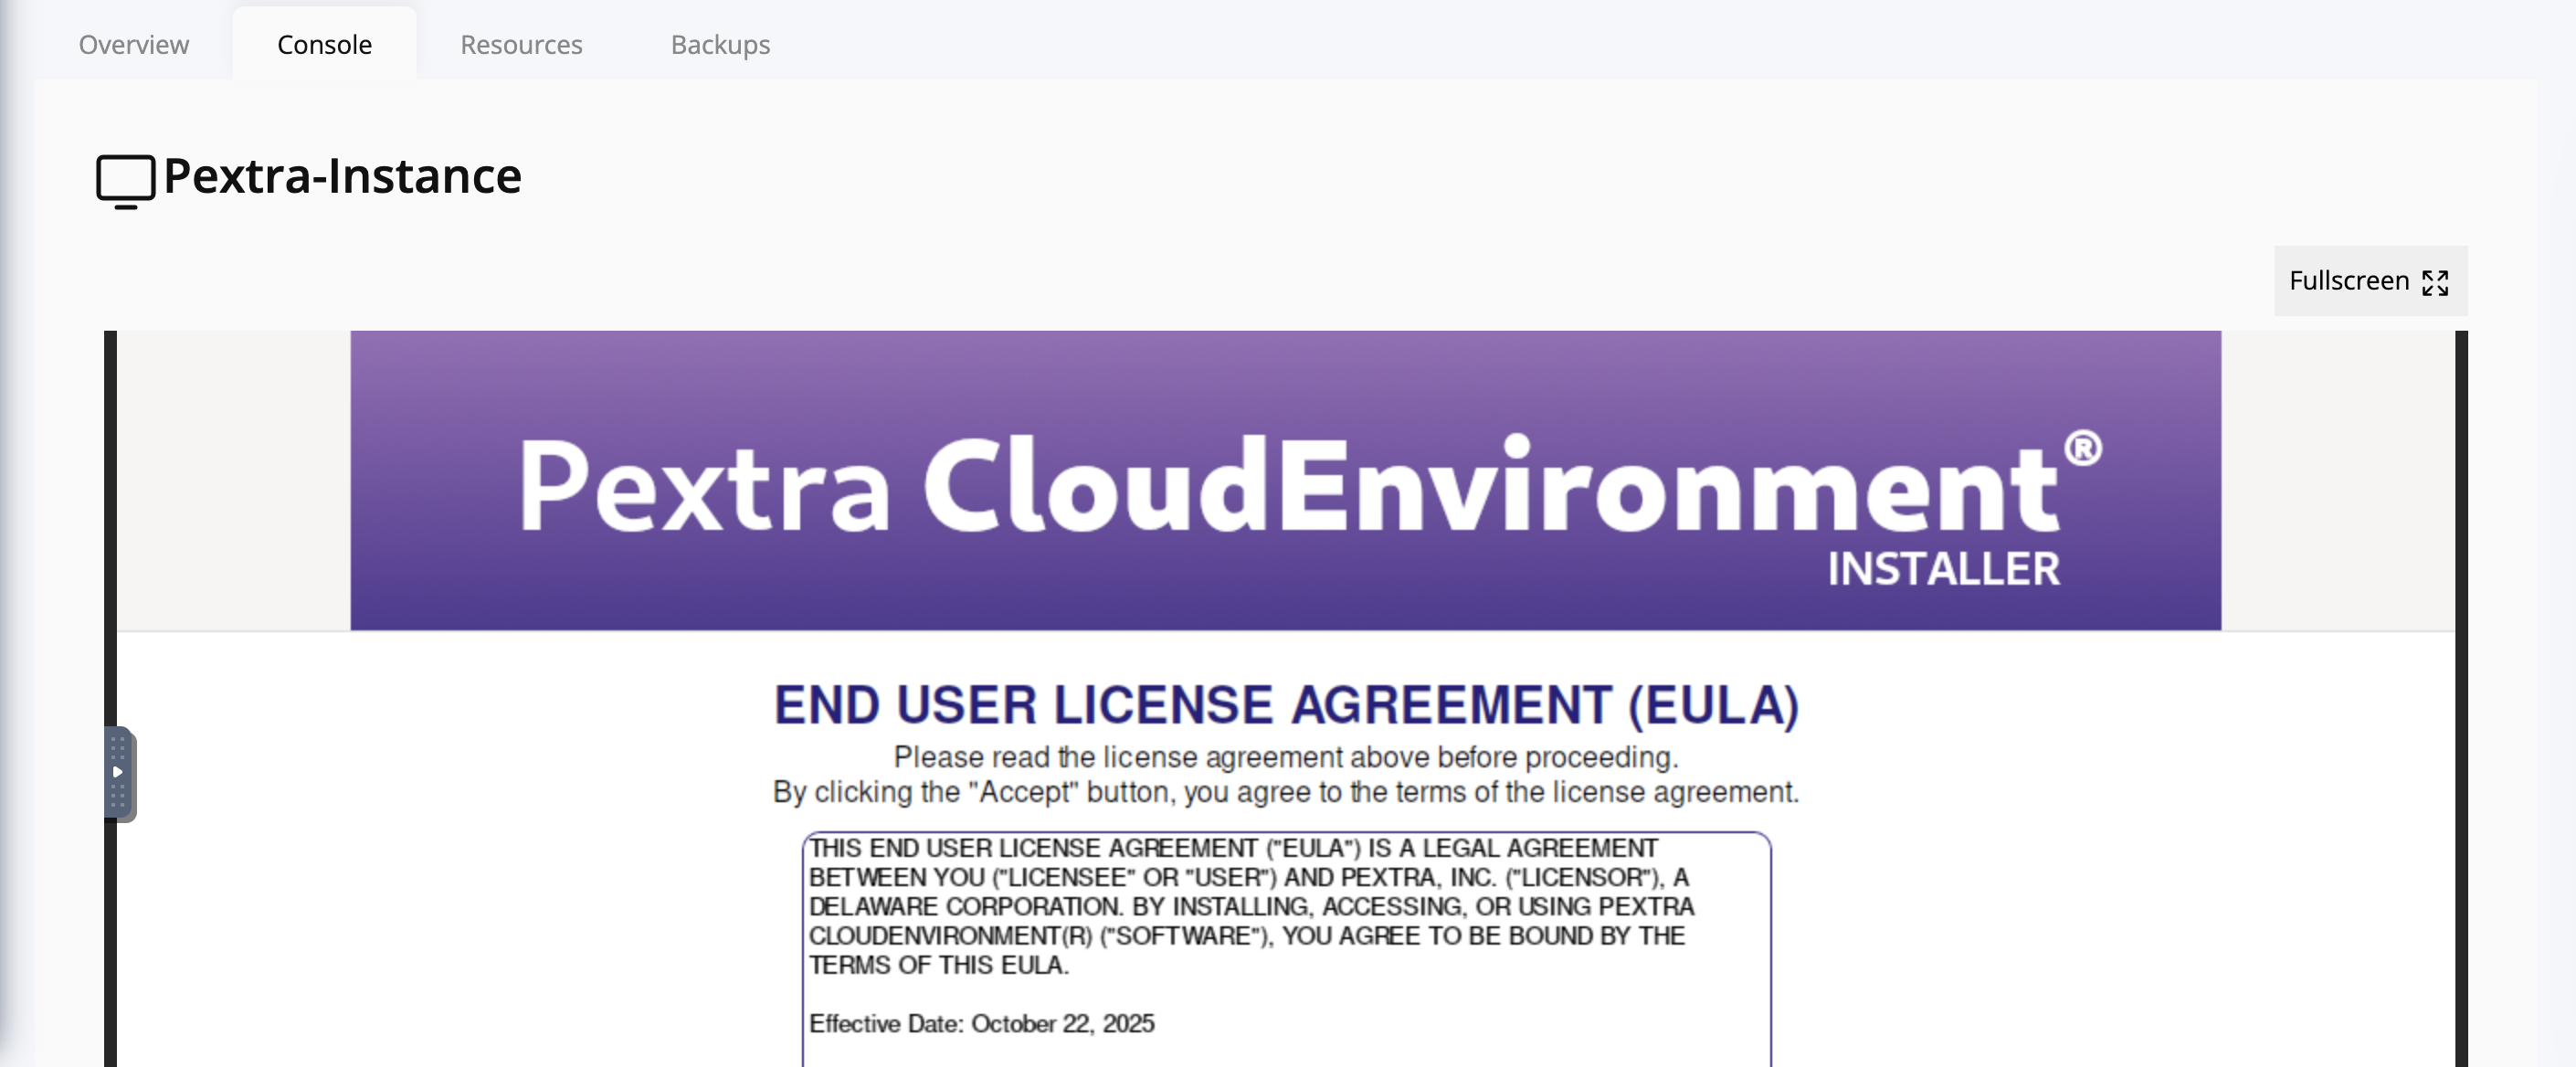
-
-
To view and adjust instance resources, click on the Resources tab.
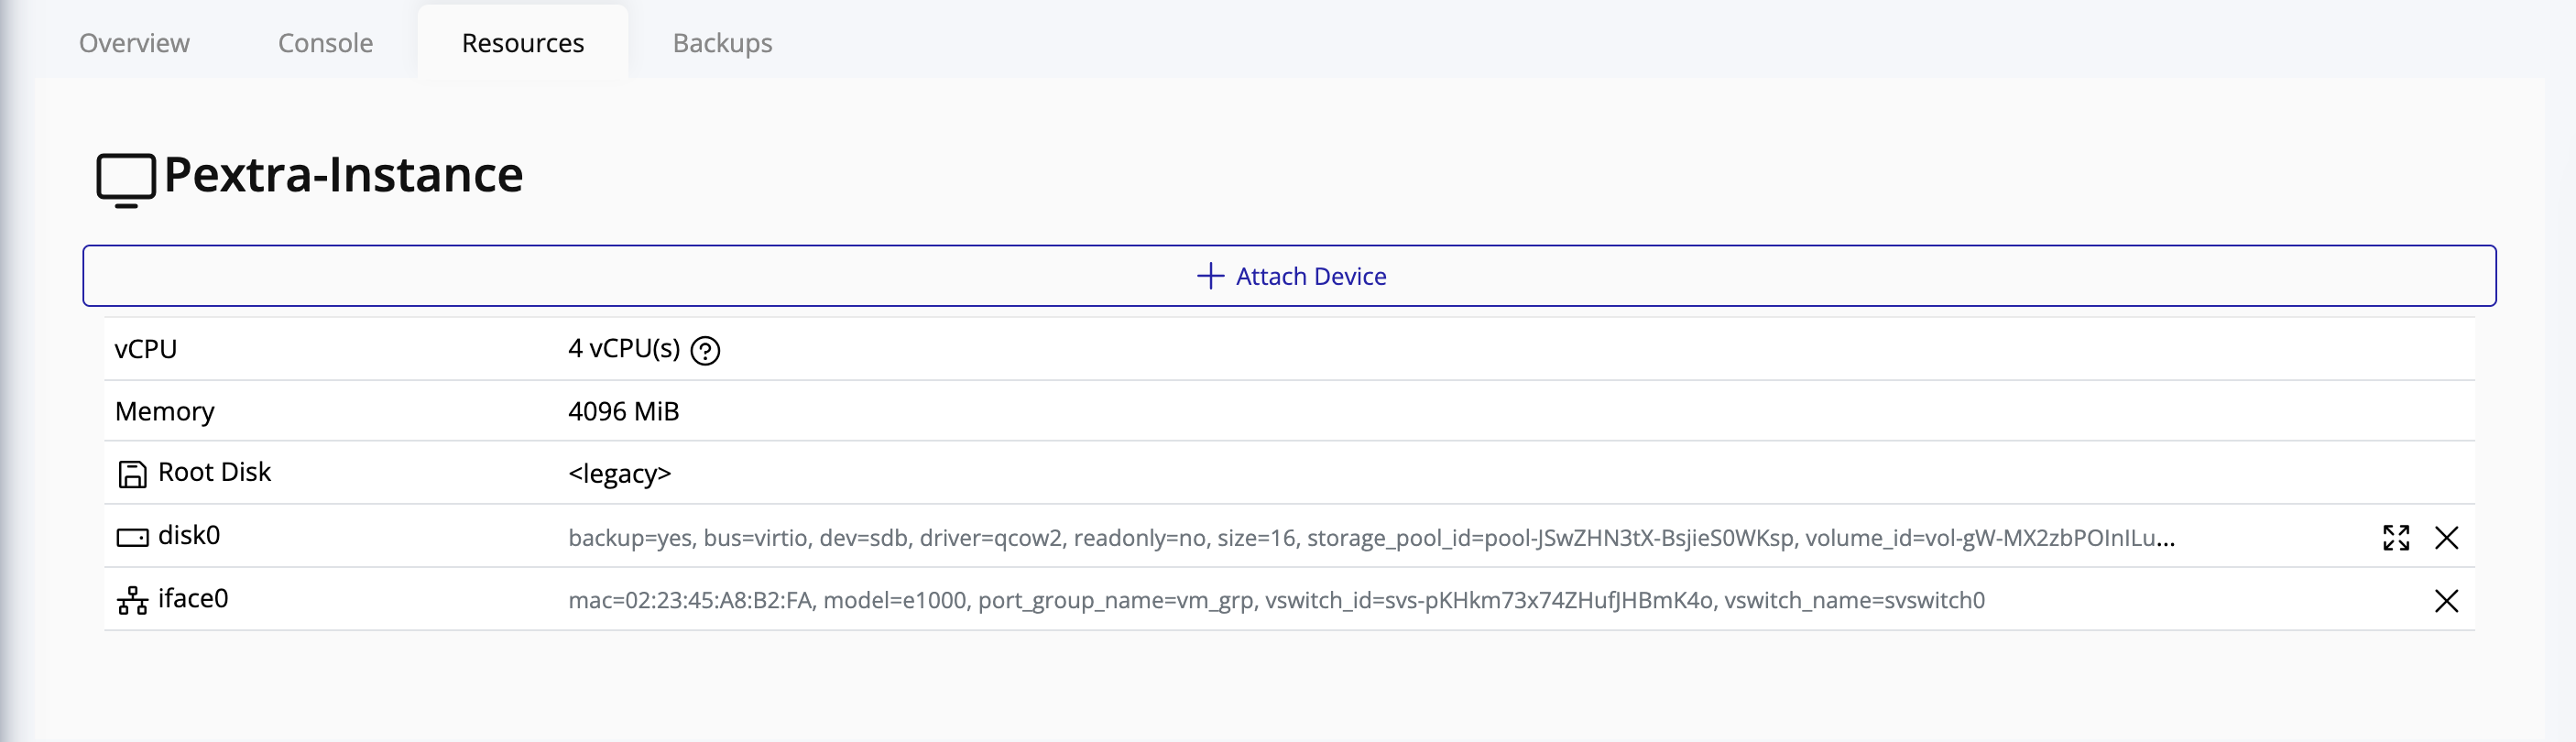
-
To view instance snapshots and create backups, click on the Backups tab.

Instance State Management
Managing the state of your instances is a key part of operating in Pextra CloudEnvironment. This section covers how to stop, force stop, restart, and start an instance that has been stopped.
Tip
All instance state actions are performed by right-clicking the target instance, selecting Power, and choosing the desired action.
Starting a Stopped Instance
To bring a stopped instance back online:
-
Right-click the stopped instance.
-
Select Power → Start.
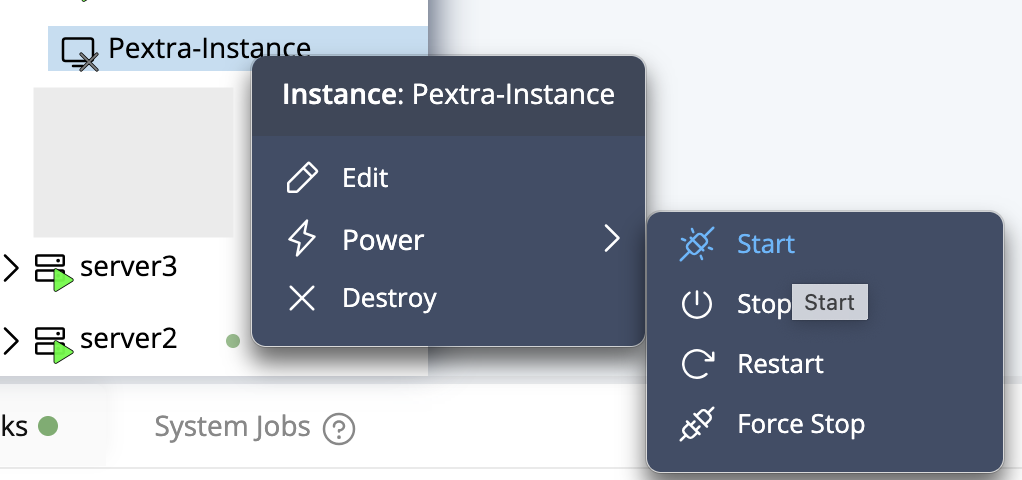
-
A confirmation dialog will appear. Click Confirm.
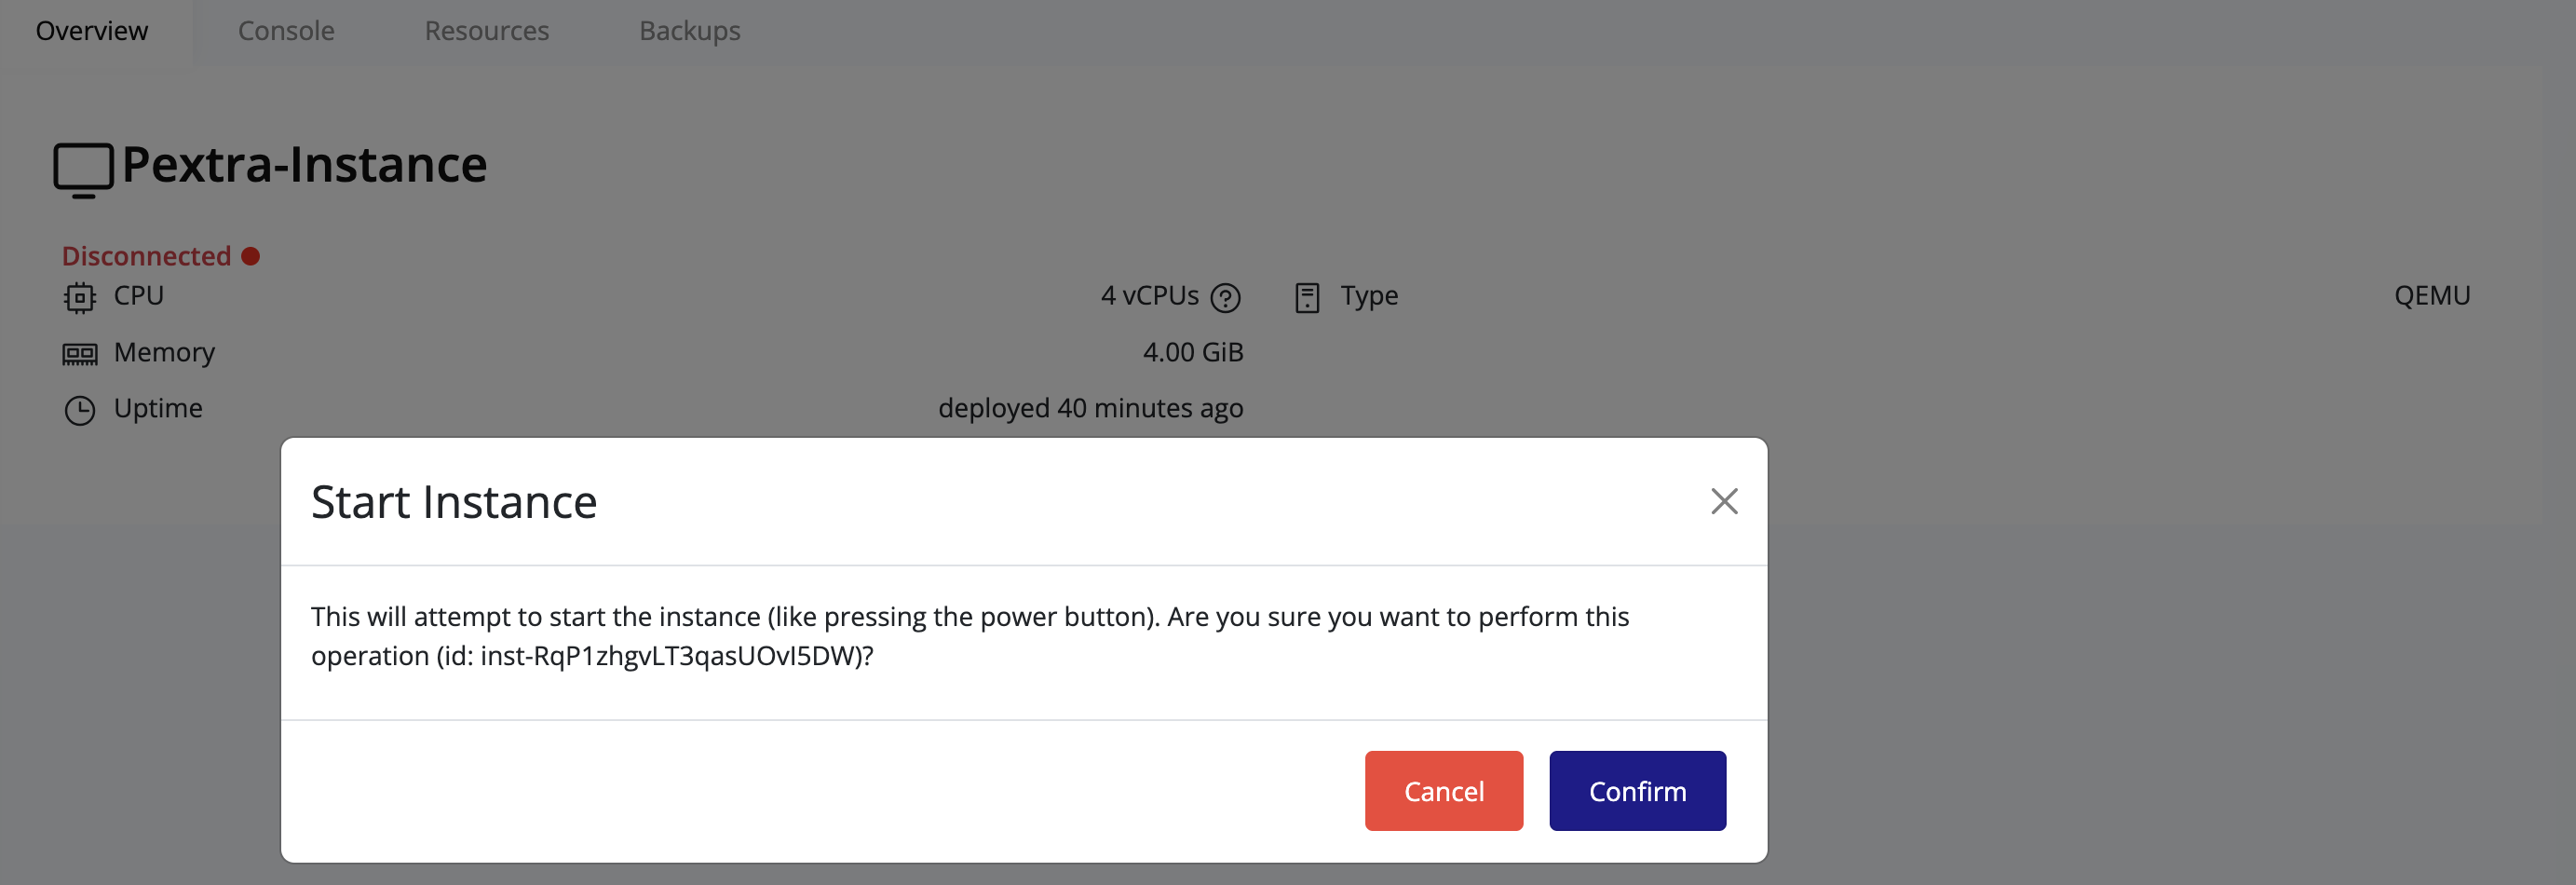
-
Wait for the instance to reach the Running state.
Tip
Use the Console tab to monitor boot progress and ensure all services start correctly.
Stopping an Instance
To gracefully stop a running instance:
-
Right-click the instance you want to stop.
-
Select Power → Stop.
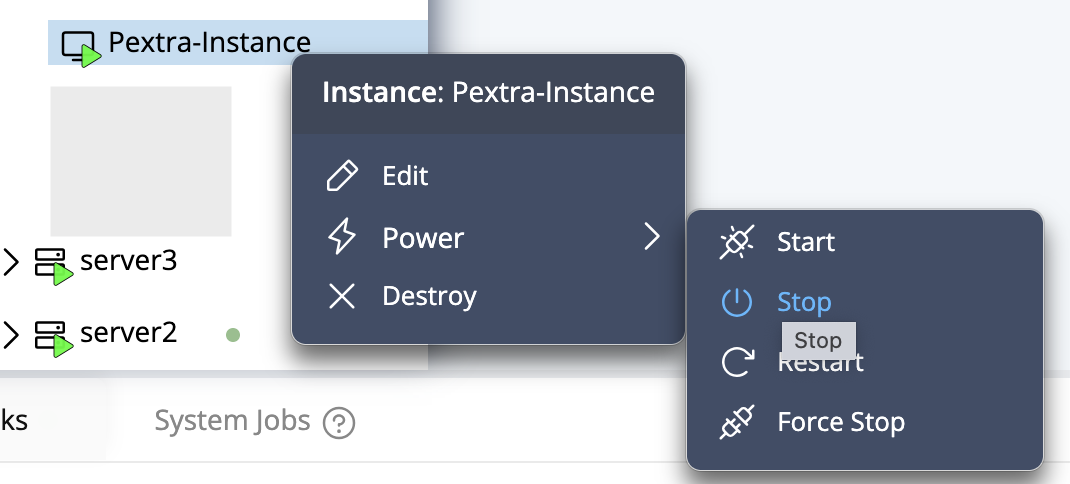
-
A confirmation dialog will appear. Click Confirm.
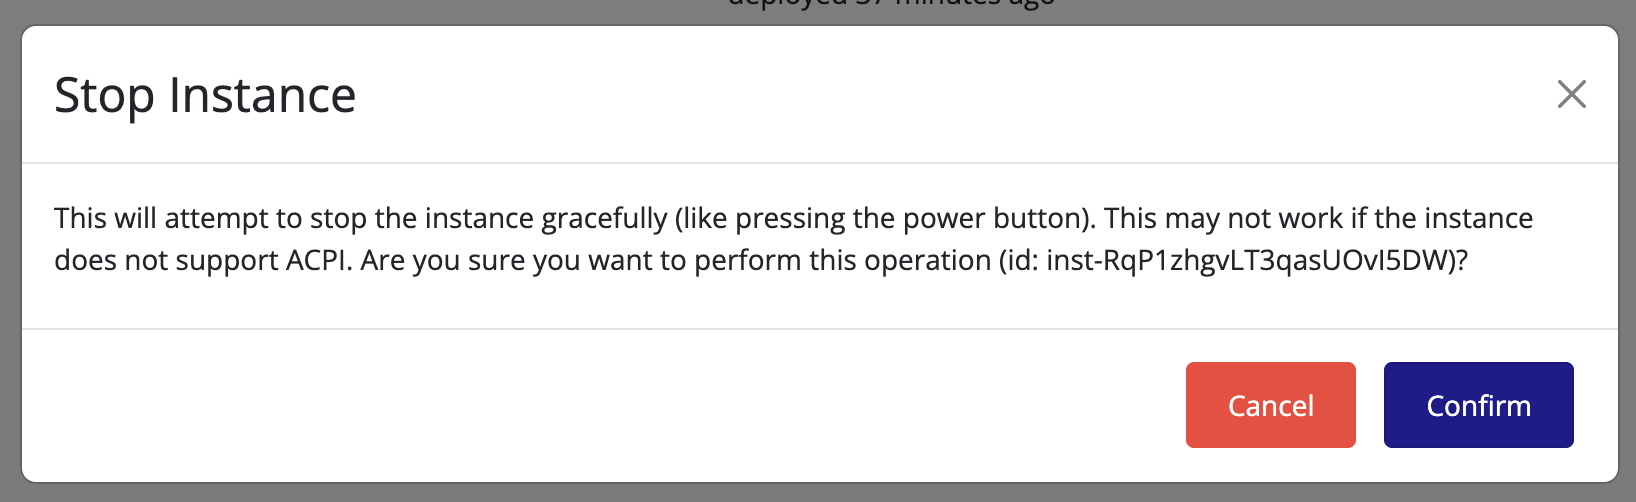
-
Wait for the instance to reach the Stopped state.
Tip
Stopping an instance shuts it down safely, allowing all processes to terminate properly. This may take a few moments depending on the workload.
Restarting an Instance
To reboot an instance:
-
Right-click the instance you wish to restart.
-
Select Power → Restart.
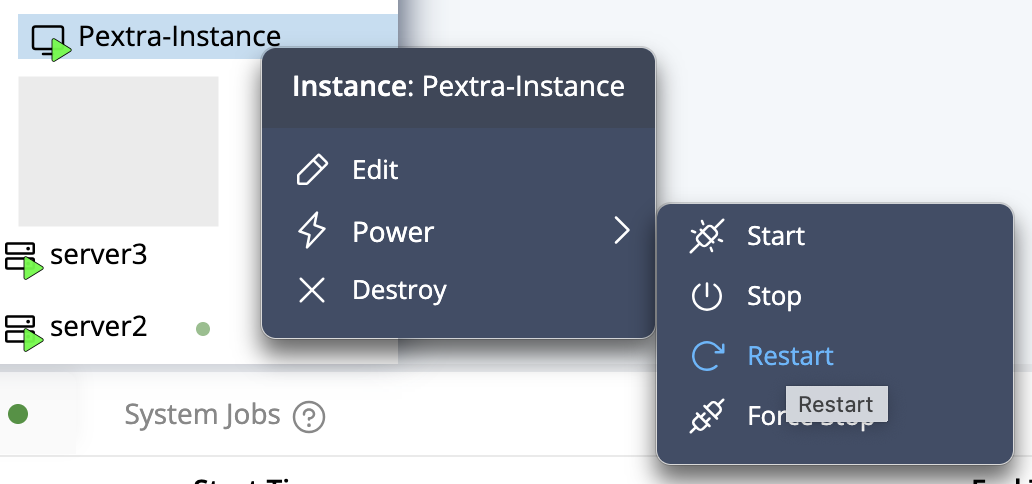
-
A confirmation dialog will appear. Click Confirm.
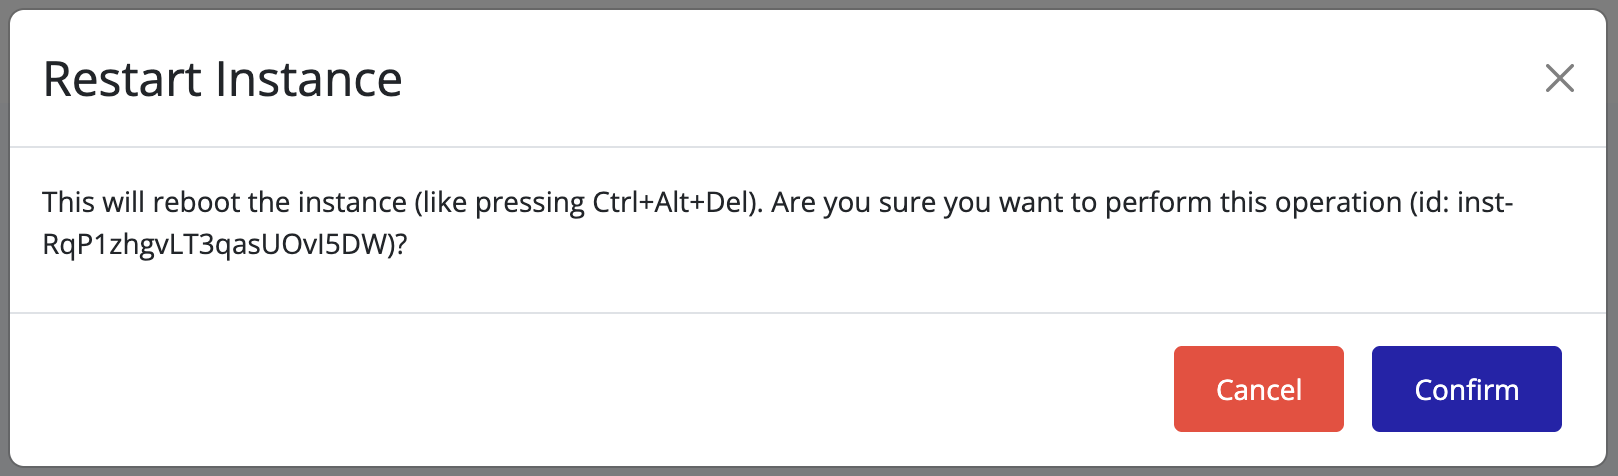
-
Wait for the instance to reach the Running state.
-
The instance will stop and start automatically. Use this option for applying configuration changes or recovering from transient issues.
Tip
Use the Console tab to monitor the restart progress and ensure all services start correctly.
Force Stopping an Instance
If an instance does not respond to a normal stop:
-
Right-click the unresponsive instance.
-
Select Power → Force Stop.
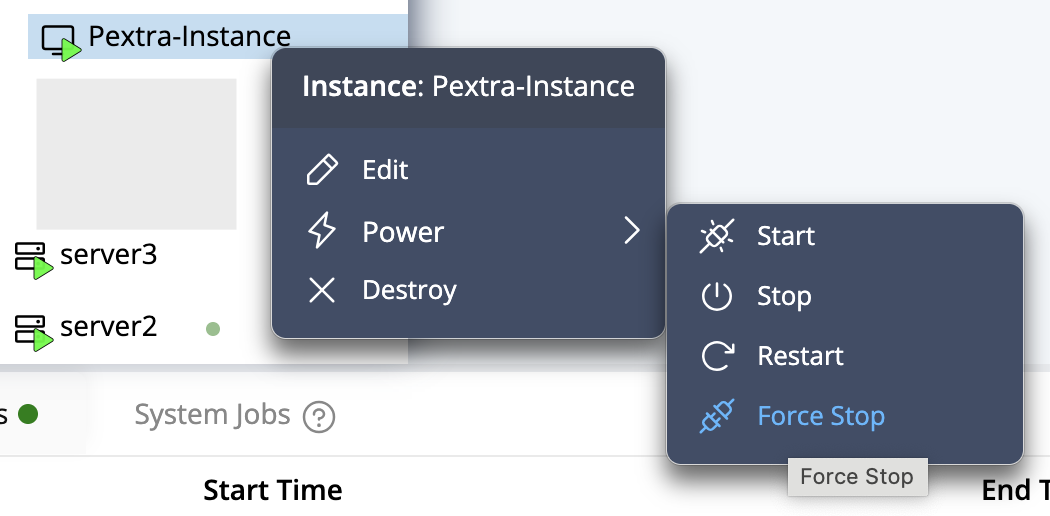
-
A confirmation dialog will appear. Click Confirm.
-
Wait for the instance to reach the Stopped state.
Warning
Force stopping immediately terminates all processes. Unsaved data may be lost. Use only when a normal stop fails.
Destroying an Instance
To permanently destroy an instance, it must first be in the Stopped state:
-
Ensure the instance is stopped.
-
Right-click the stopped instance.
-
Select Destroy.
-
A confirmation dialog will appear. Type the requested text in the popup and click Confirm.
-
Optionally, select the checkbox to destroy all attached volumes (storage) as well.
Tip
An instance must be in the Stopped state before it can be destroyed.
Warning
Destroying an instance is permanent and cannot be undone. All data on the instance will be lost.
Instance Devices
This section describes how to manage devices attached to an instance. Devices are identified by their name.
Available Device Types
- USB Device
- Storage Volume
- CD-ROM Drive
- Random Number Generator (RNG) Device
- Trusted Platform Module (TPM) Device
To detach a device from an instance, see Detach Device.
Attaching a USB Device
Attach a USB device to an instance through the Pextra CloudEnvironment® web interface.
-
Select the virtual machine in the resource tree and view the page on the right. Click on the Resources tab in the right pane. The configuration and attached devices will be listed.

-
Click the Attach Device button.

-
Select USB Device from the Device Type dropdown list. Additional USB device configuration options will appear at the bottom of the dialog.
-
Enter a device name and optional description. Select the USB device from the USB device dropdown list.
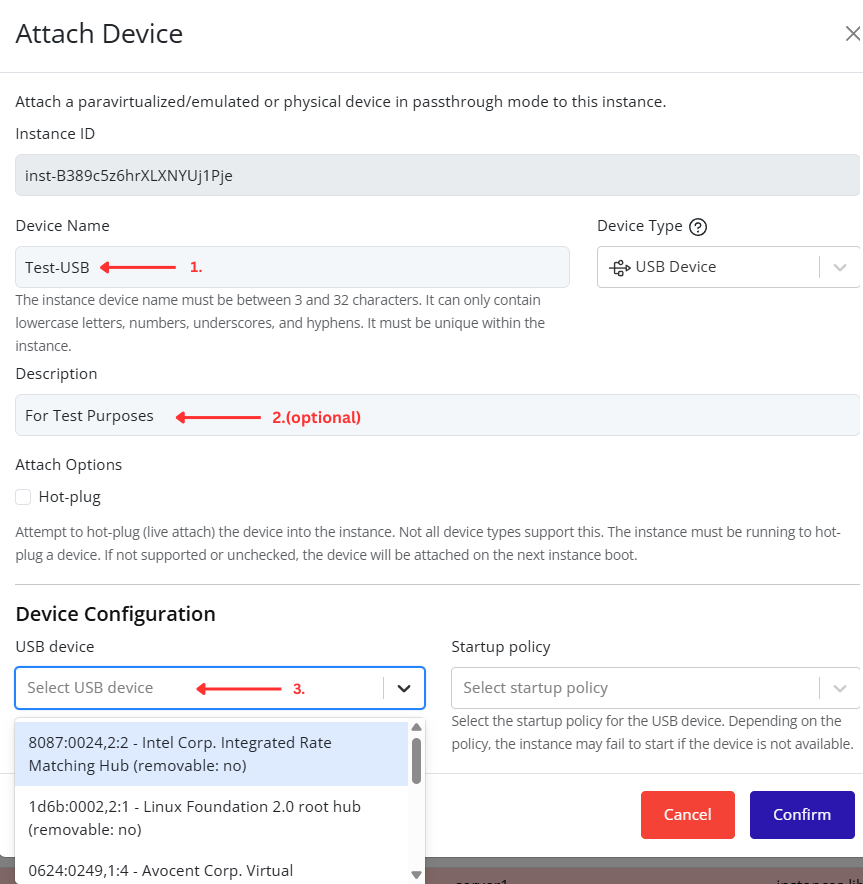
-
Choose a Startup policy for the USB device. Depending on the selected policy, the instance may fail to start if the USB device is unavailable.
Policy Description mandatory The USB device must be available for the instance to start. If the device is unavailable, startup will fail. requisite Same as mandatory, but not required when migrating the instance to another node.optional The USB device is not required for the instance to start. If the device is unavailable, startup will succeed, but the device will not be available to the instance. 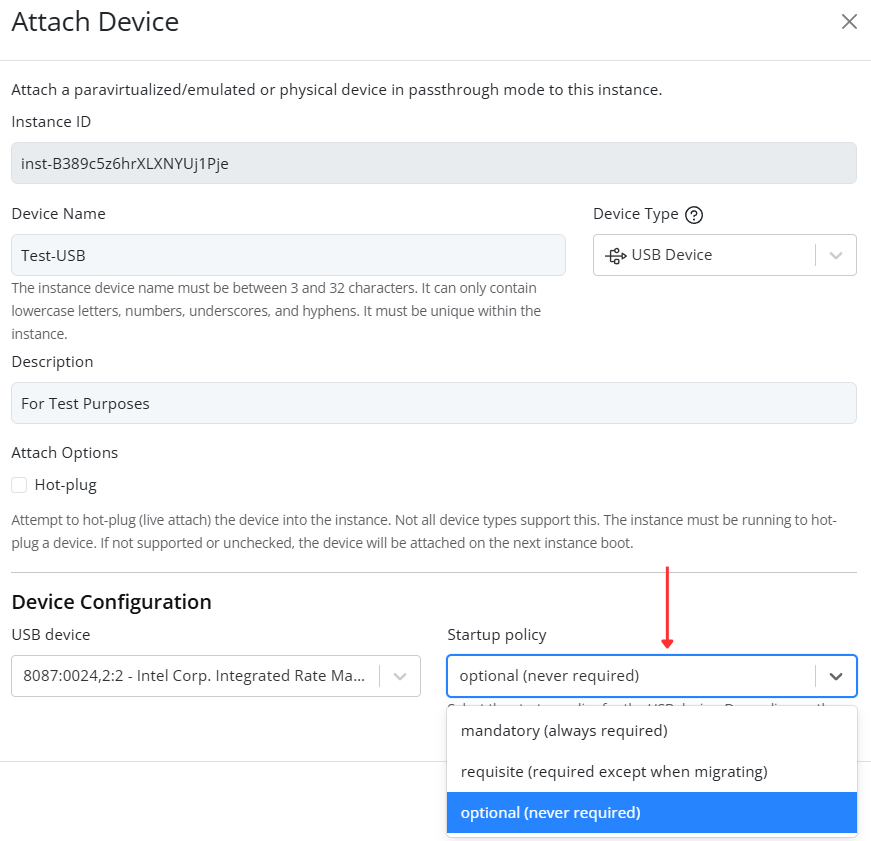
-
Optionally enable Hot-plug to attach the USB device to a running instance. If Hot-plug is not enabled, the instance must be stopped before attaching the device. Attempting to attach the device while the instance is running will fail.
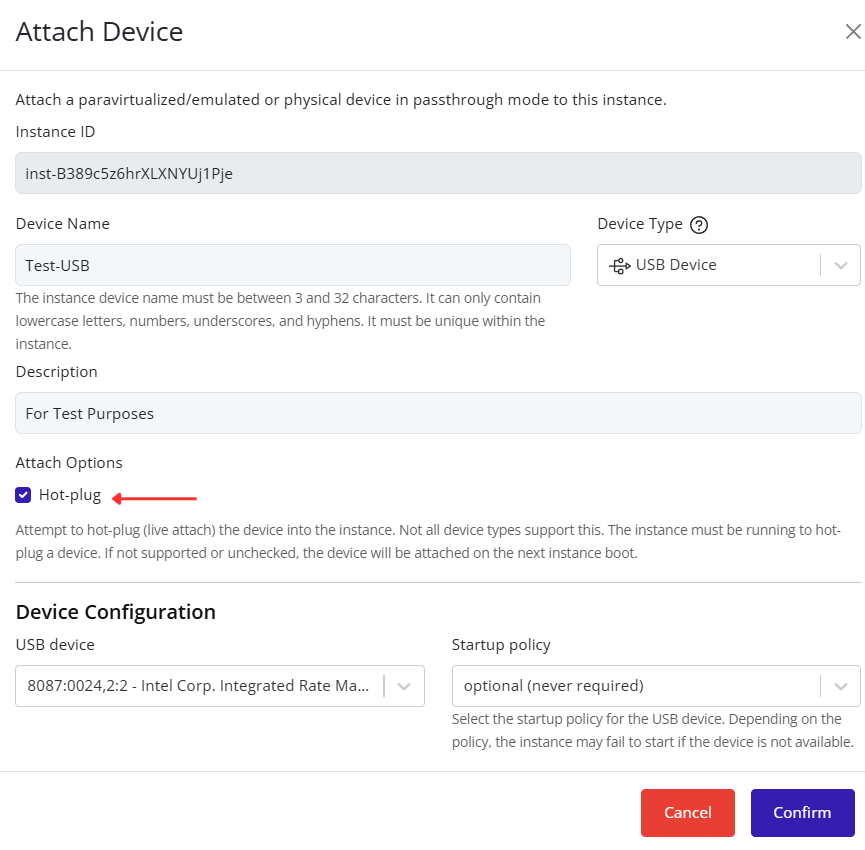
-
Click Confirm to attach the USB device to the instance.
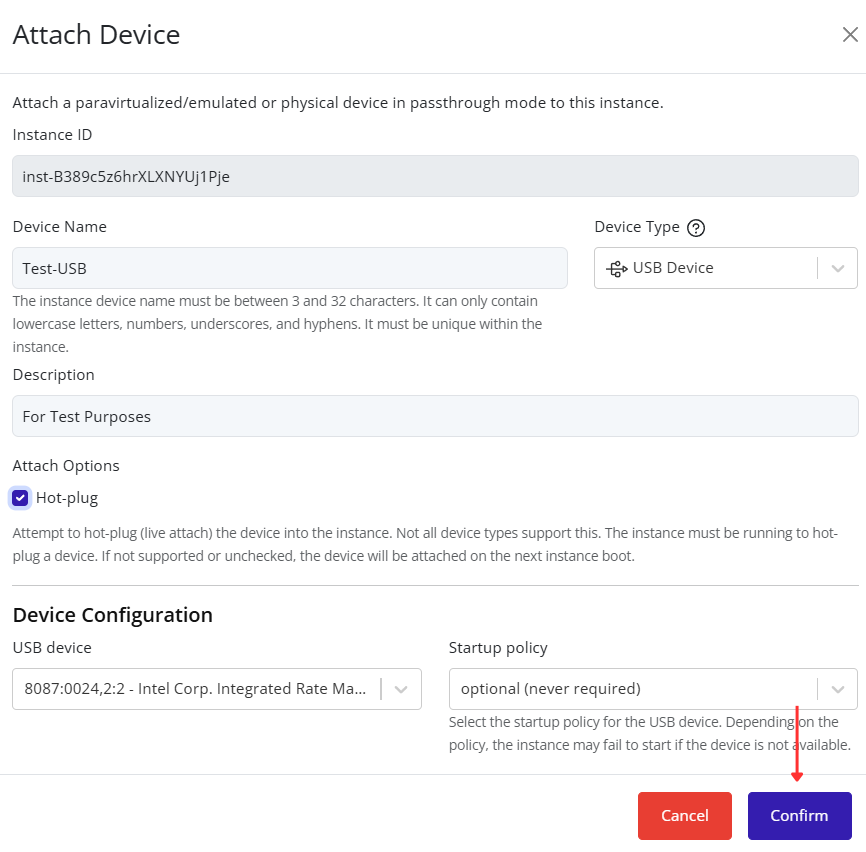
Attaching a Storage Volume
Attach a storage volume to an instance through the Pextra CloudEnvironment® web interface.
-
Select the virtual machine in the resource tree and view the page on the right. Click on the Resources tab in the right pane. The configuration and attached devices will be listed.

-
Click the Attach Device button.

-
Select Storage Volume from the Device Type dropdown list. Additional storage volume configuration options will appear at the bottom of the dialog.
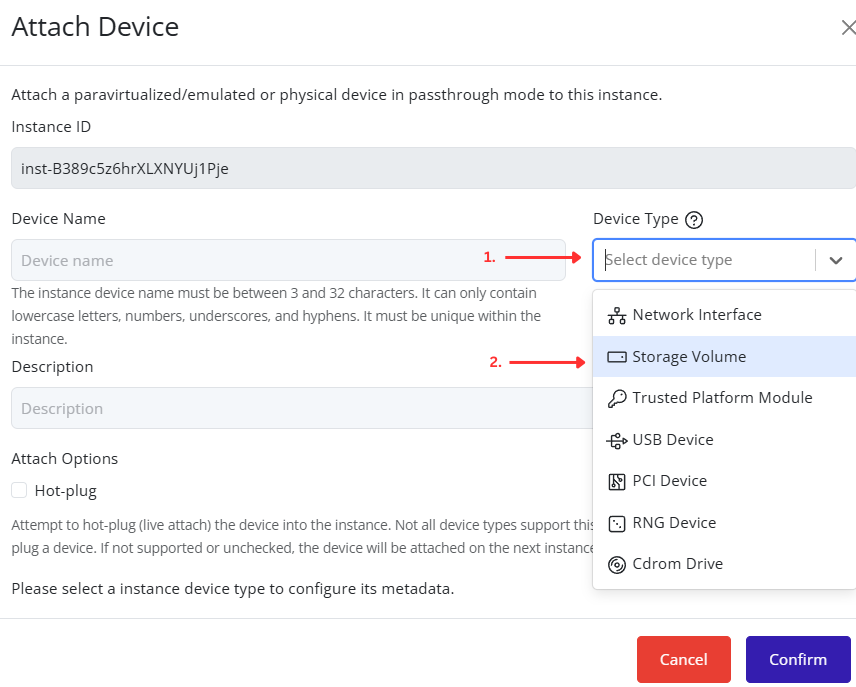
-
Enter a device name and optional description. Select the storage volume from the Volume dropdown list.

-
Optionally enable Read-only mode to attach the storage volume without allowing write operations from the instance.
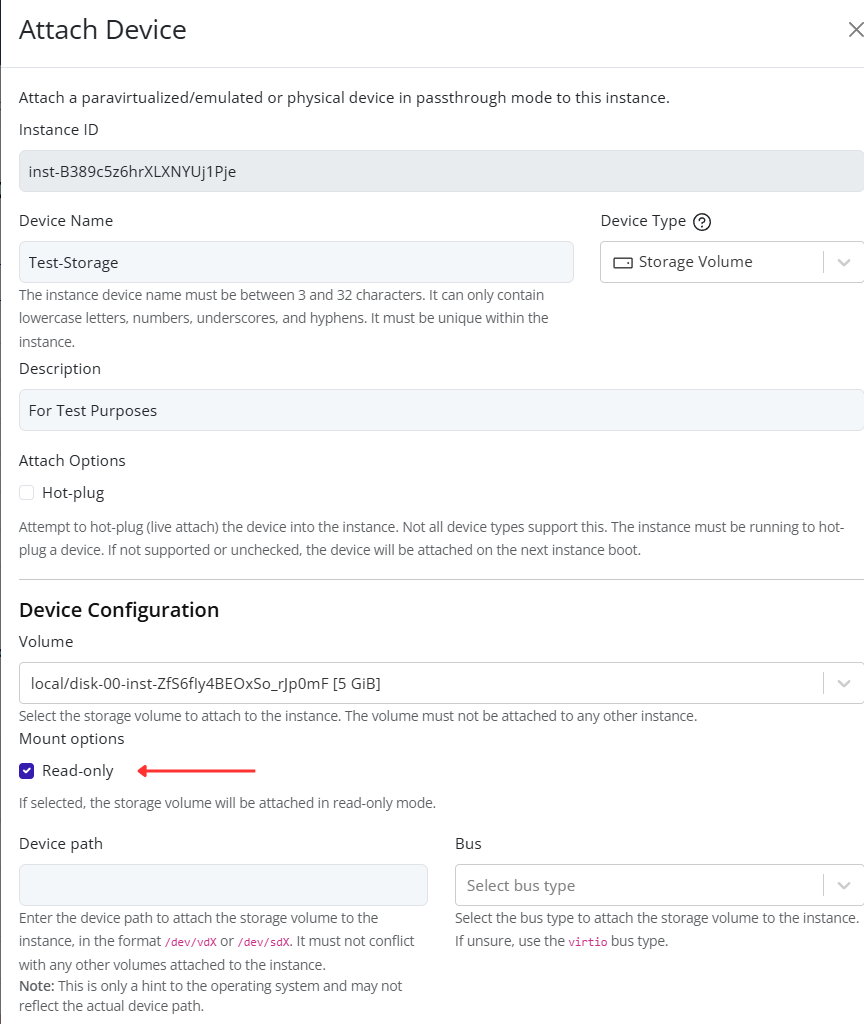
-
Enter a Device path for the volume and select a Bus type.
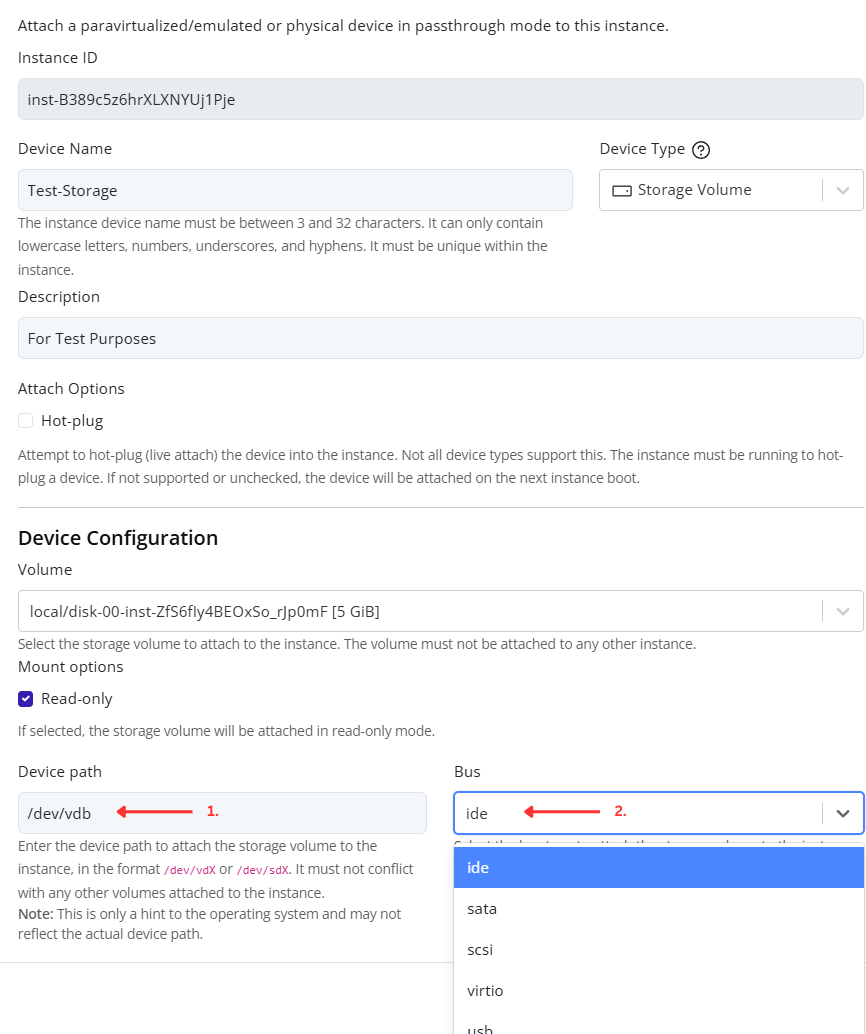
Note
The device path must be unique within the instance and must not conflict with any existing attached storage devices.
Common bus types include:
Bus Type Description virtio Recommended for most Linux guests and provides the best performance. sata Provides broad compatibility with guest operating systems. scsi Commonly used for advanced storage configurations and enterprise workloads.
-
Optionally enable Hot-plug to attach the storage volume to a running instance. If Hot-plug is not enabled, the instance must be stopped before attaching the volume.
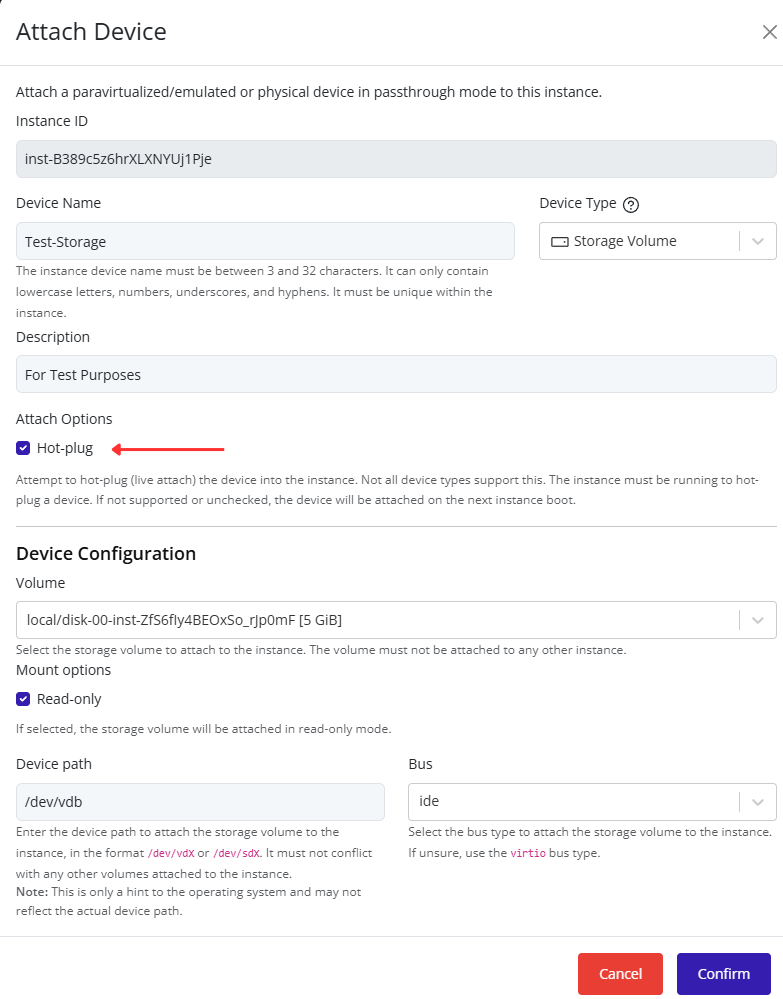
-
Click Confirm to attach the storage volume to the instance.
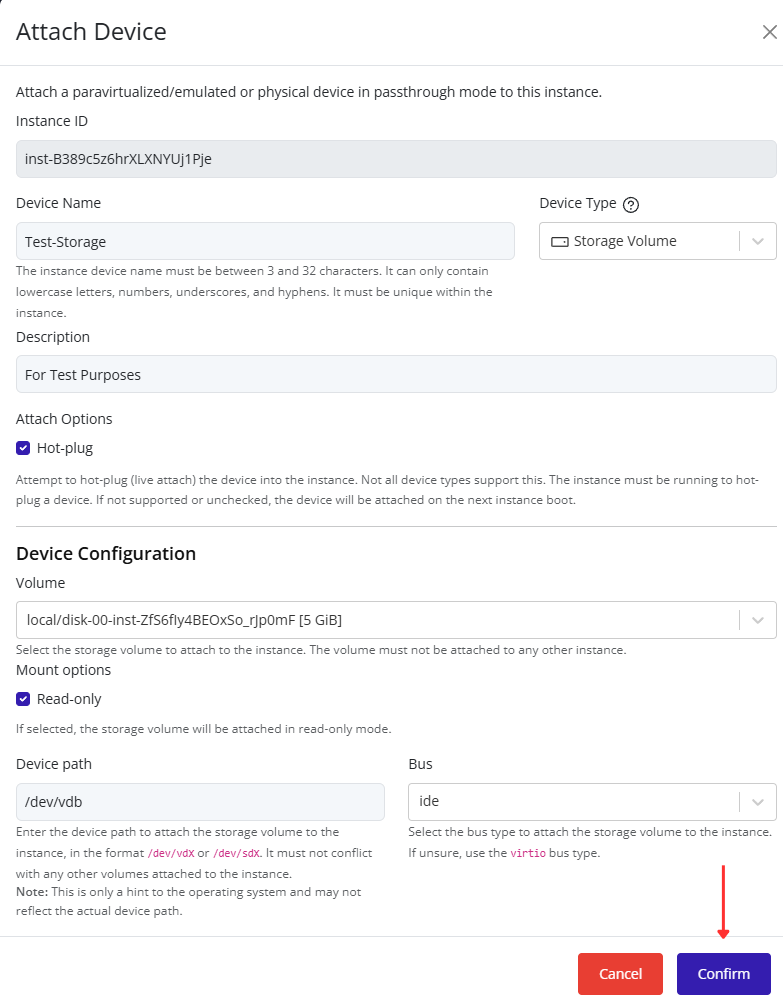
Attaching a CDROM Drive
Attach a CDROM drive to an instance through the Pextra CloudEnvironment® web interface.
-
Select the virtual machine in the resource tree and view the page on the right. Click on the Resources tab in the right pane. The configuration and attached devices will be listed.

-
Click the Attach Device button.
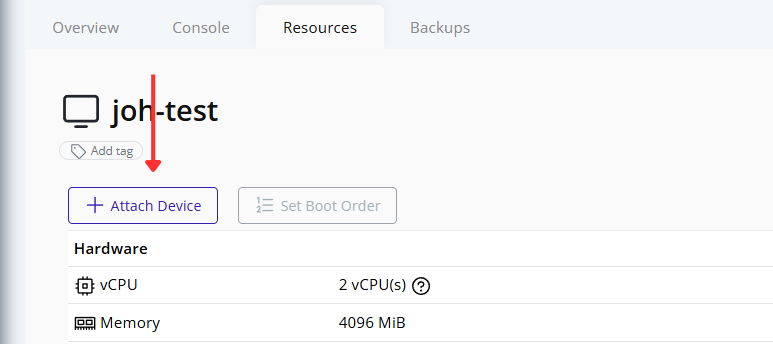
-
Select CDROM Drive from the Device Type dropdown list. Additional CDROM drive configuration options will appear at the bottom of the dialog.
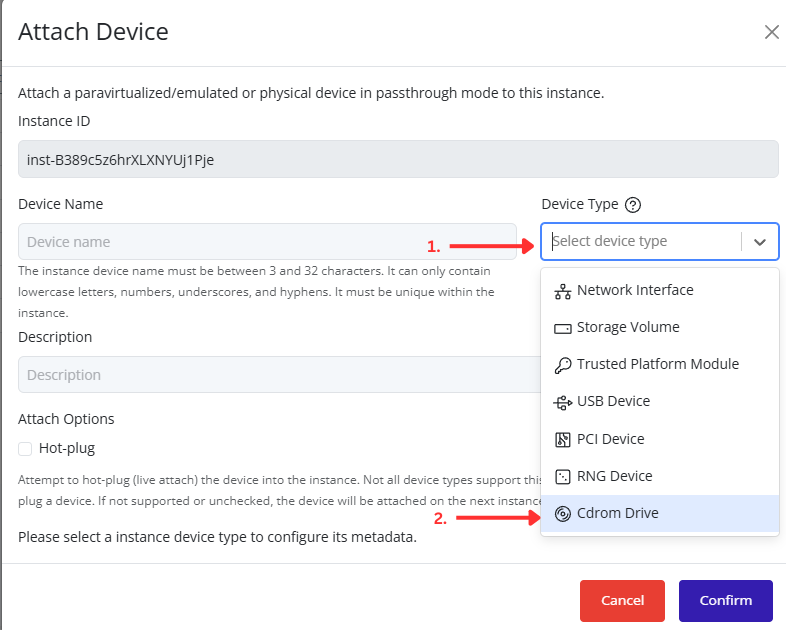
-
Enter a device name and optional description.
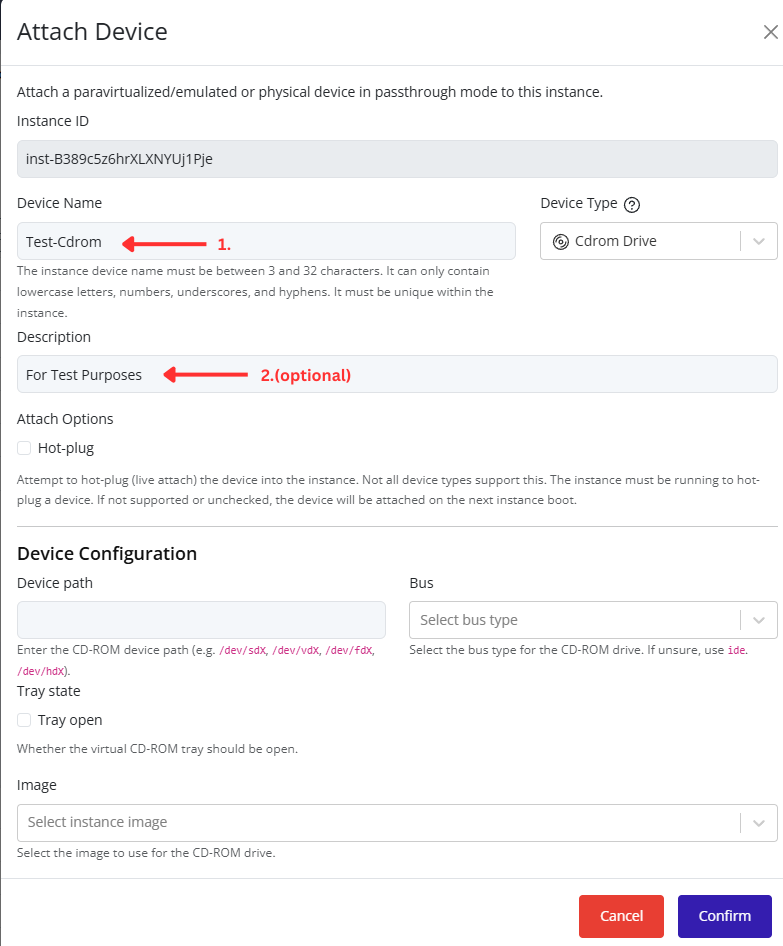
-
Optionally enable Hot-plug to attach the CDROM drive to a running instance. If Hot-plug is not enabled, the instance must be stopped before attaching the device.

-
Enter a Device path for the CDROM drive and select a Bus type.
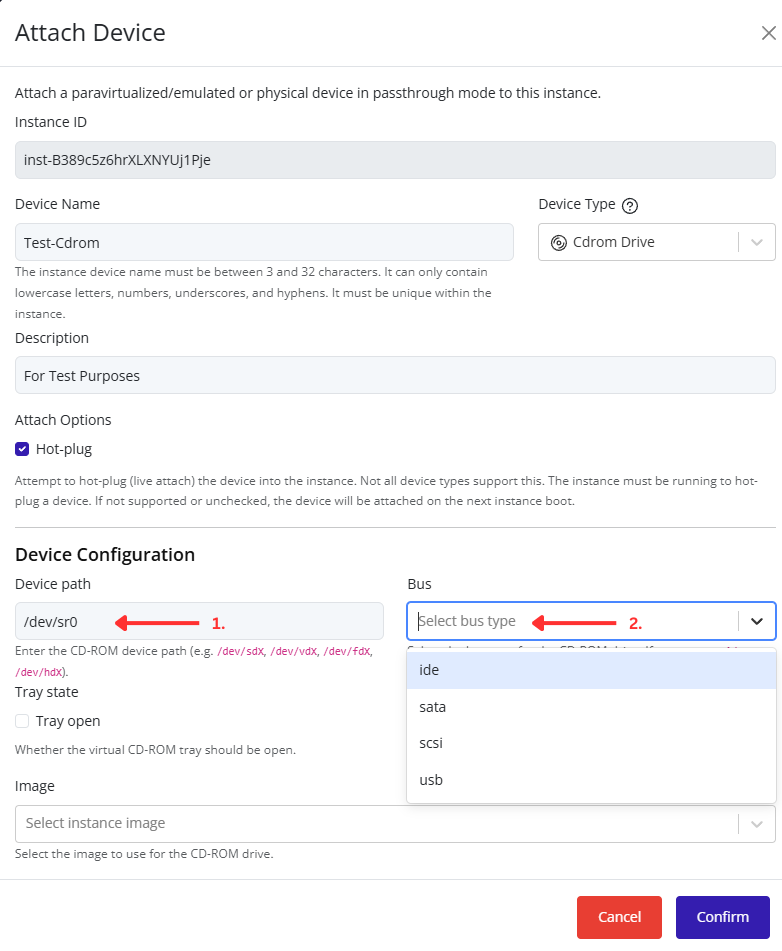
Note
The device path must be unique within the instance and must not conflict with any existing attached devices.
Common bus types include:
Bus Type Description ide Recommended default for most CDROM devices and provides broad guest operating system compatibility. sata Commonly used for modern storage and optical devices with wide operating system support. scsi Often used in enterprise environments and advanced storage configurations. usb Presents the device through a virtual USB controller, which may be useful for guest operating systems that expect removable media over USB.
-
Optionally enable Tray open if the virtual CDROM tray should be open when the device is attached.
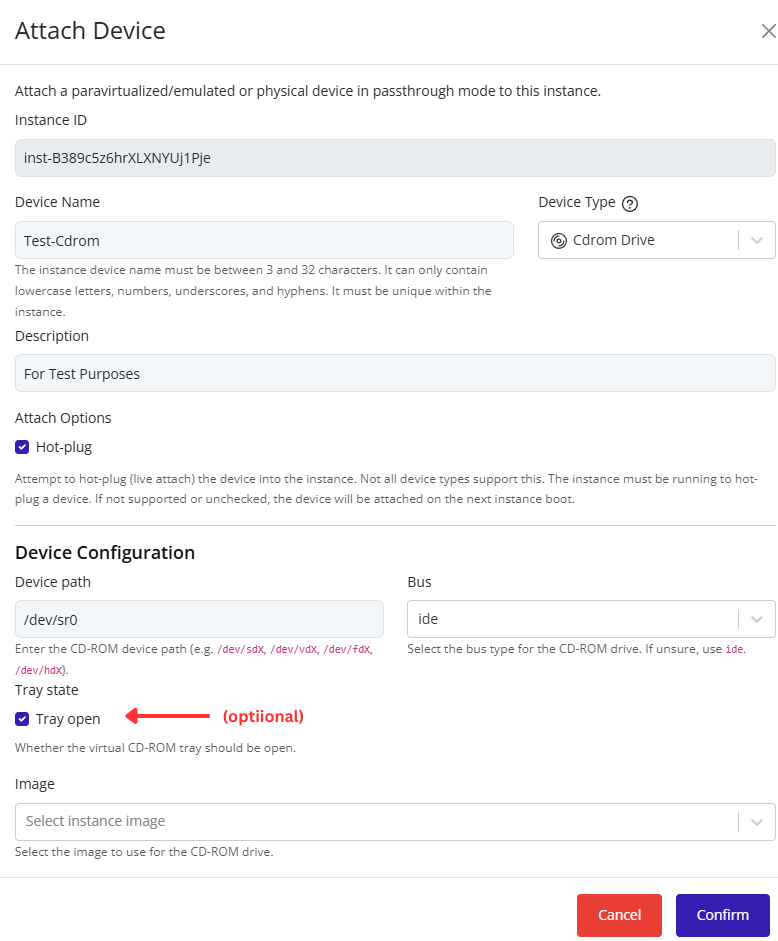
-
Select an image from the Image dropdown list. This image will be mounted in the CDROM drive and made available to the guest operating system.
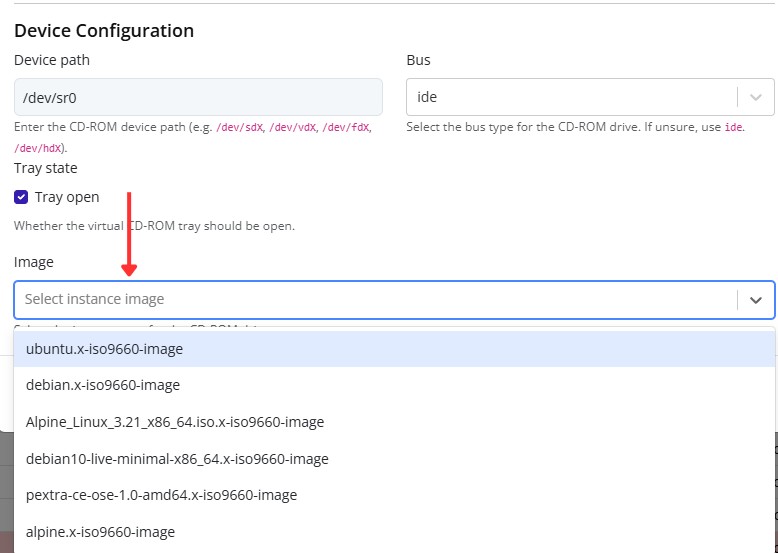
-
Click Confirm to attach the CDROM drive to the instance.
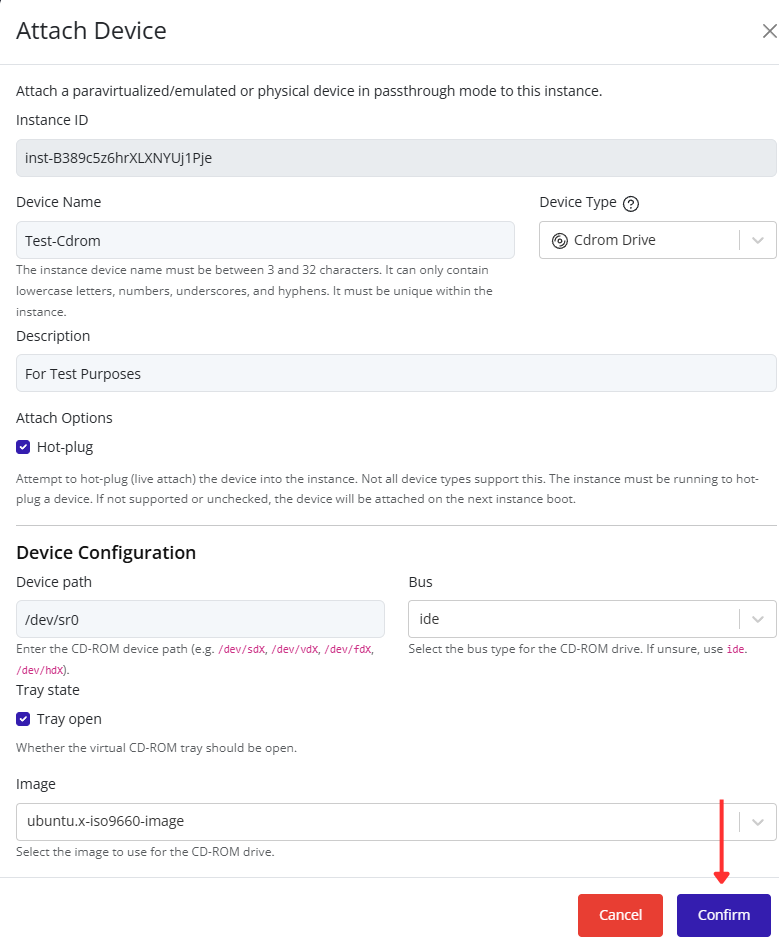
Attaching an RNG Device
Attach an RNG device to an instance through the Pextra CloudEnvironment® web interface.
-
Select the virtual machine in the resource tree and view the page on the right. Click on the Resources tab in the right pane. The configuration and attached devices will be listed.

-
Click the Attach Device button.

-
Select RNG Device from the Device Type dropdown list. Additional RNG device configuration options will appear at the bottom of the dialog.
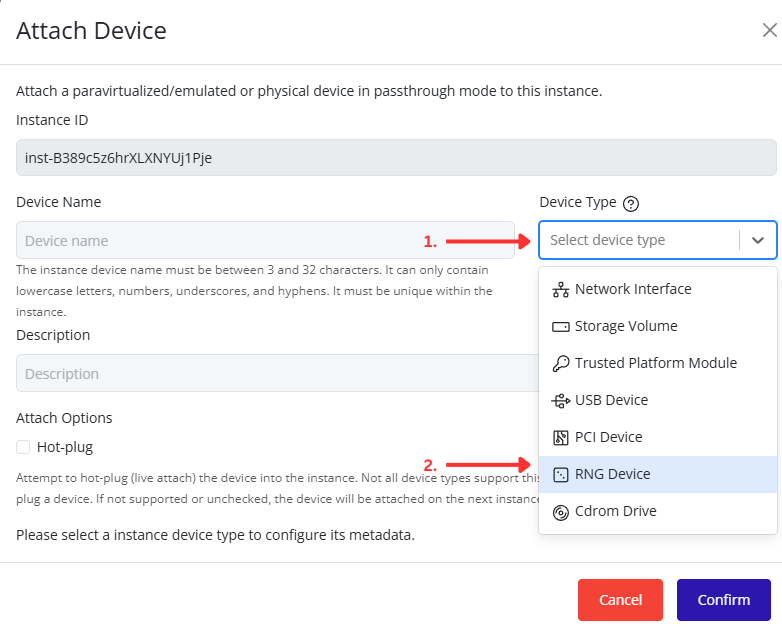
-
Enter a device name and optional description.
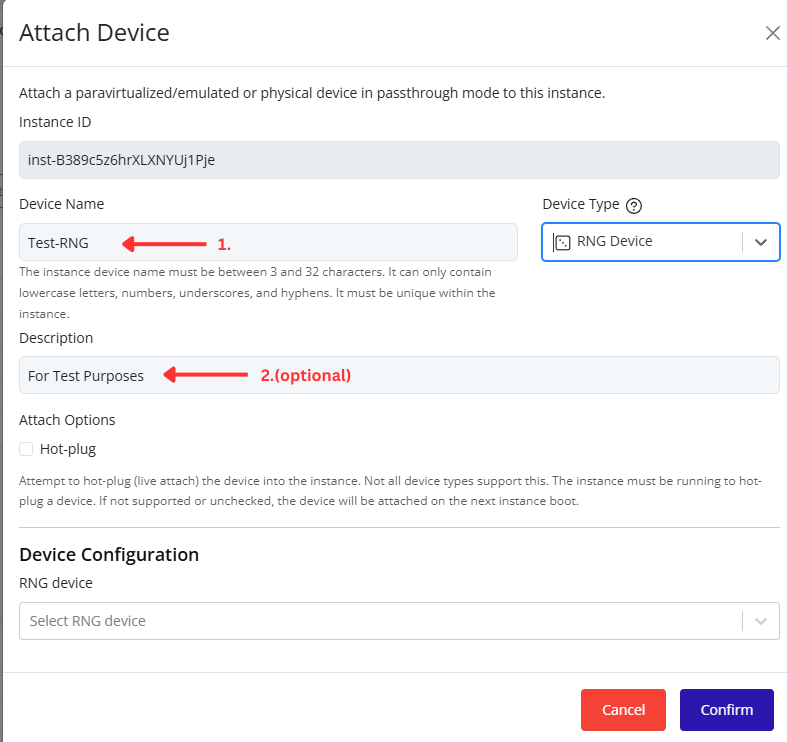
-
Optionally enable Hot-plug to attach the RNG device to a running instance. If Hot-plug is not enabled, the instance must be stopped before attaching the device.
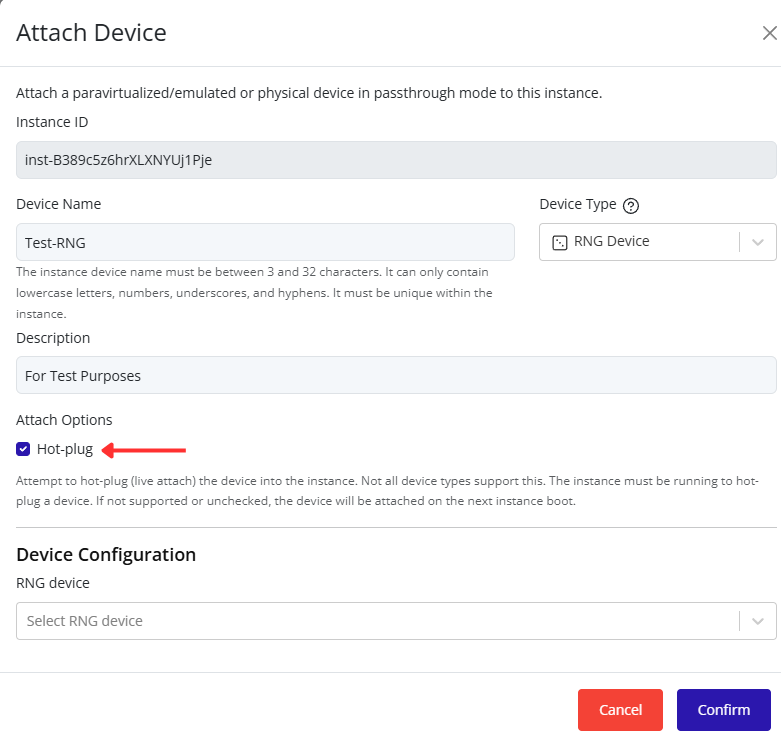
-
Select an RNG device from the RNG device dropdown list.
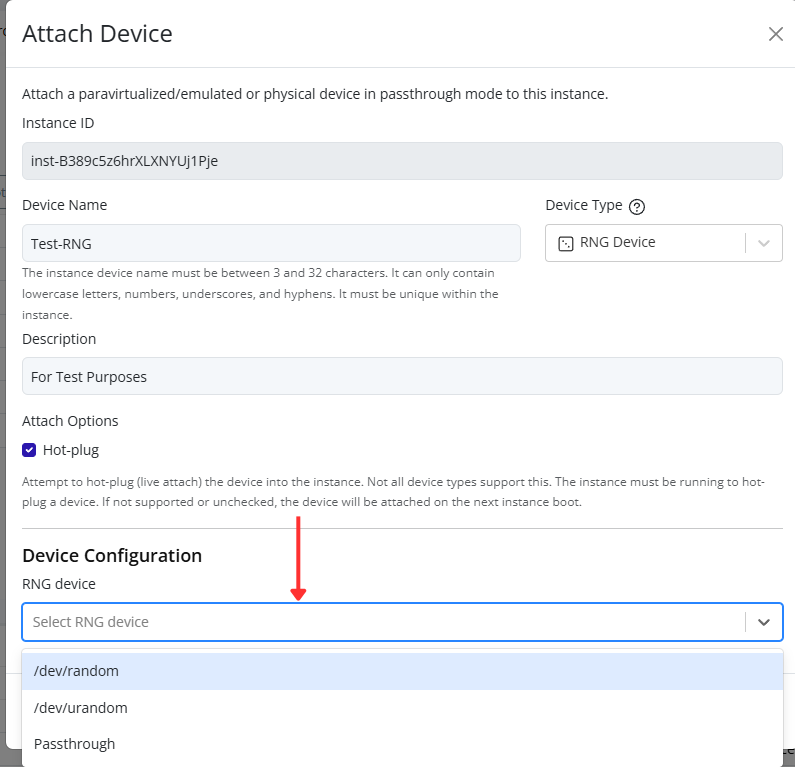
Note
RNG devices provide a source of randomness to the guest operating system and are commonly used for cryptographic operations, key generation, and other security-related functions.
Available RNG device options include:
RNG Device Description /dev/random Provides high-quality random data and may block when insufficient entropy is available. /dev/urandom Provides random data without blocking and is recommended for most workloads. Passthrough Passes the host system’s RNG device directly to the instance, allowing the guest to use the host’s entropy source.
-
Click Confirm to attach the RNG device to the instance.
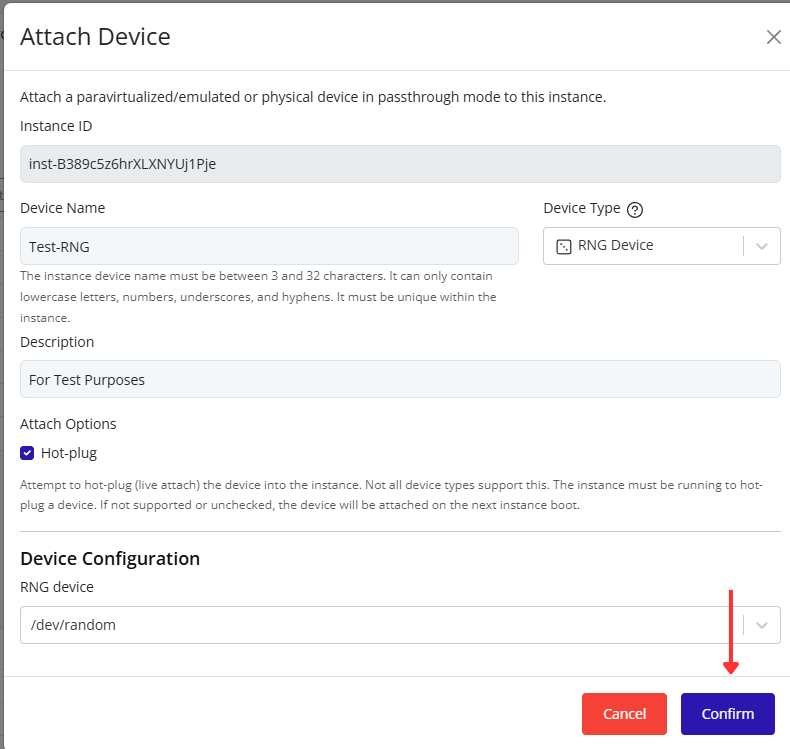
Attaching a Trusted Platform Module (TPM)
Attach a Trusted Platform Module (TPM) to an instance through the Pextra CloudEnvironment® web interface.
-
Select the virtual machine in the resource tree and view the page on the right. Click on the Resources tab in the right pane. The configuration and attached devices will be listed.
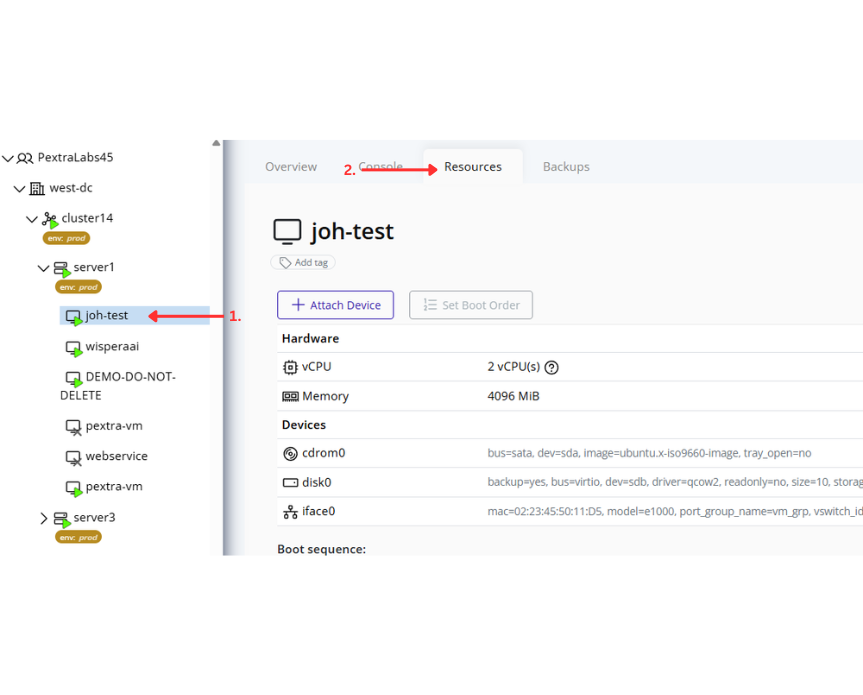
-
Click the Attach Device button.

-
Select Trusted Platform Module (TPM) from the Device Type dropdown list. Additional TPM configuration options will appear at the bottom of the dialog.
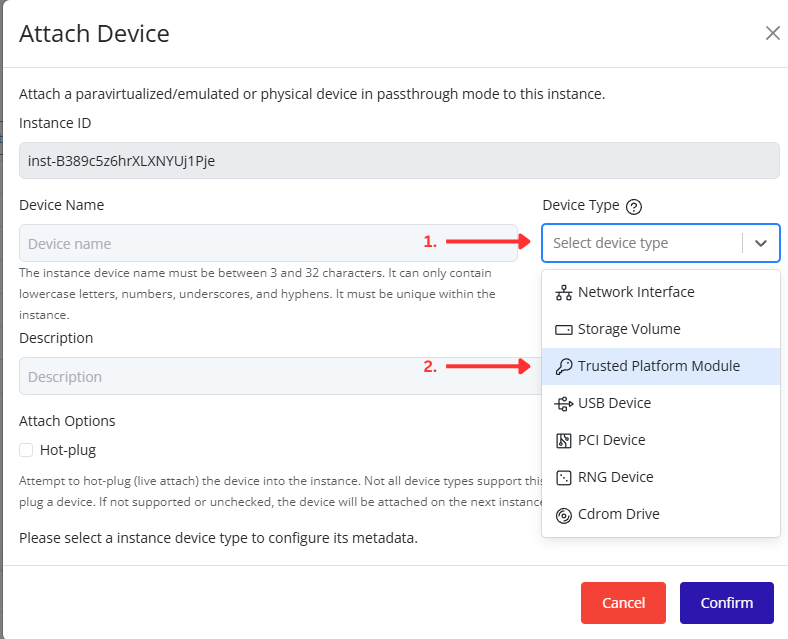
-
Enter a device name and optional description.
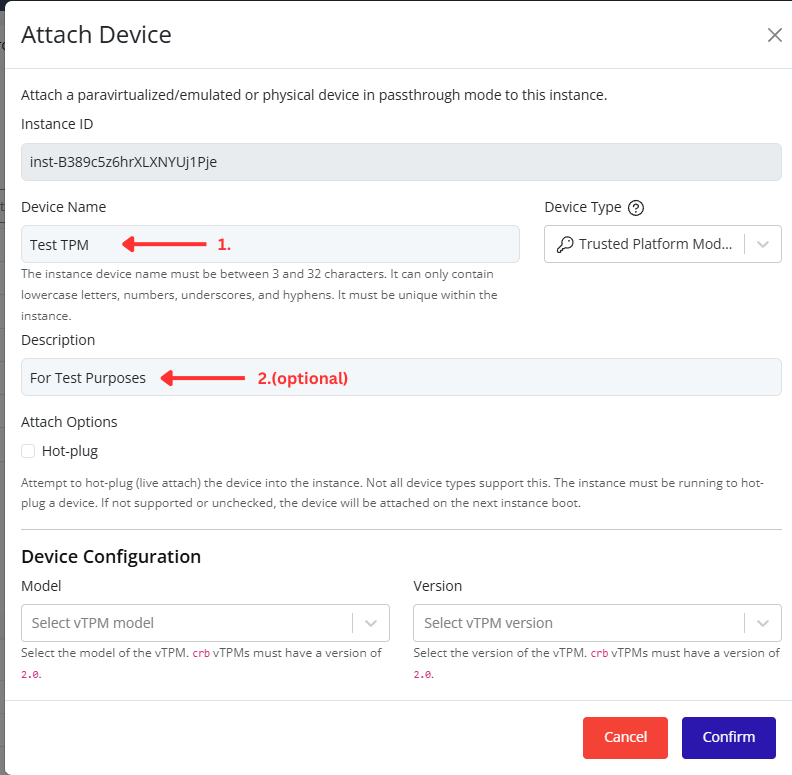
-
Optionally enable Hot-plug to attach the TPM device to a running instance. If Hot-plug is not enabled, the instance must be stopped before attaching the device.

-
Select a TPM Model.
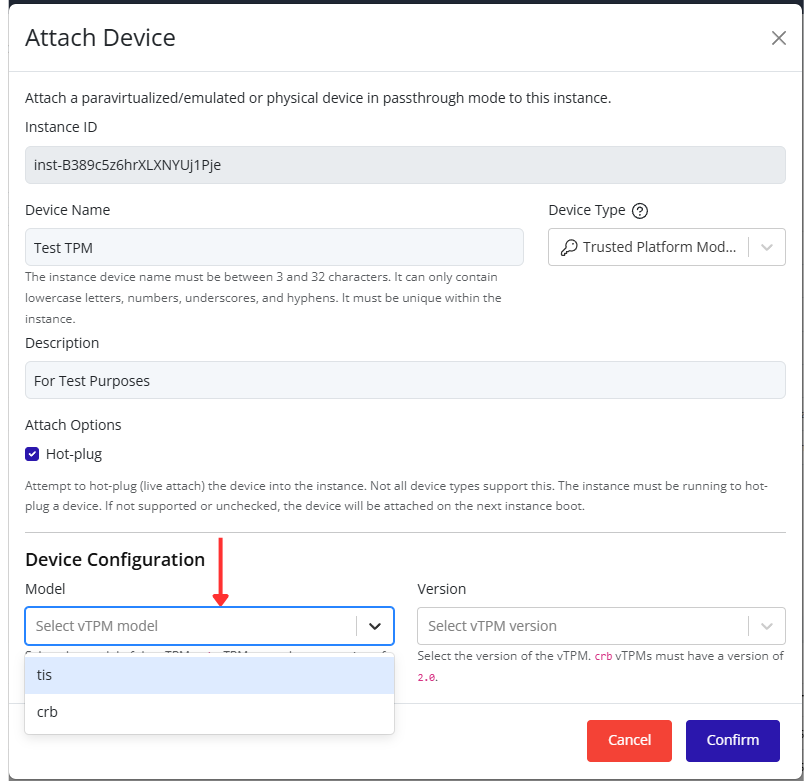
Note
Available TPM models include:
Model Description crb Modern TPM interface recommended for TPM 2.0 deployments. tis Legacy TPM interface provided for compatibility with older operating systems.
-
Select a TPM Version.
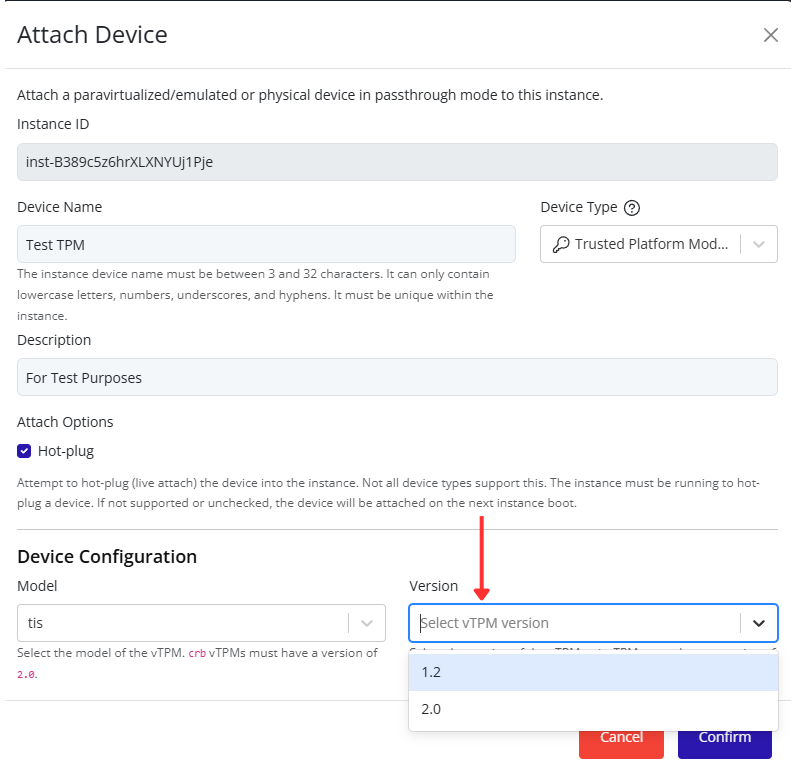
Note
Available TPM versions include:
Version Description 1.2 Legacy TPM specification. 2.0 Current TPM specification recommended for modern operating systems. The crb model requires TPM version 2.0.
-
Click Confirm to attach the TPM device to the instance.
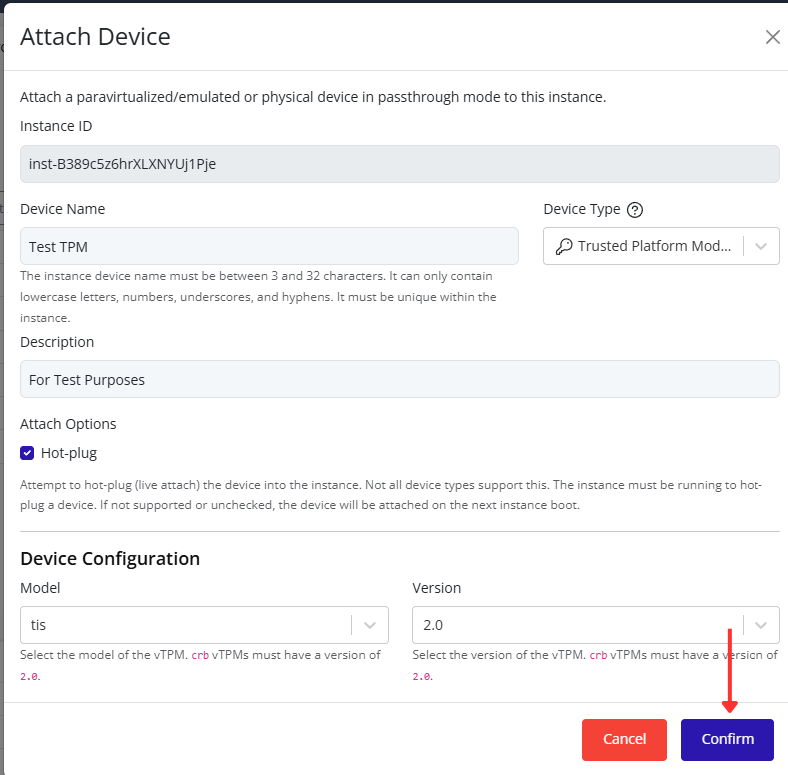
Detach Device
Note
Some device types may require the instance to be stopped before detaching. To attempt a live detachment, check the “Hot-unplug” checkbox. If the device is in use, you may need to stop the instance before detaching the device.
-
Select the virtual machine in the resource tree and view the page on the right. Click on the Resources tab in the right pane. The configuration and attached devices will be listed.
-
To detach a device, click the X icon in the row of the desired device.
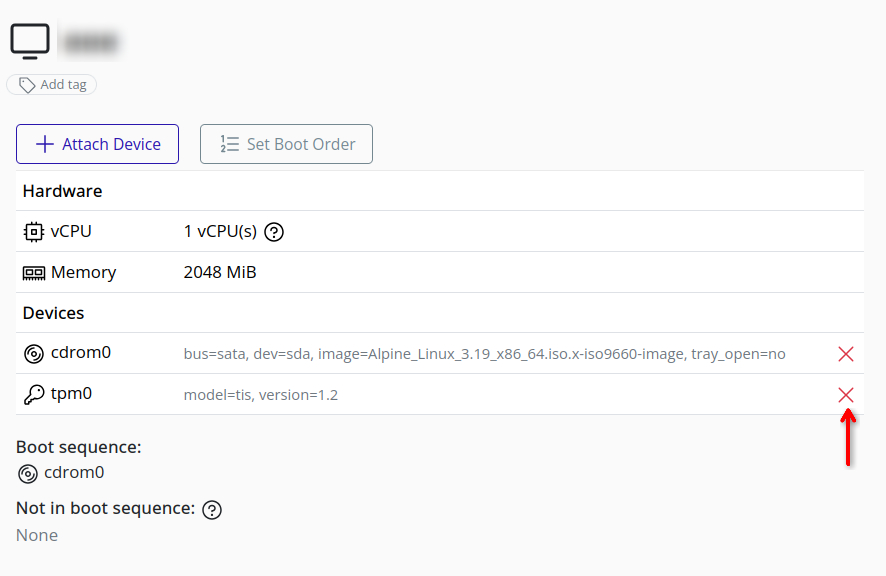
-
A confirmation popup will appear. Click Finish to confirm the detachment of the device from the instance.
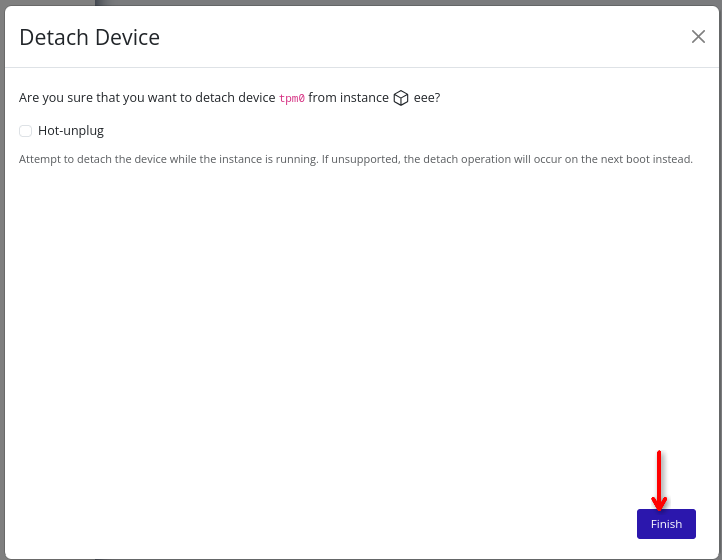
Setting Boot Order
Configure the order in which an instance attempts to boot from its attached devices through the Pextra CloudEnvironment® web interface.
-
Select the virtual machine in the resource tree and view the page on the right. Click on the Resources tab in the right pane. The configuration and attached devices will be listed.

-
Click the Set Boot Order button.
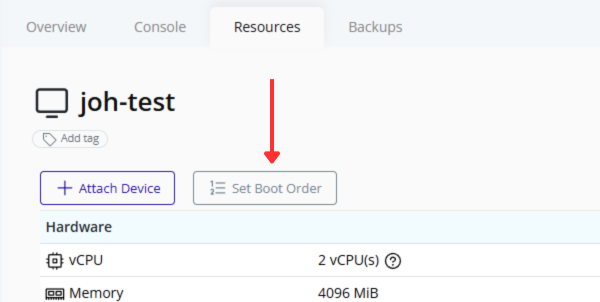
-
The Set Boot Order dialog will appear. Devices currently included in the boot sequence are displayed at the top of the dialog. Devices that are not currently included in the boot sequence are displayed below.
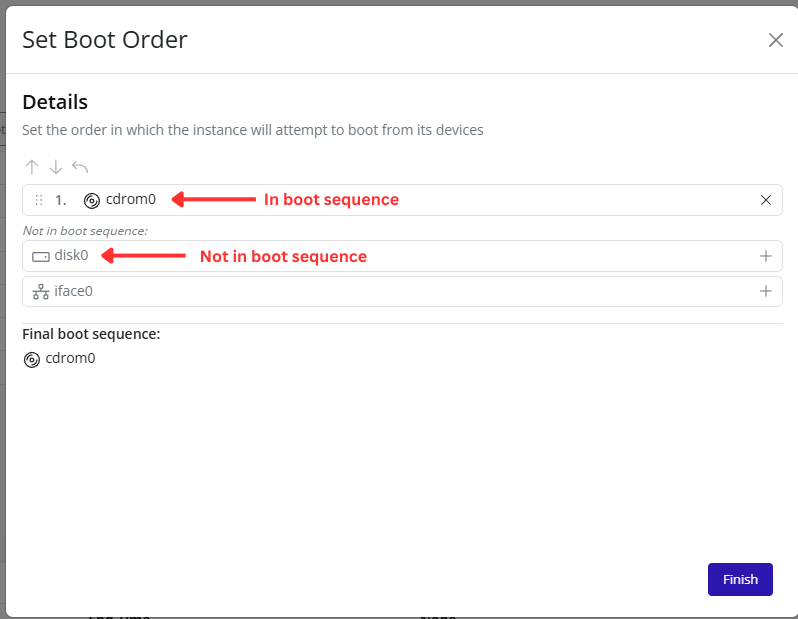
-
To add a device to the boot sequence, click the + button next to the device under Not in boot sequence.
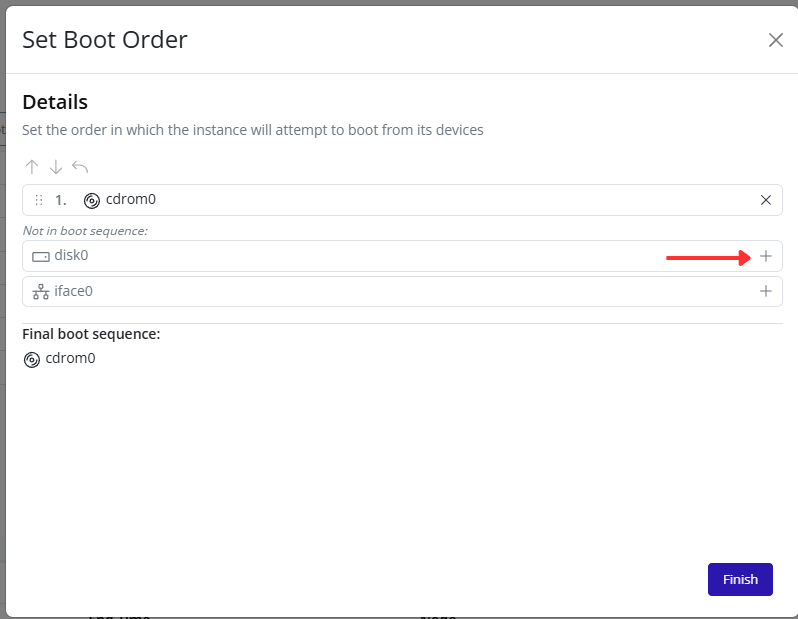
-
To remove a device from the boot sequence, click the X button next to the device in the current boot sequence.
-
First Select a device then use the Up and Down arrow buttons to change the order of devices in the boot sequence. Devices higher in the list will be attempted before devices lower in the list.
-
Optionally click the Reset button to restore the default boot sequence.
-
Review the Final boot sequence section to verify and click Finish to save the boot order configuration.
Note
The instance will attempt to boot from devices in the order shown in the Final boot sequence section.
For example, if a CDROM device is listed before a disk device, the instance will attempt to boot from the CDROM first.
If the first device is unavailable or not bootable, the instance will continue to the next device in the sequence.
Monitoring & Metrics
Pextra CloudEnvironment® provides a comprehensive Monitoring & Metrics dashboard, allowing administrators to observe and manage the health, performance, and resource usage of clusters, nodes, and instances.
Viewing Available Monitoring Metrics
To access monitoring metrics:
- Select the cluster, node, or instance in the left navigation panel.
- On the right-hand panel, the Monitoring section displays key metrics, organized under three main categories: Cluster, Node, and Instance.
Tip
To view monitoring metrics, click the specific resource (cluster, node, or instance) in the left navigation panel. This opens the monitoring dashboard for that resource on the right-hand panel.
Cluster-Level Monitoring
Cluster-level metrics provide a comprehensive overview of the entire cluster’s health, performance, and resource usage.
Tip
To view cluster metrics, click on the cluster in the left navigation panel. The metrics for the selected cluster will appear on the right-hand panel.
The following metrics are available at the cluster level:
- Cluster Health: Displays the overall health status of the cluster.
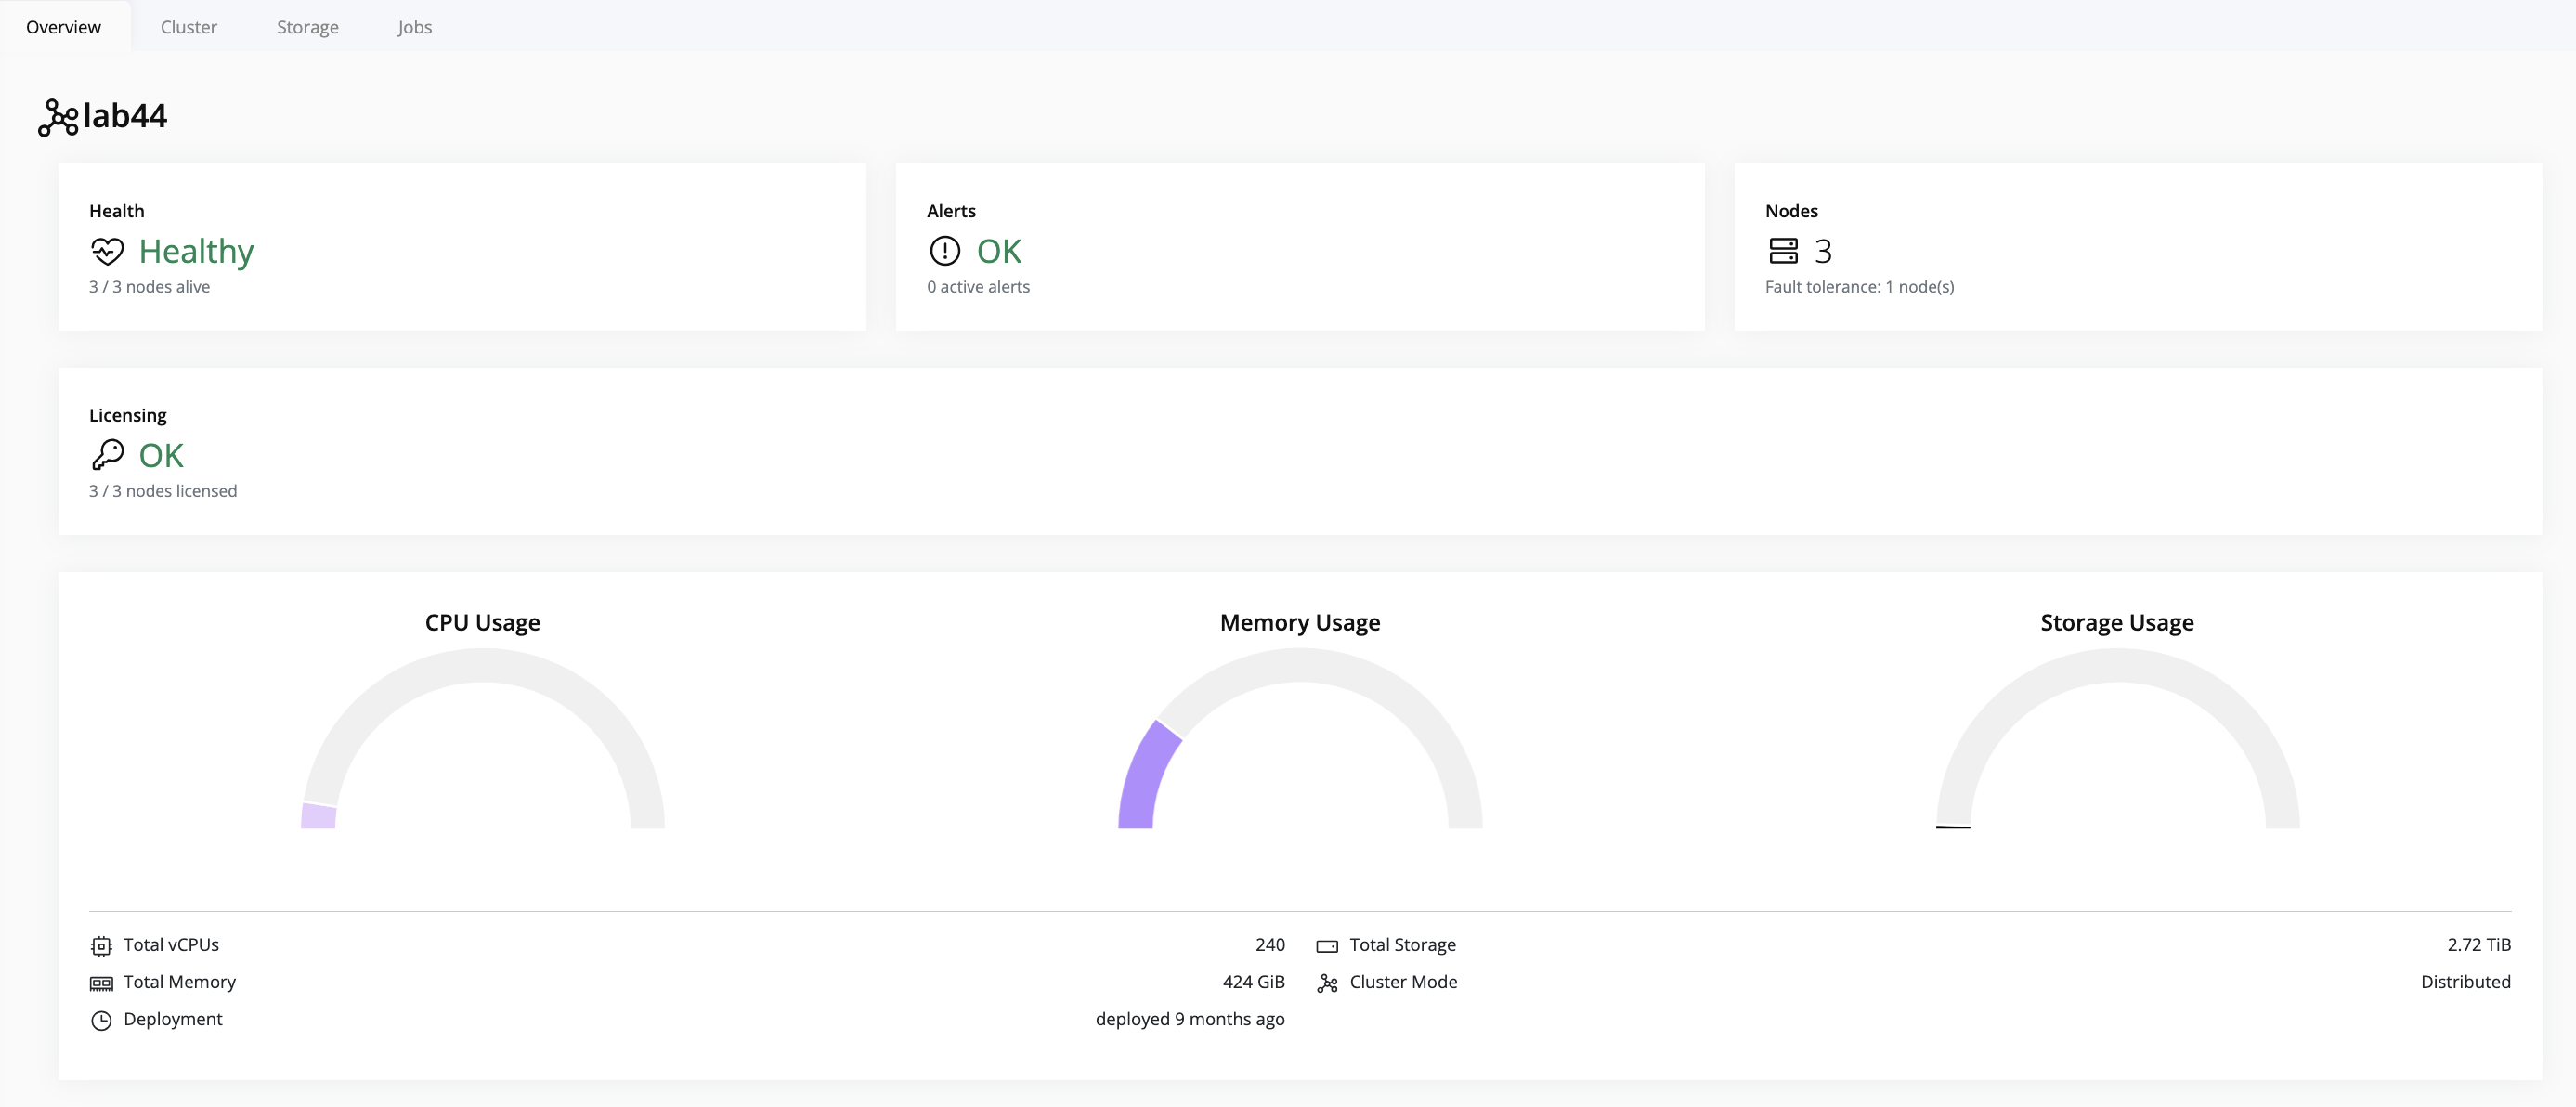
- Number of Nodes: Shows the total number of nodes in the cluster.
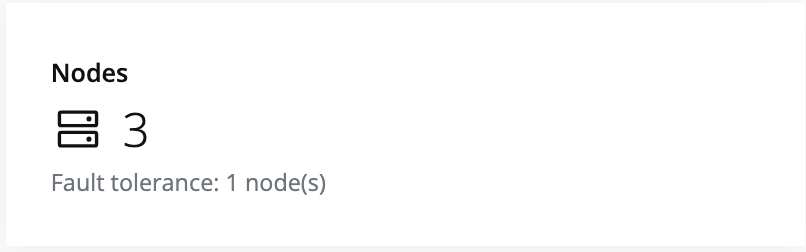
- License Status: Displays current license status, including expiration and any issues.

- Deployment Overview: Provides overall cluster resource usage, including CPU, memory, storage, total vCPUs, total memory, deployment duration, total storage, and cluster mode.
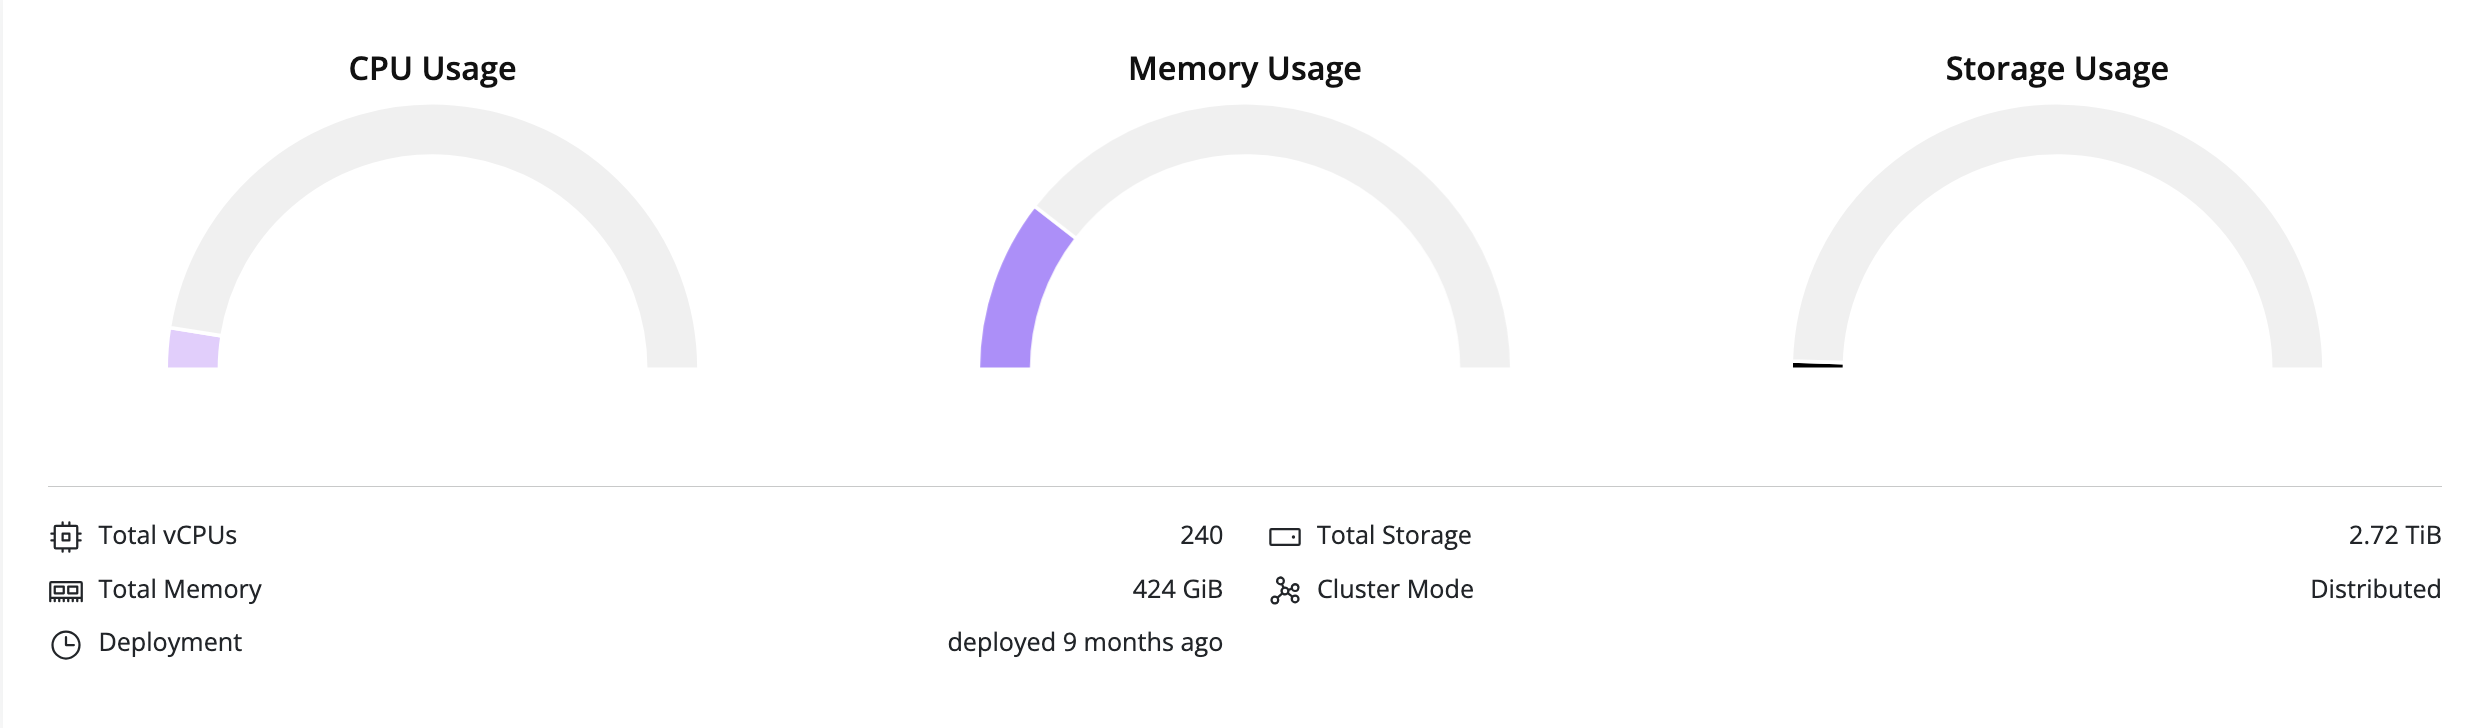
Node-Level Monitoring
Node-level metrics provide detailed insights to help identify performance or health issues on individual nodes.
Tip
To view node health metrics, click on the node in the left navigation panel. The metrics for that node will appear on the right-hand panel.
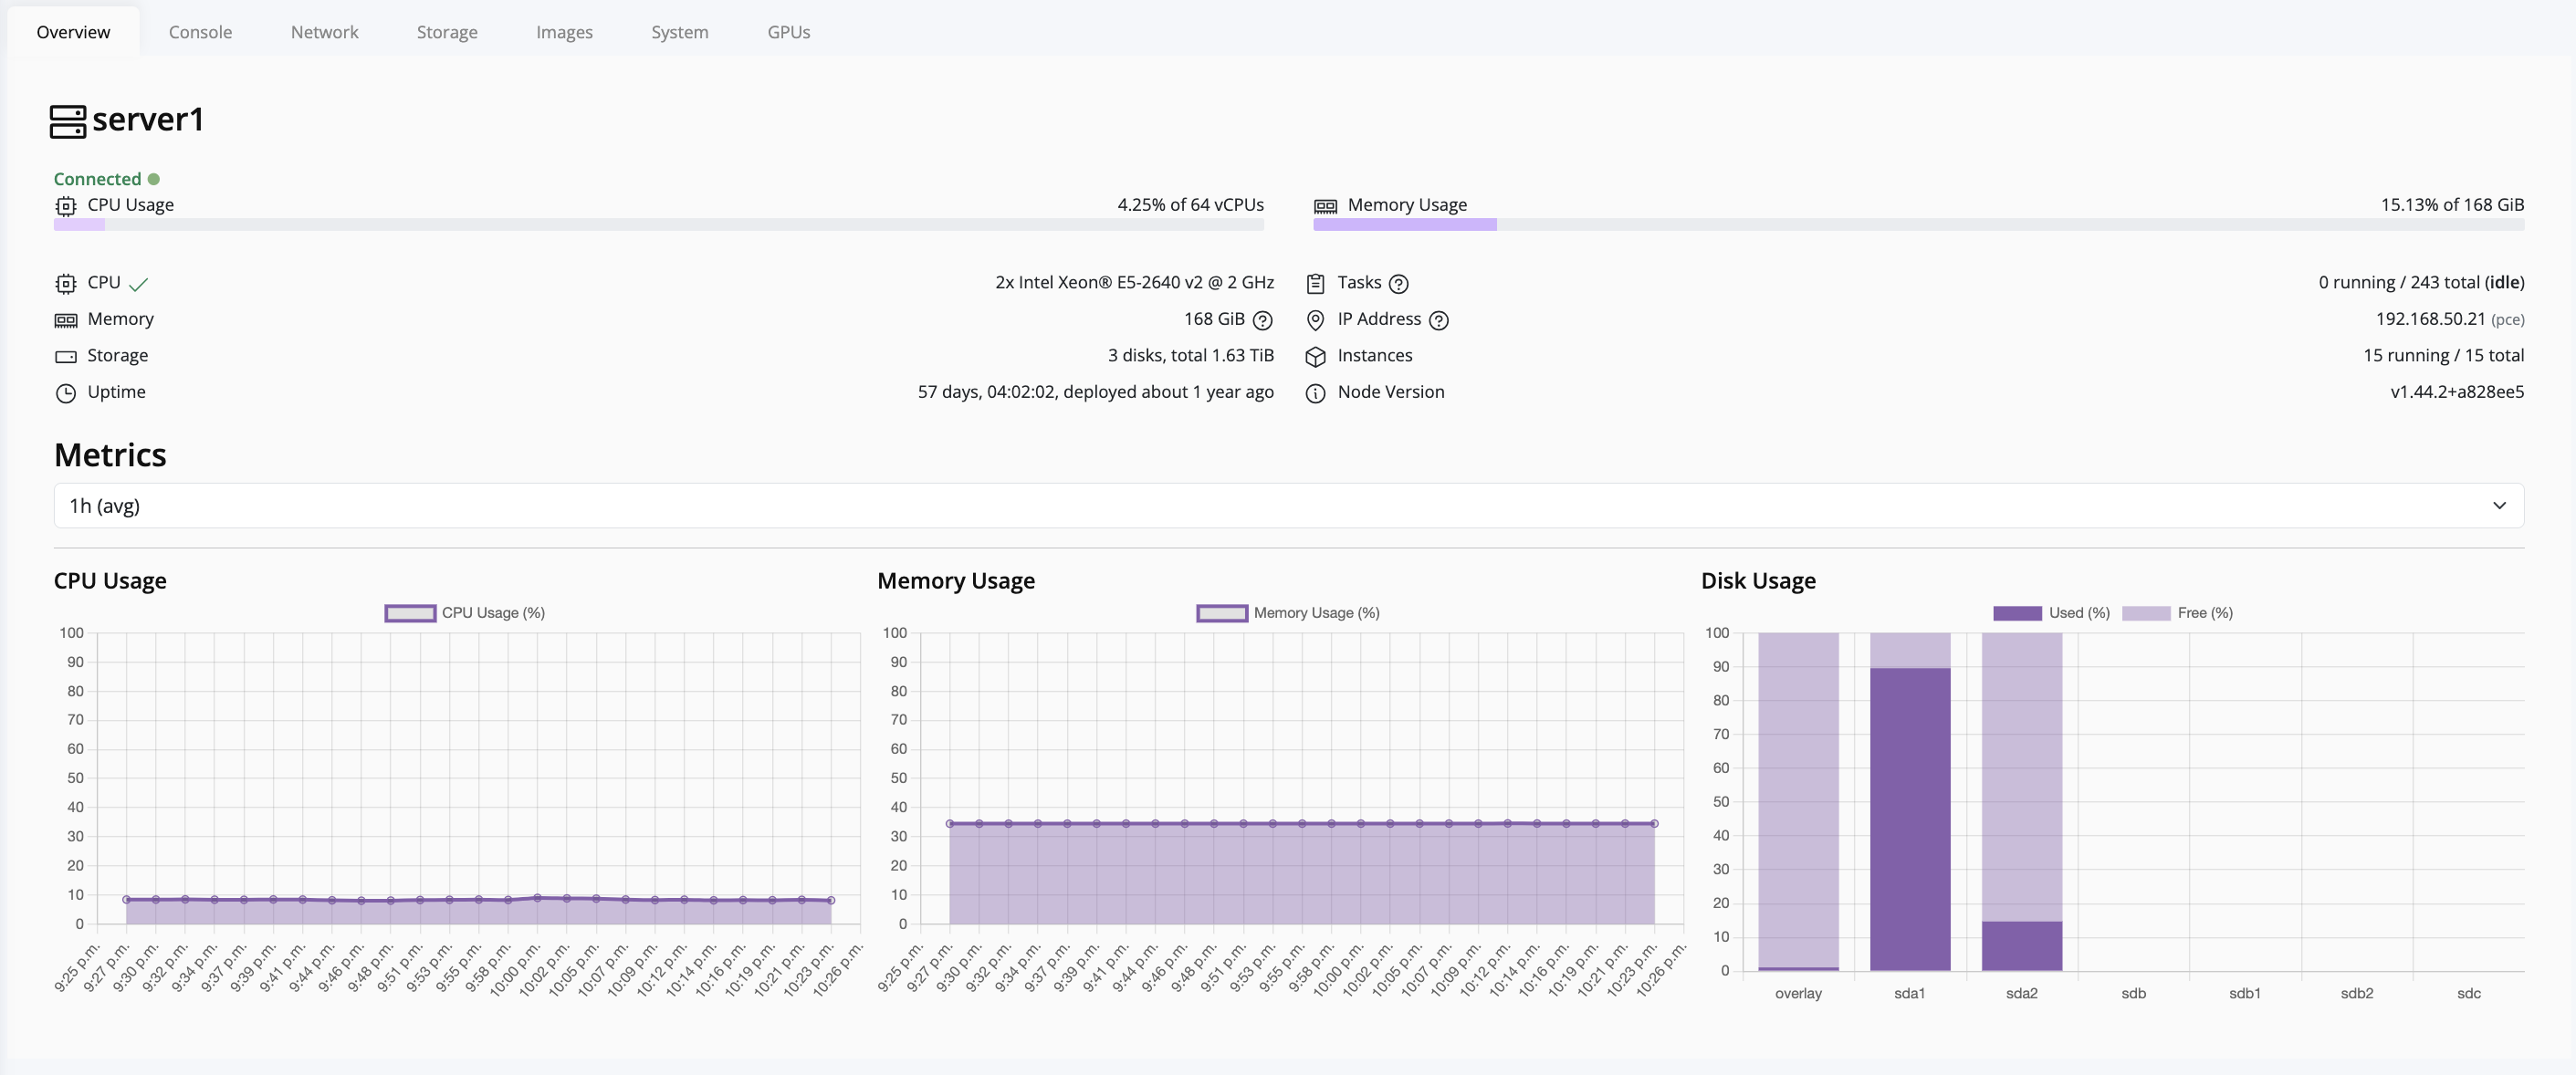
The following metrics are available at the node level:
- Node Health: Displays the overall status of the node.
- CPU Usage: Shows real-time CPU utilization for the node.
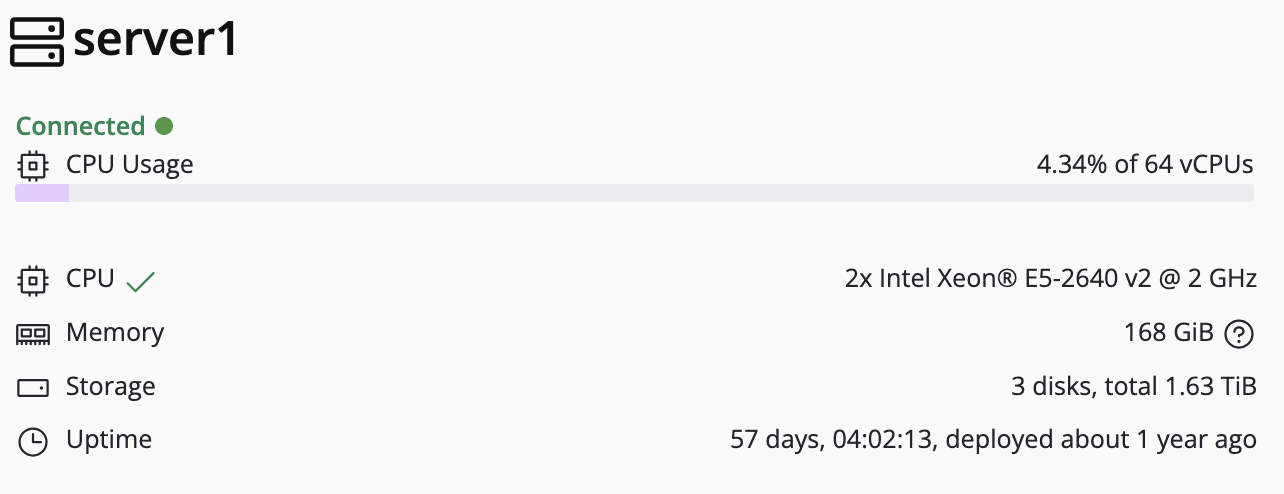
- Memory Usage: Monitors memory consumption per node.
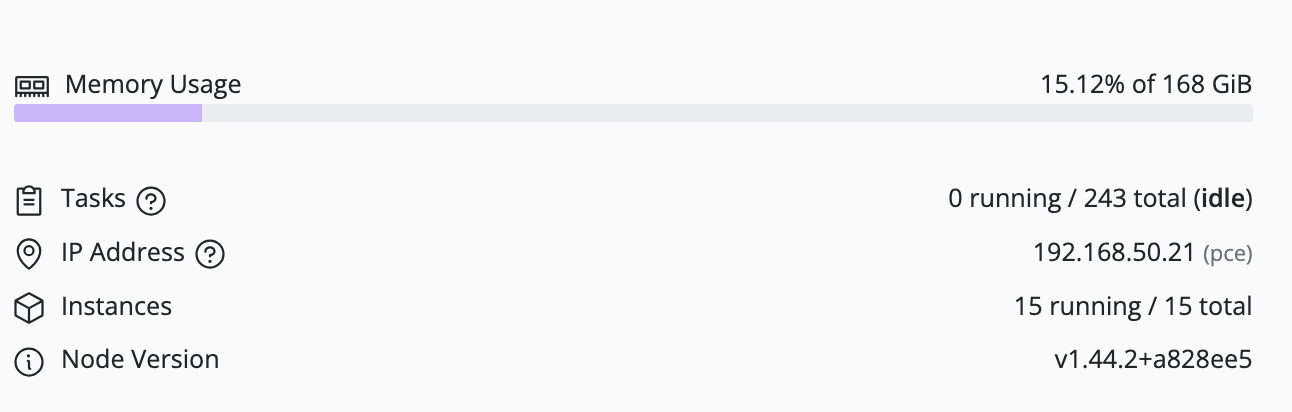
- Storage Usage: Displays storage allocation and usage for the node.
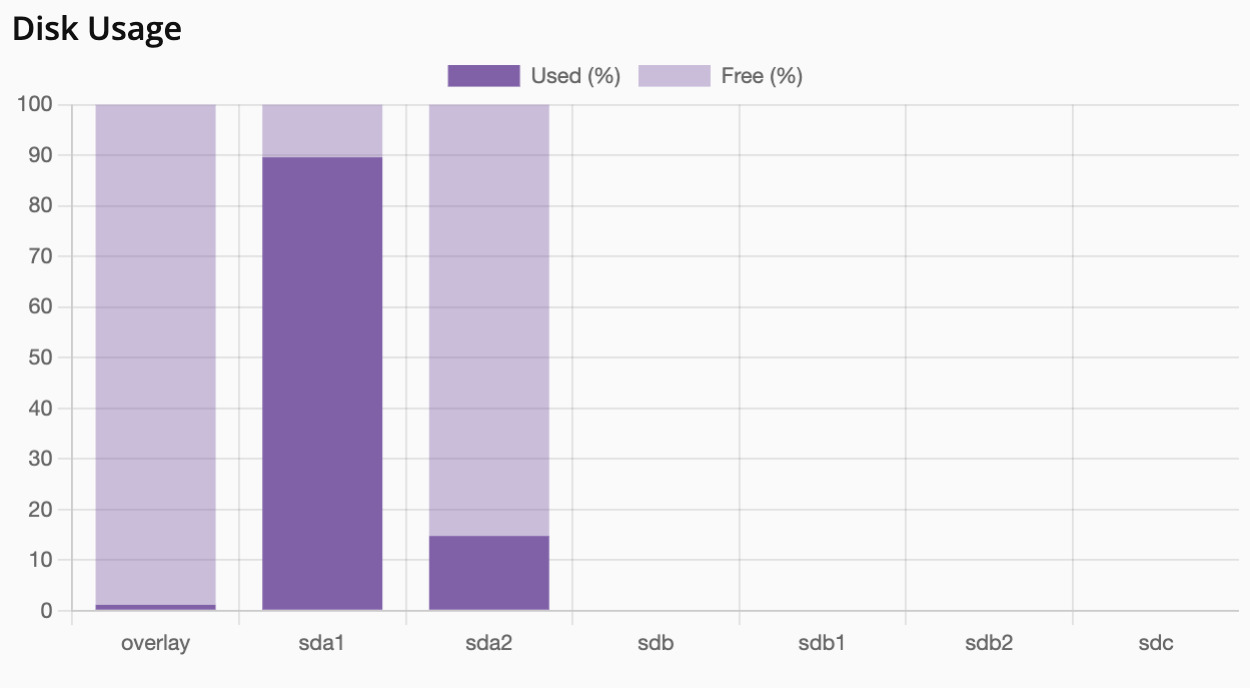
Instance-Level Monitoring
Instance-level metrics provide detailed insights into each deployed virtual machine or container.
Tip
To view instance metrics, click on the instance in the left navigation panel. The available metrics for that instance will appear on the right-hand panel.
The available instance metrics include:
- Name: The name of the instance.
- Status: Connection status—Connected (green) or Disconnected (red).
- Memory Allocated: Amount of memory assigned to the instance.
- Instance Type: Type of instance, such as QEMU or LXC.
- Deployment Duration: Length of time the instance has been deployed.

Frequently Asked Questions
Welcome to the Pextra CloudEnvironment® FAQ! Here you can find answers to common questions about installing, configuring, and managing your nodes and instances.
If you have a question that is not already listed and is not repetitive, please send it to faq@pextra.cloud. Our team will review submissions and add relevant questions to the FAQ.
Why did my node go down?
There are several potential causes for a node in your Pextra CloudEnvironment® cluster to suddenly go down. Manual intervention may be required to diagnose and resolve the issue. In most cases, the node will self-recover after the underlying problem is fixed.
Note
It may not be possible to access the node remotely if it is down due to hardware failure. Physical access or out-of-band management tools (like IPMI, iLO, or DRAC) may be required.
Resource Exhaustion
Running out of critical resources like CPU, memory, or disk space can cause a node to crash or freeze. You may need to consider upgrading hardware resources if resource exhaustion is a recurring issue.
Disk Space
Warning
Do not, under any circumstances, delete system files or directories unless you are absolutely sure of their purpose. This includes directories like
/bin,/sbin,/usr,/etc, and/var. This will destroy your installation and may lead to data loss.
- Check disk space usage on all mounted partitions:
df -h
If any partitions are at or near 100% usage, take immediate action to free up space.
-
Find large files consuming disk space:
du -ah / | sort -rh | head -n 20 -
Clear cache and temporary files:
apt clean -
Remove old log files or archive them to free up space:
find /var/log -type f -name "*.log" -exec rm -f {} \;
Memory
- Check memory usage:
free -h
If memory usage is critically high, consider adding more RAM or stopping unnecessary instances.
Hardware Failures
Hardware issues like disk failures, memory errors, or power supply problems can lead a node to fail and become unresponsive. If any component is identified as failing, schedule replacement immediately to minimize downtime.
-
Check for hardware errors:
dmesg | grep -i error tail -n 100 /var/log/syslog -
Memory (RAM) test using Memtest86+ can identify RAM issues. You may run it from a bootable USB.
-
Inspect disk health:
smartctl -a /dev/sdX # Replace /dev/sdX with your disk identifier -
Review power supply and cooling systems to ensure they are functioning correctly.
Network Issues
Network connectivity problems can result from interface failures, network partitions, or misconfigurations. Verify network status and connectivity to other nodes in the cluster.
- Check network interface status:
ip a - Test connectivity to other nodes:
ping <other-node-ip> - Review network configuration and logs for errors.
cat /var/log/syslog | grep -i network - Restart network services if necessary:
systemctl restart systemd-networkd
Software Bugs or Misconfigurations
Although it is highly unlikely, bugs in the operating system or misconfigurations can lead to instability and crashes. To update your system, refer to the System Upgrade section.
How are disks formatted during installation?
The Pextra CloudEnvironment® installer automatically formats disks during the installation process to prepare them for use by the system. The selected target disk is partitioned in the following manner:
-
EFI System Partition (EF00):
- Size: 1 GiB
- Purpose: Contains the UEFI bootloader and related files necessary for system boot.
-
Root Partition (8300):
- Size: Remaining disk space
- Purpose: Contains the root filesystem (
/) where the operating system and Pextra CloudEnvironment® components are installed.
Why is Pextra CloudEnvironment® distributed as an ISO image?
To ensure a consistent and reliable installation experience across diverse hardware environments, Pextra CloudEnvironment® is distributed as an ISO image instead of traditional package formats.
If distributed as system packages, users would need to manually install a compatible operating system, configure storage, networking, and dependencies, which could lead to inconsistencies and potential misconfigurations. By using an ISO image, we provide a pre-configured environment that includes all necessary components, ensuring that installations are uniform and optimized for Pextra CloudEnvironment®.
How do I change the IP address of a node?
As of version v2.3.0, Pextra CloudEnvironment® supports changing node IP addresses through Node Addresses.
How do I change the DNS servers of a node?
Pextra CloudEnvironment® uses CoreDNS for cluster DNS resolution. External DNS queries are forwarded to upstream DNS servers. To change the upstream DNS servers used by nodes, create a CoreDNS drop-in configuration to override the default upstream servers:
-
Create a drop-in file with the following format under
/etc/coredns/conf.d/:echo "forward . <DNS_SERVER_1> <DNS_SERVER_2> <DNS_SERVER_N>" > /etc/coredns/conf.d/custom-upstream.confExample:
echo "forward . 192.0.2.1 192.0.2.2" > /etc/coredns/conf.d/custom-upstream.conf -
Apply the CoreDNS configuration change.
systemctl reload coredns
Note
Up to 15 DNS servers can be specified in the
forwardrule.
Default Upstream Servers
The following default fallback servers are used if no upstreams are configured:
9.9.9.9(Quad9)1.1.1.1(Cloudflare)8.8.8.8(Google)
Reference
For advanced configuration, see https://coredns.io/plugins/forward/.
Reporting Issues
This section provides guidance on how to effectively report issues, bugs, and feature requests related to the software. It includes instructions on collecting logs, creating support tickets, and gathering diagnostic information to assist in troubleshooting and resolution.
Collecting Logs
Seeking Help
This section provides guidance on how to seek help through the appropriate channels, including the official helpdesk and community forum. It also includes tips for effective support tickets to ensure a smooth resolution process.
Official Helpdesk
Important
An active support subscription is required to create a support ticket through our official helpdesk. If you would like to purchase a support subscription, please visit our customer portal.
Note
If you do not have an active support subscription, you can still seek help through our community forum. See the Community Forum section for more details.
If you have an active support subscription, you can create a support ticket through our official helpdesk:
-
Navigate to our helpdesk.
-
Log in with your credentials.
-
Click on “Create Ticket”.
-
Complete the ticket submission form with the following information:
- A clear, descriptive title
- Detailed description of the issue
- Steps to reproduce the issue
- Screenshots or error messages (if applicable)
- System information and logs (see Collecting Logs)
- Any troubleshooting steps you’ve already attempted
-
Select the appropriate priority level based on the impact to your operations.
-
Submit the ticket.
Our support team will respond according to the Service Level Agreement (SLA) associated with your support subscription level.
Support Ticket Lifecycle
Each support ticket goes through a lifecycle, which includes the following stages:
-
Submission: You create and submit a ticket.
-
Acknowledgment: Support team acknowledges receipt.
-
Investigation: Support team investigates the issue.
-
Resolution or Escalation: Issue is either resolved or escalated to engineering.
-
Verification: You verify the solution works.
-
Closure: Ticket is closed once you confirm the issue is resolved.
Tip
Check your email regularly for updates on your support ticket. The support team may request additional information or provide solutions that require your input.
Community Forum
Tip
Pextra has a dedicated support team available to assist you with any issues you may encounter. If you have an active support subscription, we recommend using the official helpdesk for the fastest response times.
If you do not have an active support subscription or prefer community-based assistance, you can post your issue on our community forum:
-
Visit our community forum.
-
Create an account or log in if you already have one.
-
Navigate to the appropriate section (e.g., “Installation Issues,” “Configuration Help,” etc.).
-
Click on “New Topic” to create a new post.
-
Provide a clear title and detailed description of your issue.
-
Include relevant system information, logs, and any troubleshooting steps you’ve already taken.
-
Submit your post.
Our community members and Pextra staff monitor the forums regularly and will respond as soon as possible. While this option does not have a formal SLA, the community is active and helpful.
Tips for Support Tickets
To ensure that your support ticket is effective and leads to a quick resolution, follow these tips:
-
Be specific: Provide precise details about what you were doing when the issue occurred.
-
Include context: Mention your environment details, such as hardware specifications, current version, and any recent changes.
-
Attach logs: Always include relevant logs.
-
Document steps to reproduce: List the exact steps someone would need to follow to encounter the same issue.
-
Describe expected vs. actual behavior: Explain what you expected to happen and what actually happened.
-
Add screenshots: Visual evidence can help the support team understand the issue more quickly.
Repository Mirrors for Airgapped Environments
In standard deployments, servers connect to the Pextra repository to download updates. However, airgapped environments require special consideration for package management, as they lack direct internet access. This tutorial provides a guide to managing an offline repository mirror in airgapped environments using aptly. This approach ensures Pextra CloudEnvironment systems remain updatable and secure even in the most restrictive network environments.
Before You Begin
Hardware Requirements:
- Mirror server (online system with internet access) with sufficient storage space
- The Pextra repository is approximately 200MiB in size per architecture (
amd64andarm64)
- The Pextra repository is approximately 200MiB in size per architecture (
- USB drive or removable media (for full airgap transfers only)
- Network connectivity between mirror and offline servers (for restricted airgap only)
Software Requirements:
- Debian-based system with administrative privileges
curl,tar, and standard Unix utilities- Administrative (
sudo) access
Estimated Setup Time:
- 30 minutes for restricted airgap
- 1 hour for full airgap
Understanding Airgap Types
To set up Pextra CloudEnvironment® servers in an airgapped environment, it is essential to understand the two different types of airgaps:
Restricted/One-way Airgap
The offline server cannot directly access public internet but can communicate with an outside server through a controlled endpoint. This allows for automated synchronization while maintaining security boundaries.
Full Airgap
Complete network isolation with no connectivity to external servers. Package updates require manual media transfer (e.g. with USB drives, portable storage).
Note
A full airgap is the most secure option, but it requires significant manual work to keep the offline servers updated. A restricted airgap allows for more automation and is recommended if possible.
Setup Instructions
-
Set up the mirror server:
-
Follow the relevant setup instructions based on your airgap type:
Mirror Setup
This guide will help you set up a local mirror of the Pextra repository using aptly. This is the first step in creating an airgapped setup for Pextra CloudEnvironment®.
Install aptly
Run the following command on your online mirror server:
apt install aptly
You may need to run apt update to ensure the package list is up to date before installing.
Import Pextra GPG Key
Download and import the Pextra repository GPG key:
# Download the GPG key for the repository (signed by the master key)
curl -fSsLo /usr/share/keyrings/pextra-ce.gpg https://repo.pextra.cloud/debian/cloudenvironment/key.gpg

# Import the GPG key into trustedkeys.gpg (to be used by aptly)
gpg --no-default-keyring --keyring trustedkeys.gpg --import /usr/share/keyrings/pextra-ce.gpg
Configure the Mirror
To mirror only one architecture (recommended), use the following command:
aptly -architectures="<architecture>" mirror create pextra-ce-bookworm https://repo.pextra.cloud/debian/cloudenvironment bookworm common meta
where <architecture> can be amd64 or arm64, depending on your server’s architecture.
To mirror all architectures, omit the -architectures option:
aptly mirror create pextra-ce-bookworm https://repo.pextra.cloud/debian/cloudenvironment bookworm common meta
Run Initial Sync
At this point, you have created a mirror configuration but it is still empty. To perform the initial synchronization of the mirror, run:
aptly mirror update pextra-ce-bookworm
This command may take some time, depending on your internet connection. It will download all packages and metadata from the Pextra repository.
To verify the synchronization (after the update command completes), you can check the status of the mirror:
aptly mirror show -with-packages pextra-ce-bookworm
Sample output:
Name: pextra-ce-bookworm
Archive Root URL: https://repo.pextra.cloud/debian/cloudenvironment/
Distribution: bookworm
Components: common, meta
Architectures: amd64, arm64
Download Sources: no
Download .udebs: no
Last update: 2025-08-12 21:28:38 UTC
Number of packages: 17

Information from release file:
Architectures: amd64 arm64
Codename: bookworm
Components: common meta
Date: Tue, 12 Aug 2025 19:15:03 UTC
Description:  Pextra Inc. Debian repository

Label: Pextra Inc.
Origin: Pextra Inc.
Suite: stable
Version: 1.0
Packages:
  <list of packages>...
This will ensure that your mirror stays synchronized with the Pextra repository.
Prepare the Mirror for Publishing
To make the mirrored repository available for use, you need to take a snapshot. Taking a snapshot allows you to create a versioned point-in-time copy of the mirror, which can be useful for rollback or auditing purposes:
# Create a snapshot of the mirror (e.g. pextra-ce-bookworm-20250812)
aptly snapshot create pextra-ce-bookworm-$(date +%Y%m%d) from mirror pextra-ce-bookworm
Before publishing, a GPG key must be generated to sign the mirror, if you haven’t done so already. Refer to the above link for instructions on generating a GPG key.
Warning
Make sure to keep your GPG key secure, as it will be used to cryptographically sign the repository metadata. If you lose access to your GPG key, you will need to create a new mirror and reconfigure your offline servers.
To retrieve the fingerprint of your GPG key, run:
gpg --list-secret-keys --keyid-format LONG
This will display your GPG keys, including their fingerprints. Copy the fingerprint (e.g. F6C824A95B510F49ED4B0D640B4F9057C7DBDC41) for use in the next step.
Publish the Mirror
To publish the mirror, you can use the following command:
aptly publish snapshot -gpg-key=<your-gpg-key-fingerprint> pextra-ce-bookworm-$(date +%Y%m%d)
Sample output:
Loading packages...
Generating metadata files and linking package files...
Finalizing metadata files...
Signing file 'Release' with gpg, please enter your passphrase when prompted:
Clearsigning file 'Release' with gpg, please enter your passphrase when prompted:

Snapshot pextra-ce-bookworm-20250812 has been successfully published.
Please setup your webserver to serve directory '/home/user/.aptly/public' with autoindexing.
Now you can add following line to apt sources:
  deb http://your-server/ bookworm main
Don't forget to add your GPG key to apt with apt-key.

You can also use `aptly serve` to publish your repositories over HTTP quickly.
Mirror Maintenance
For additional documentation on how to manage your repository mirror, including updating and publishing snapshots, refer to the Aptly documentation.
Updating the Mirror
To keep your mirror up to date, you can set up a cron job to run an update script at a regular interval (e.g. daily):
cat << 'EOF' > /usr/local/bin/update-pextra-mirror.sh
#!/bin/bash
aptly mirror update pextra-ce-bookworm
aptly snapshot create pextra-ce-bookworm-$(date +%Y%m%d) from mirror pextra-ce-bookworm
aptly publish snapshot -gpg-key=<your-gpg-key-fingerprint> pextra-ce-bookworm-$(date +%Y%m%d)
EOF
chmod +x /usr/local/bin/update-pextra-mirror.sh

# Add a cron job to run this script daily at 2 AM
echo "0 2 * * * /usr/local/bin/update-pextra-mirror.sh" | crontab -
Next Steps
Export the public GPG key used to sign the mirror so that it can be imported on your offline servers:
gpg --armor --export <your-gpg-key-fingerprint> > /usr/share/keyrings/pextra-mirror-key.asc
Keep a copy of this key file, as it will be needed to configure your offline servers to use the mirror.
To use the mirror on your offline Pextra CloudEnvironment® servers, follow the relevant setup instructions based on your airgap type:
Restricted Airgap Setup
After setting up your Pextra repository mirror, you can configure your offline servers to use this mirror in a restricted airgap environment. This guide will walk you through the steps to set up your offline servers to access the mirrored repository.
Transfer this key file to your offline servers using your available transfer method.
Configure Repository on Offline Servers
On each offline Pextra CloudEnvironment® server:
# Backup original repository configuration
mv /etc/apt/sources.list.d/pextra-ce.list /etc/apt/sources.list.d/pextra-ce.list.backup

# Add your mirror server's GPG key to trusted keys
cp /path/to/pextra-mirror-key.asc /usr/share/keyrings/pextra-mirror-key.asc

# Update repository source to point to your mirror
echo "deb [signed-by=/usr/share/keyrings/pextra-mirror-key.asc] http://your-mirror-server/ bookworm common meta" | tee /etc/apt/sources.list.d/pextra-ce.list

# Update package cache
apt update
Verify Configuration
Test that the configuration is working correctly:
# Verify package availability
apt-cache policy pce-common
Sample output:
pce-common:
  Installed: <version>
  Candidate: <version>
  Version table:
 *** <version> 500
        500 http://your-mirror-server bookworm/meta amd64 Packages
        100 /var/lib/dpkg/status
A successful output indicates that your offline server can access the mirrored repository and retrieve package information. The setup is now complete, and your offline Pextra CloudEnvironment® servers are configured to use the repository mirror in a restricted airgap environment.
Full Airgap Setup
In a full airgap environment where no network connectivity exists between your mirror server and offline servers, you’ll need to transfer packages and configuration files using physical media. This guide covers the complete process of setting up Pextra CloudEnvironment® in a completely isolated environment.
The guide is coming soon, but here are the high-level steps:
- Archive the Pextra repository on your mirror server (with
tar). - Transfer the archive to removable media (USB drive, external HDD, etc.).
- Move the archive to your airgapped environment.
- Extract the archive on your airgapped server.
- Configure the repository on your fully airgapped Pextra CloudEnvironment servers to use the local file-based repository.
Feedback & Contributions
In this section, we encourage users to provide feedback on their experience with the product. This includes suggestions for new features, improvements to existing features, and any other comments or concerns they may have.
We value your feedback and take it seriously. It helps us understand what is working well and what needs improvement.
As an emerging solution, we also appreciate any contributions to our documentation, whether it’s fixing typos, adding examples, or suggesting new topics. If you have a suggestion or contribution, please refer to the Contributing section for guidelines on how to submit your feedback or contribution.
Feature Requests
We continuously improve Pextra CloudEnvironment® based on user feedback and suggestions. If you have ideas for new features or enhancements that would improve your experience, we encourage you to share them with us.
Submitting Feature Requests
The primary channel for submitting feature requests is through our community forums:
-
Visit our community forum.
-
Create an account or log in if you already have one.
-
Navigate to the “Feature Requests” section.
-
Click on “New Topic” to create a new post.
-
Provide a clear, descriptive title for your feature request.
-
In the description, include:
- A detailed explanation of the requested feature
- The problem it solves or the value it provides
- Your use case and why this feature would be beneficial
- Any relevant examples, screenshots, or mockups (if applicable)
-
Submit your feature request.
What Happens After Submission
After submitting your feature request:
-
Community Discussion: Other users may comment on your request, adding their perspectives or use cases.
-
Feedback Collection: Pextra team members monitor the forums and gather feature requests.
-
Evaluation: Our team evaluates requests based on factors such as:
- Alignment with product vision
- Number of users who would benefit
- Technical feasibility
- Implementation complexity
-
Prioritization: Approved features are prioritized in our development roadmap.
-
Implementation: When a feature is scheduled for development, we may reach out for additional information.
General Feedback
We value your opinions about Pextra CloudEnvironment® and are committed to continuously improving our product based on user feedback. Your insights help us understand what’s working well and where we can make enhancements to better serve your needs.
Providing General Feedback
The most effective way to share your general feedback is through our community forums:
-
Visit our community forum.
-
Create an account or log in if you already have one.
-
Navigate to the “Feature Requests” section.
-
Click on “New Topic” to create a new post.
-
Provide a descriptive title that summarizes your feedback.
-
In the description, include:
- Your overall experience with the product
- Specific aspects you find particularly useful or challenging
- Any suggestions for improvements
- Context about your use case and environment
-
Submit your feedback.
Examples of Feedback
We encourage various types of feedback, including:
-
Comments on the user interface and experience
-
Suggestions for improving our guides and documentation
-
Reports about system performance in your environment
-
Feedback on how well Pextra CloudEnvironment® works with other tools
-
Overall thoughts about the product and its value
How We Use Your Feedback
When you share your feedback:
-
Other users may respond with their own experiences or suggestions.
-
Your feedback directly influences our product roadmap and development priorities.
-
We use your insights to make incremental improvements to the product.
We appreciate you taking the time to share your thoughts with us. Your feedback is essential to helping us build a better product for all users.
Contributing
We welcome contributions to our documentation. Whether you want to fix a typo, add examples, or suggest new topics, your contributions are valuable to us. Below are the guidelines for contributing to our documentation.
How to Contribute
One-Click Contribution
-
If you find a typo or want to suggest an improvement, click the notepad with a pencil icon at the top right of the page:

- This will take you to the GitHub page for that file.
- If you are logged in to GitHub, you can edit the file directly in your browser. If you are not logged in, you will be prompted to log in or create an account.
-
Make your changes in the online editor.
-
Click “Propose changes” to create a pull request (PR) with your changes.
- Commit your changes with a clear and descriptive commit message. We use Conventional Commits for commit messages, so please follow that format:
- Commit your changes with a clear and descriptive commit message. We use Conventional Commits for commit messages, so please follow that format:
-
Wait for feedback from the maintainers. They may request changes or approve your PR. Once approved, your changes will be merged.
-
Celebrate your contribution! 🎉
Full Development Setup
-
Create a GitHub account if you don’t have one.
-
Fork the repository by clicking the “Fork” button at the top right of the page:

-
Clone your forked repository to your local machine:
git clone https://github.com/PextraCloud/documentation.git -
Create a new branch for your changes:
git switch -c <name>/<feature> -
Set up your development environment:
- Install the necessary dependencies.
- Follow the instructions in the repository’s README for setting up your local environment.
-
Make your changes to the documentation files.
- Use Markdown for formatting.
- Follow the existing style and structure of the documentation.
-
Commit your changes with a clear and descriptive commit message. We use Conventional Commits for commit messages, so please follow that format:
git add . git commit -m "fix: correct typo in installation guide" -
Push your changes to your forked repository:
git push origin <name>/<feature> -
Create a pull request (PR) to the original repository:

- Navigate to the original documentation repository.
- Click on the “Pull Requests” tab.
- Click on “New Pull Request.”
- Select your branch and click “Create Pull Request.”
- Provide a clear description of your changes and why they are needed.
-
Wait for feedback from the maintainers. They may request changes or approve your PR. Once approved, your changes will be merged.
-
Celebrate your contribution! 🎉